Map It: Displaying Locations on a Google Map
This tutorial shows how you can develop an app that allows you to record list of addresses and view the address on the Google Maps. It will also show you how view your current location on the Google Map. This tutorial assumes you have completed the basic tutorials of App Inventor. For basic and intermediate tutorials, click here.
Introduction
This tutorial introduces:
- List manipulation – creating lists, appending items to lists
- ListPicker – adding items to lists, saving list data
- LocationSensor – detecting current location for displaying on Google Maps
- ActivityStarter – used to start-up Google Maps for current or predefined address
- Notifier – displaying messages
- TinyDB – saving data into a persistent database
- Misc. – text manipulation, basic validation
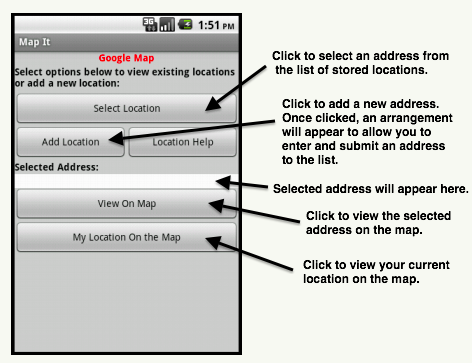
We will be working toward the design shown in figure blow:
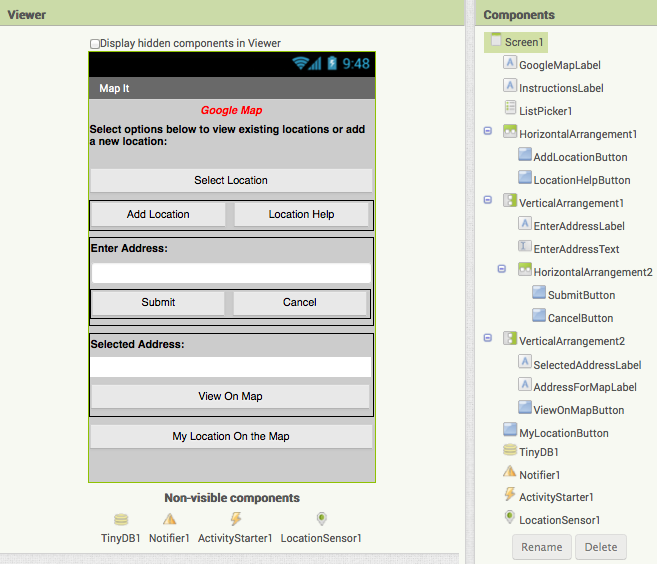
The figure below shows how the components are arranged in the design editor. It also shows you the non-visible components (e.g. TinyDb, ActivityStarter, LocationSensor, Notifier) that are used in the app.
Blocks
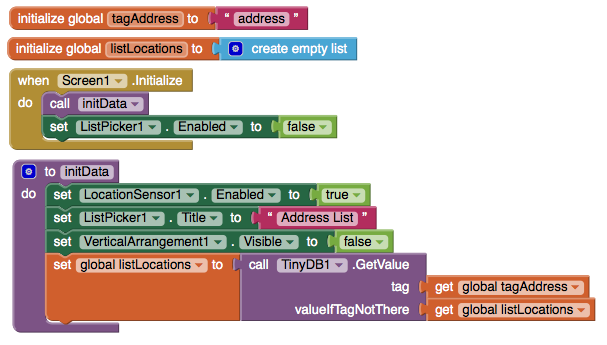
We define 2 global variables.
- tagAddress – a variable that is a constant and will be used, as a tag, for storing and retrieving data from our database.
- listLocations – a variable that can be used to store and manipulate list of addresses.
We now create a procedure that can be invoked when the app is started (initialized). The procedure sets up the initial state of some of the components. Some of these settings could have been done from the design editor, but for demo purpose and clarification, we are using a procedure. In the procedure, we also check our database to find out if there are any stored addresses. If no data, then we just use an empty list.
Adding a New Addresses
We use AddLocationButton to add a new address, CancelButton to cancel the process of adding, and LocationHelpButton to display what type of addresses can be entered. The blocks to make these actions work are here:
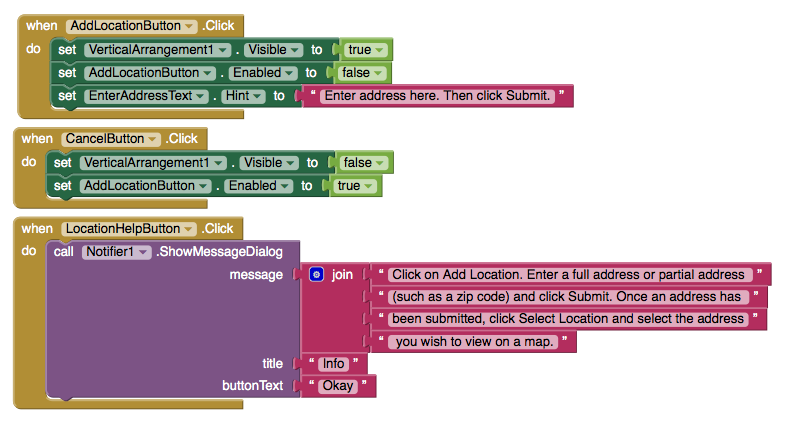
When AddLocationButton is clicked, we make our address data entry visible (using screen arrangement), allowing user to enter address. If user clicks on Cancel, we make the arrangement hidden again. Using this approach, we keep the screen simple and avoid the clutter. We also provide the SubmitButton to allow the user to indicate that they want to store data.
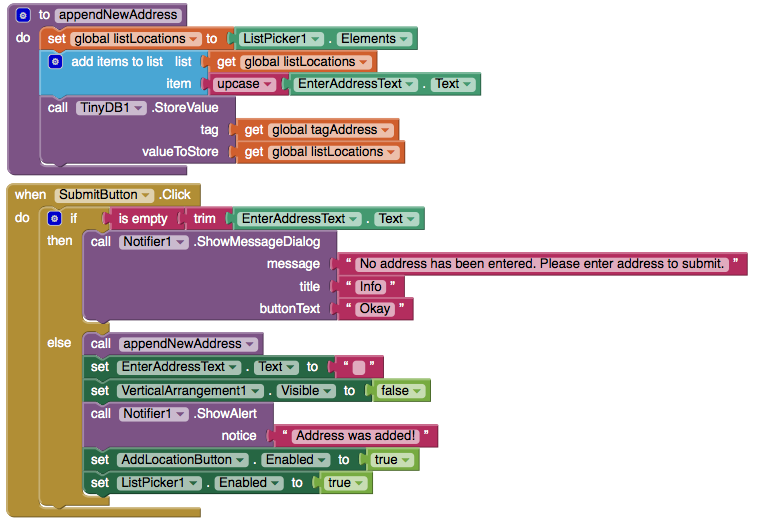
When the user clicks on SubmitButton, we perform basic validation to ensure data has been submitted. If validation does not pass, we display an error message. Otherwise, we invoke a procedure that appends the new address to our list. We also store the updated list into our database. Once address is added, we hide our arrangement again. The blocks below show how this logic is done:
Selecting an Addresses
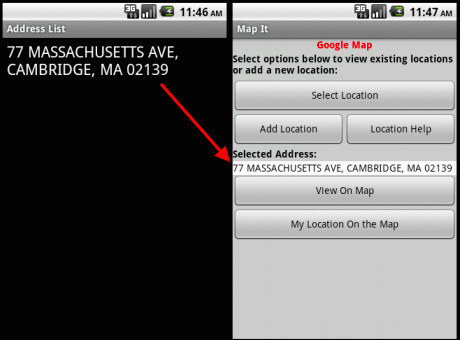
When the user clicks on ListPicker1 ‘Select Location’ and selects an address, this action calls the blocks below:

This displays the address in the device and allow the user to tap on ViewOnMapButton to see the blocks selected address on the Google Map — see the figure below:
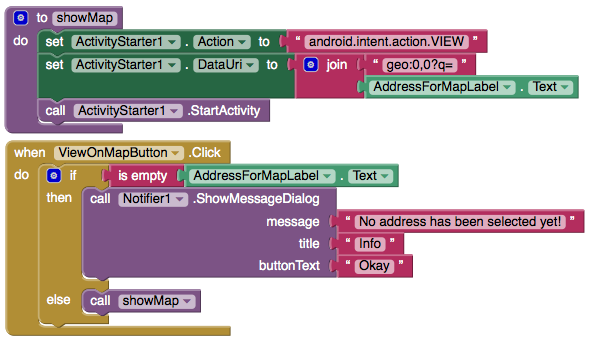
When ViewOnMapButton is clicked, we validate to ensure that an address already has been selected. If not, an error message is displayed. Otherwise, we use blocks below to show address:
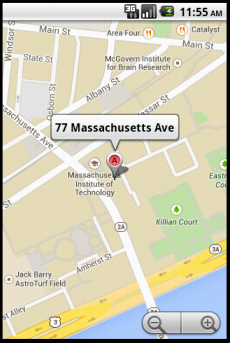
The above blocks will open the map and the output will be like image below:
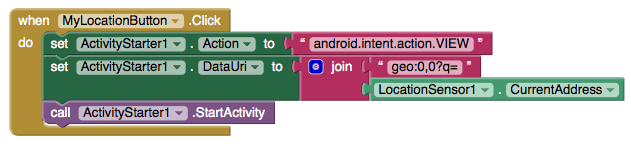
Viewing Current Location On the Map
We have dropped in a button, MyLocationButton ‘My location On the Map’ that can be clicked to view one's current location. It will use
Download Source Code
If you'd like to work with this sample in App Inventor, download the source code to your computer, then open App Inventor, click Projects, choose Import project (.aia) from my computer..., and select the source code you just downloaded.
MIT App Inventor expresses its gratitude to M. Hossein Amerkashi for developing this tutorial. Visit Hossein's blog to find out more about him and his App Inventor support materials.
MIT App Inventor


This work is licensed under a Creative Commons Attribution-ShareAlike 4.0 International License.
Terms of Service and Privacy Policy
Other inquiries: Email
GitHub: mit-cml
Accessibility: accessibility.mit.edu


