Pizza Party with Fusion Tables
App Inventor Classic • App Inventor Classic • FOR APP INVENTOR 2 CLICK HERE• App Inventor Classic • App Inventor Classic
This information pertains to App Inventor 1 (Classic). For tutorials about App Inventor 2, go to the App Inventor 2 Tutorials.
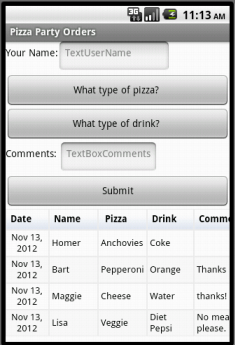

In this tutorial, you will create an app that lets people enter food orders for a pizza party. Orders are stored in a Fusion Table, providing one easy to access place for the data. By reading from the table, the app can easily display the orders that have been entered.
A Fusion Table is a Google service to support the gathering, managing, sharing, and visualizing of data. Data are stored in multiple tables on Google's cloud. Individual tables can be merged (or fused) if they contain a common column, and they can be easily visualized on maps and in various kinds of charts and graphs. All of the data are stored in a public table that can be accessed via Google Drive, and allows different users** to add information to the tables. Coupled with a location sensor, an App Inventor app could post periodic updates of each user's location to a public fusion table. Users could post notes to mark noteworthy locations. For example, a team of botanists could use a Fusion Table app to create an annotated catalog of the trees or plants within a certain geographical area. See the Google Documentation on Fusion Tables for more information.
This tutorial introduces:
- Using the FusionTables component
- Using a WebViewer component
This tutorial assumes you are familiar with the basics of App Inventor-- using the Component Designer to build a user interface, and using the Blocks Editor to specify the app's behavior. If you are not familiar with the basics, try stepping through some of the basic tutorials before continuing.
IF YOU DOWNLOAD THE SOURCE CODE you will need to supply your own API KEY, your own Table ID, and your own TABLE URL in the global variables in the blocks editor. This source code will not work without these additions.
Creating your own Fusion Table
Creating your own Fusion Tables is as easy as creating a Google document, if you are familiar with that process.
- On the web, login to your Gmail account or any other Google service (e.g., Drive, YouTube).
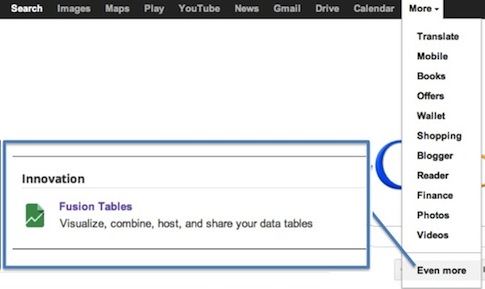
- Select the More > Even more menu and scroll to the bottom of the page of Google services where you will find the Fusion Tables service under "Innovation", click on the Fusion Tables link.
- Click "Create New Table"
- You will be given three options for the new table: "From this computer", "Google Spreadsheets", or "Create an empty table". For the purposes of this tutorial, select Create an empty table.
- You will see that the new table automatically comes with four columns. Change the column names for your Pizza app by going to Edit > Change Columns.You'll rename the four default columns to Date (type=Date), Name (type=Text), Pizza (type=Text), Drink (type=Text). Click save and then add a fifth column by going to the Edit > Add Column. Name this fifth column Comment (type=Text). .
- Leave this window open so that you can come back and get the URL, which you'll need when you set up the properties of the WebViewer component in your app.
- Click on the Share button (top right) to modify the table's permissions. For this tutorial, you can specify a few friends who will use the app. Only people who are explicitly given permission will be able to enter pizza party preferences through your app.
Another way to create a new table: go to Google Drive. Click the Create button, then go to More > Fusion Table. The picture at right shows what the Create button's menu should look like. If you do not see Fusion Table in your menu, then you may need to contact your school's network administrator. (See Troubleshooting section at the bottom of this page.)
NOTE about sharing your app after it's complete: To share your app, all users will have to be given access to the Fusion Table. To share a FusionTable with others, you have to invite each person individually or invite a Google Group (see footnote at the end of this tutorial), the same way you would share a private google doc. There is no way to share write privileges to a FusionTable with the public. Public access is restricted to read-only.
Getting an API Key
In order to use the FusiontablesControl Component you need to acquire a Google Applications Programming Interface (API) key, an API Key. To get an API key, follow these instructions:
- Go to your Google APIs Console and login if necessary.
- Select the Services item from the menu on the upper left.
- In the list of services, find the Fusion Tables API service and click the toggle button that currently says "off".
- Read and agree to the terms of service. When you return to the APIs Console page you'll see that the on/off switch next to Fusion Tables API is now "On" and green.
- Go back up the menu on the upper left of the screen and select the API Access item.
- Your API Key will be in the rectangular box in the section called "Simple API Access". You will need set the "API Key" property of the Fusiontables Control component in any app that you make that uses Fusion Tables. (More info below.)
Building the App
Connect to the App Inventor web site and start a new project. Name the new project PizzaParty, set the screen's orientation to Portrait and uncheck the Screen's scrollable property. You may also wish to set the Screen's Title property to something other than 'Screen 1'.
The User Interface
In addition to the FusiontablesControl component, the Pizza Party app makes use of several other types of components. It is assumed that you have learned how to use these in previous lessons. Use the component designer to create the interface for the Search Party. When completed, the designer should look like this:
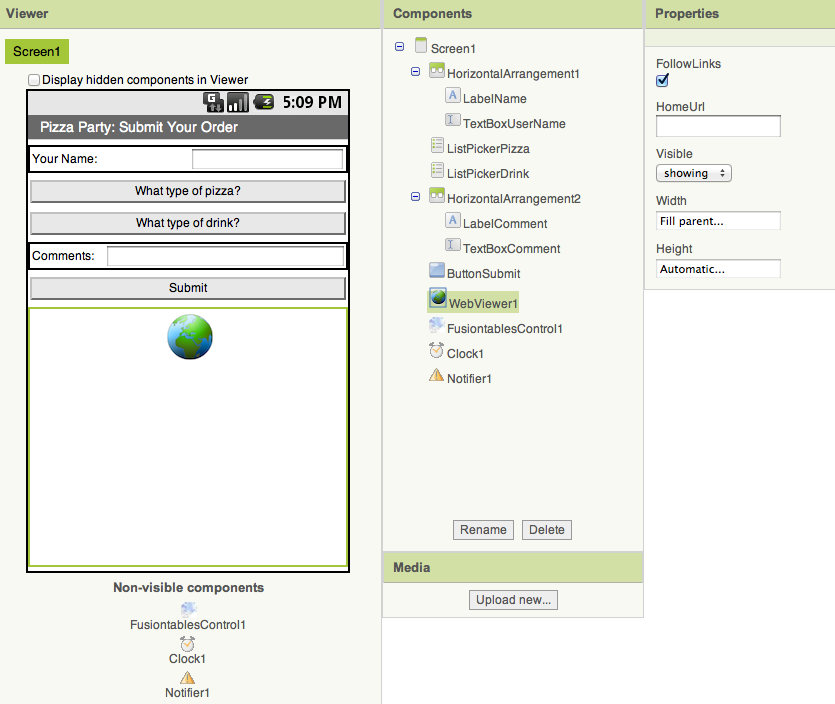
The components are:
| Component Type | Palette Group | What you'll name it | Purpose of Component | Settings of Component |
| Label | Basic | LabelName | Shows the text "Your Name:" | |
| TextBox | Basic | TextBoxUserName | Gets input from user | Set the width property to Fill Parent |
| HorizontalArrangement | Screen Arrangement | HorizontalArrangement1 | Contains Name Label and Textbox | |
| ListPicker | Basic | ListPickerPizza | Accesses the list of available pizza types |
Set the Width property to Fill Parent Set the Text property to "What type of pizza?" Set the ElementsFromString to "Cheese, Pepperoni, Anchovies, Hawaiian" |
| ListPicker | Basic | ListPickerDrink | Accesses the list of available drinks. |
Set the Width property to Fill Parent Set the Text property to "What type of drink?" Set the ElementsFromString to "Coke, Diet Coke, Sprite, Ginger Ale" |
| Label | Basic | LabelComment | Shows the text "Comments:" | |
| TextBox | Basic | TextBoxComments | Takes user input | Set the width property to Fill Parent |
| HorizontalArrangement | Screen Arrangement | HorizontalArrangement2 | Contains Comments Label and Textbox | |
| Button | Basic | ButtonSubmit | Adds new data to the public fusion table | Set the Text to "Submit" Set the width property to Fill Parent |
| WebViewer | Not ready for prime time | WebViewer1 | Displays Fusion Table | Set width and height properties to Fill Parent |
| FusiontablesControl | Not ready for prime time | FusiontablesControl1 | Manages interactions with the app's Fusion Table | |
| Clock | Basic | Clock1 | Used to provide a timestamp each time an order is placed. | |
| Notifier | Other stuff | Notifier1 | Notifies the user of any errors |
Determining your Fusion Table URL and Table ID
In the blocks editor, you will set the WebViewer component's HomeURL property to point to the URL of your table. To find your Fusion Table's URL:
- In your browser, navigate to the new Fusion Table you just created.
- Go to the menu and select Tools > Publish.
- You'll see a notice saying: "This table is private and will not be visible". Click the blue link that says "Change Visibility".
- In the list of "Who Has Access", click the blue "Change..." link next to "Private - Only people listed below..."
- Choose"Public on the Web" or "Anyone with the link". Either of these settings will work for this tutorial. In the future, you should decide this setting based on the sensitivity of your data.
- Click the green Save button, then the blue Done button.
- Back on the Fusion Table page, go to the menu bar and select Tools > Publish. Select the URL from the top text box (labeled "Send in an email or IM"), copy the URL and return to App Inventor. You will paste the URL into the definition block for the TABLE_URL (see below).
- You can find the Table ID by browsing to your table, then selecting File>About this table in the menu.
Blocks Editor
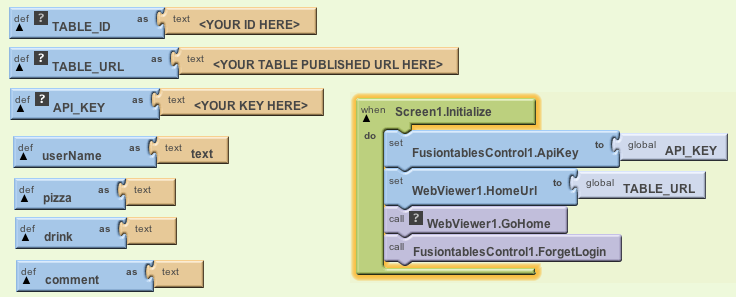
Open the Blocks Editor so you can program the app's behavior. First, you will describe the app's variables. Variables whose names are ALL_CAPS are constants -- that is, variables whose values do not change while the program is running. It is good to get into the habit of using this naming convention. Define the following variables and give them the initial values shown in the table.
| Variable Name | Initial Value | Purpose |
| TABLE_URL | text | Initialize this global variable to the "published" URL of your fusion table. See instructions above. |
| TABLE_ID | text | Initialize this global variable to your table ID (e.g. a long string of characters unique to your fusion table). See instructions above. |
| API_KEY | text | Initialize this global variable to your own API Key for Google Fusion Tables. See instructions above. |
| UserName | text | Records the name of the user. |
| pizza | text | Stores the pizza choice input by the user. |
| drink | text | Stores the drink choice input by the user. |
| comment | text | Stores the comment input by the user. |
Initializing the App
It is important to perform some initialization steps whenever the app is started. These are done in the Screen1.Initialize block. For this app we need to set the initial values for the FusionTable component's API Key property (set to global API_KEY) and the WebViewer component's HomeURL property (set to global TABLE_URL). We also tell the app to forget the user's login credentials. This will prompt the user to login to their Google account and give permission to the app to access the Fusion Table. This authentication step will happen only once when the app first tries to access the Fusion Table. Remember, Fusion Tables are only writeable by users who have been given permission by the table's owner. You specify this in the Sharing settings for the Fusion Table (easy to do from the Google Drive webpage.) If you want to be able to add users at a later date, you should set up a Google Group and give that group access to the Fusion Table. That way, you just have to add people to the Google Group and they'll automatically get access to the Table.
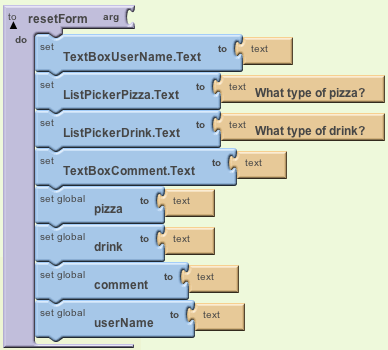
Set up the resetForm procedure as shown below. After recording an entry, this procedure resets the interface back to the original state.
List Picker Blocks
In the designer, you set the choices for the pizza and drink types by filling in the "Selection" property with comma separated lists. These pre-programmed choices will be displayed on the user interface so the user can select their food and drink. Their selections are stored in the pizza and drink variables.

Submitting Data
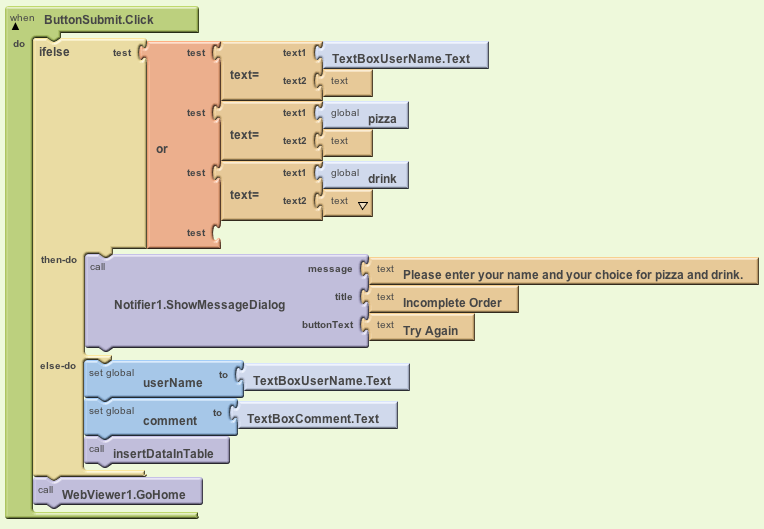
Once the user has entered their name, food choices, and comments, they will click the Submit button. The app tests to make sure that the name, pizza, and drink fields have values in them, and prompts the user to try again if any of the required answers are missing. Notice that the text = block is used (find it under Built-in palette, Text drawer). This block compares two strings of text to see if they are equal. Do not use the math "equals" block. If all required information is present, it calls the procedure InsertDataInTable (see below). The blocks for the ButtonSubmit.Click are shown here:
Inserting Data into the Fusion Table
The FusiontablesControl component is used to send the data to the Fusion Table. This action will create a new row in the Fusion Table, setting the values of the various columns involved. App Inventor makes this easy to do, but you have to be careful that the insert query is formatted correctly.
This procedure involves two steps: (1) constructing the insert query and then (2) sending the query to Google's Fusion Table service. The query we want to send will take this format:
INSERT INTO
The words in CAPS are part of the query's syntax. The words in parentheses are values that we need to plug in. First there is a list of (column names) followed by VALUES followed by a list of (value names). The order of the column names and value names must be in the same order so that they match up. An example of what this might look like is shown below. Notice that the values must be enclosed in single quotes:
INSERT INTO 191GHtZ_B2 (Name, Date) VALUES ('Sam', '10/10/2012')
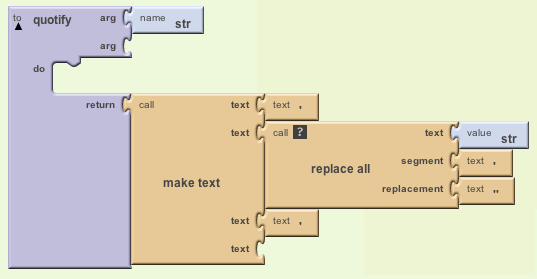
First, setup a new Procedure With Result that takes a string and returns it surrounded by single quotes. The procedure quotify is used in the InsertDataInTable procedure to place quotes around all of the values in the query. It also takes care of "escaping" any single quotes or apostrophes that are input by the user. You can send single apostrophes as part of a value in the query, so the "replace all" block adds an extra single quote. Two single quotes in a row are interpreted as one single quote.
To construct the query we use App Inventor's make text block. Be sure to put spaces where needed, such as before and after the words INSERT INTO and VALUES:
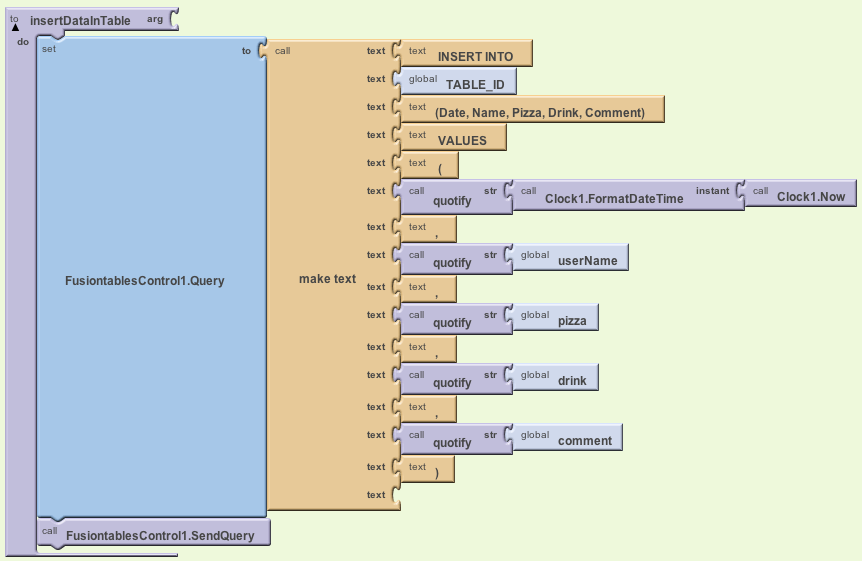
For this app, the column names must match the column names of the table we created earlier (with columns Date, Name, Pizza, Drink, Comment). Their respective values are taken from the procedure's global variables. Note: If you did not use these exact words for your table's columns, then be sure to use your table's column names when you build your query.
Don't forget the FusiontablesControl.SendQuery command at the very end of this procedure. It's small in size compared to rest of the procedure, but very important.
Handling the Response from the Fusion Tables Service
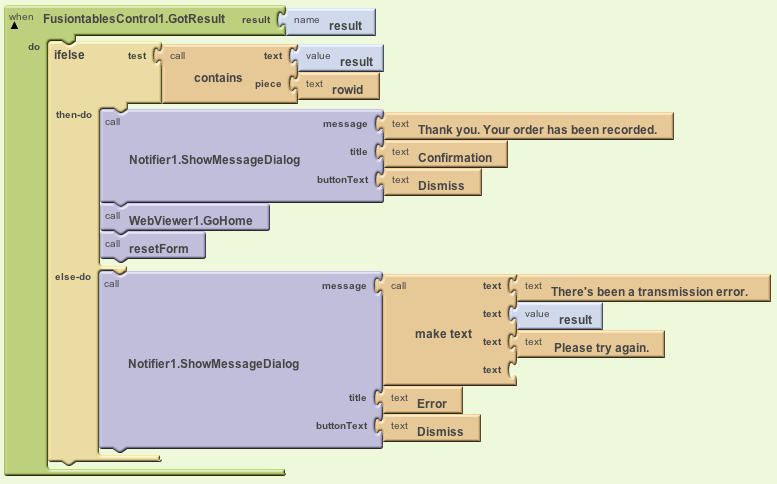
The FusiontablesControl.GotResult event will be fired when the app receives a response from Google's Fusion Tables Service. For an insert query the service will return the rowID of the new row that was inserted or an error message if something went wrong. In this simple example, we use the "contains" block ( (find it under Built-in palette, Text drawer) to check whether the result string has the rowID in it. If so, then we know that the rowID was received, and we then invoke the WebViewer.GoHome procedure, which reloads the "HomeURL" as specified in the WebViewer's properties. Note that this set of blocks also calls the resetForm procedure. After recording an entry, it resets the interface back to the original state.
You're done! Package the app by going to Package for Phone on the Designer. You can now test the App for the purposes of the pizza party. Once you understand this tutorial, you'll be ready to make new Fusion Tables and modify the app to collect different types data from users. Remember, you have to give each user permission to access the Fusion Table. You do this through the Google Fusion Tables interface, not through App Inventor. Luckily, this means you don't have to change the app in order to add more users who can access the table.
Challenges
This app has the Fusion Table hard-coded into the blocks. Find a way to let users specify their own fusion table ID so that they can host their own Pizza Party.
Variations
Now that you have a simple app that uses fusion tables and a webviewer working, you might want to build some other apps with Fusion Tables. For example:
- Include a LocationSensor so that the user's location can be added to the Fusion Table to create a map with notes
- Make the WebViewer display something other than the table of stored values; perhaps a map or a chart
Troubleshooting
If you are using a Google Apps for Education account, and you are not able to create a new fusion table (in the "Create" menu of Google Drive you won't even see an option for Fusion Tables), you will need to ask your system administrator to turn this option on for you. Or, you can switch to a standard gmail account. Fusion Tables are not automatically turned on for Google Apps for Education Accounts, your system administrator must make Fusion Tables available to the accounts in your domain.
If you are receiving errors when trying to submit to the Fusion Table, especially if the error mentions Authentication, be sure that you have put the correct API Key into the API Key property field on the FusionTables component in the Design Window.
To familiarize yourself with fusion tables, have a look around the Fusion Tables Web Site. Check out the example gallery to see what kinds of things are possible. Work through this Fusion Table tutorial, which shows how import some data, create a Fusion Table, and view the data on a map with your browser. You'll need to log in with your Google account.
NOTE Sharing Fusion Tables with a Google Group: An alternative way to deal with entering email addresses individually is to create a dedicated Google Group for your app and let all the app users know how to join the group (maybe through the web page for your app). From the moment you create your app, you share the Fusion Table once with your Google Group (using its email address, for example, usersOfAwesomeAIapp@googlegroups....), and make sure to give to the group editing rights. Every user who joins the group will inherit the editing rights automatically.
Done with PizzaParty? Return to the other tutorials.
Download Source Code
If you'd like to work with this sample in App Inventor, download the source code to your computer, then open App Inventor, go to the My Projects page, and choose More Actions | Upload Source.
MIT App Inventor


This work is licensed under a Creative Commons Attribution-ShareAlike 4.0 International License.
Terms of Service and Privacy Policy
Other inquiries: Email
GitHub: mit-cml
Accessibility: accessibility.mit.edu


