MapTour
App Inventor Classic • App Inventor Classic • FOR APP INVENTOR 2 CLICK HERE• App Inventor Classic • App Inventor Classic
This information pertains to App Inventor 1 (Classic). For tutorials about App Inventor 2, go to the App Inventor 2 Tutorials.
MapTour
What you're building
 Download Refined Version (Book Chapter PDF)
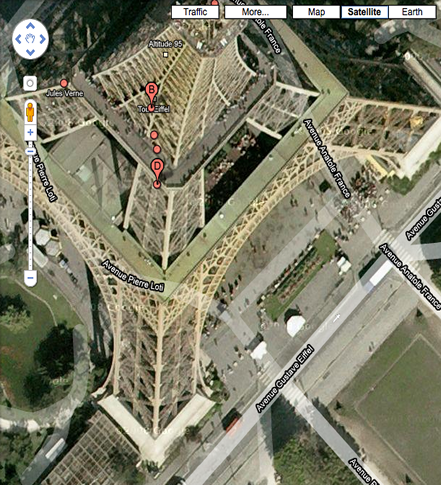
This is a two-part tutorial introduces the ActivityStarter component for launching arbitrary Android Apps and the ListPicker component for allowing a user to choose from a list of items. You'll build MapTour, an app for visiting French vacation destinations with a single click. Users of your app will be able to visit the Eiffel Tower, the Louvre, and Notre Dame in quick succession.
This tutorial assumes you are familiar with the basics of App Inventor-- using the Component Designer to build a user interface, and using the Blocks Editor to specify event-handlers. If you are not familiar with the basics, try stepping through some of the basic tutorials before continuing.
Once you complete the first part of this tutorial, try part 2.

Getting started
Connect to the App Inventor web site and start a new project. Name it "MapTour", and also set the screen's Title to "MapTour". Open the Blocks Editor and connect to the phone.
Introduction
You'll design the app so that a list of destinations appears. When the user chooses one, the Google Maps app is launched to display a map of the destination.
The tutorial introduces the following App Inventor concepts:
- The ActivityStarter component for launching Android apps from your app.
- The ListPicker component for allowing the user to choose from a list of choices.
Set up the Components
The user interface for MapTour is simple: you'll have a single ListPicker component and an ActivityStarter (non-visible) component. The design view should look like this when you're done:
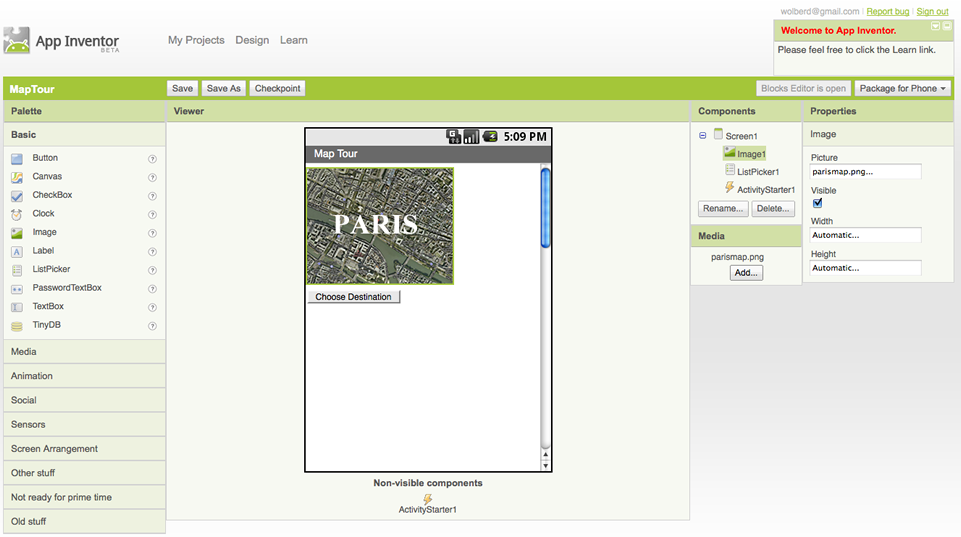
The components listed below were used to create this designer window. Drag each component from the Palette into the Viewer and name it as specified:
| Component Type | Palette Group | What you'll name it | Purpose of Component |
| Image | Basic | Image1 | Show a static image of Paris map on screen |
| ListPicker | Basic | ListPicker1 | Display the list of destinations |
| ActivityStarter | other stuff | ActivityStarter1 | Launches the maps app when a destination is chosen |
Download the file parismap.png onto your computer, then choose Add in the Media section to load it into your project. For it to appear, you'll also need to set this as the Picture property of Image1.
The ListPicker component has an associated button-- when the user clicks it, the choices are listed. Set the text of that button by setting the Text property of ListPicker1 to "Choose Destination".
Setting the properties of ActivityStarter
ActivityStarter is a component that lets you launch any Android app-- the browser, Maps, even another one of your own apps. When another app is launched from your app, the user can click the back button to get back to your app. You'll build MapTour so that the Maps application is launched to show particular maps based on the user's choice. The user can then hit the back button to return to your app and choose a different destination.
ActivityStarter is a relatively low-level component in that you'll need to set some properties of the component with information familiar to a Java Android SDK programmer, but foreign to the rest of the 99.999% people in the world. Not to worry, however. By copying the sample protocol information provided here, you can easily learn how to launch apps like Maps from the apps you are creating.
So, to set-up the ActivityStarter to launch the Maps application, set the following ActivityStarter properties in the Component Designer:
| Property | Value |
| Action | android.intent.action.VIEW |
| ActivityPackage | com.google.android.apps.maps |
| ActivityClass | com.google.android.maps.MapsActivity |
With these values set, you'll be able to launch the Maps application. In the Blocks Editor, you'll set one more property, DataUri , which will allow you to launch Maps with a particular map being displayed. This property must be set in the Blocks Editor because it will change based on whether the user chooses to visit the Louvre, the Eiffel Tower, or the Notre Dame.
Create a list of destinations
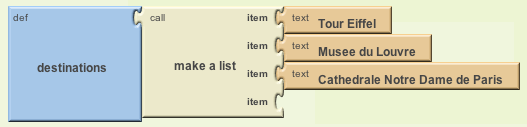
Open the blocks editor and create a variable with the list of destinations for the MapTour. You'll need the following blocks:
| Block type | Drawer | Purpose |
| def variable ("Destinations") | Definitions | create a list of the destinations |
| make a list | Lists | use to add the items to the list |
| text ("Tour Eiffel") | Text | the first destination |
| text ("Musee du Louvre") | Text | the second destination |
| text ("Cathedrale Notre Dame") | Text | the third destination |
The blocks will look like this:
Add behaviors to the components
MapTour has two behaviors:
- When the app begins, the app loads the destinations into the ListPicker component so the user can choose.
- When the user chooses a destination from the ListPicker, the Maps application is launched to show a map of that destination. For Part I, you'll just open Maps and tell it to invoke a search for the chosen destination
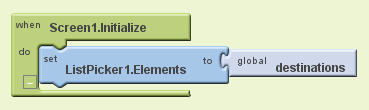
The ListPicker component displays a list of items when the user clicks a button. ListPicker has a property Elements . If you set Elements to a list, the items in the list will appear in the ListPicker . For this app, you want to set the ListPicker' s Elements property to the destinations list you just created. Because you want this to happen when the app begins, you'll define this behavior in the Screen1.Initialize event. You'll need the following blocks:
| Block type | Drawer | Purpose |
| Screen1.Initialize | Screen1 | this event is triggered when the app starts |
| set ListPicker1.Elements to | ListPicker1 | set this property to the list you want to appear |
| global destinations | My Definitions | the list of destinations |
The blocks should look like this:
How the blocks work
Screen1.Initialize is triggered when the app begins. The event-handler just sets the Elements property of ListPicker so that the three destinations will appear.
Test this behavior. On the phone, click the button labeled "Choose Destination". The list picker should appear with the three items.
Launching Maps with a search for the destination
Next, you'll program the behavior that should occur when the user chooses one of the destinations-- the ActivityStarter should launch Maps and search for the selected destination.
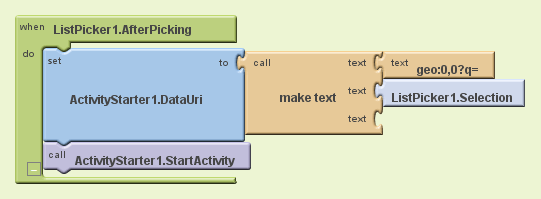
When the user chooses from the ListPicker component, the ListPicker.AfterPicking event is triggered. In the event-handler for AfterPicking you need to set the DataUri of the ActivityStarter component so it knows which map to open, then you need to launch the app using StartActivity.
You'll need the following blocks:
| Block type | Drawer | Purpose |
| ListPicker1.AfterPicking | ListPicker1 | this event is triggered when the user chooses from ListPicker |
| set ActivityStarter1.DataUri to | ActivityStarter1 | the DataUri tells Maps which map to open on launch |
| make text | Text | build the DataUri from two pieces of text |
| text ("geo:0,0?q=") | Text | the first part of the DataUri expected by Maps |
| ListPicker1.Selection | ListPicker1 | the item the user chose |
| ActivityStarter1.StartActivity | ActivityStarter1 | launch Maps |
The blocks should look like this:
How the blocks work
When the user chooses from the ListPicker, the AfterPicking event is triggered. Whatever item was chosen is in the ListPicker1.Selection property. So if the user chose "Musee du Louvre", that value is in ListPicker1 's Selection property.
In the Component Designer, you already setup the ActivityStarter componenent with properties so that it will launch the Maps application. Here, you just need to tell it which map to show. The DataUri property of ActivityStarter allows you to specify this using a special protocol.
In this case, you want to show the map that would appear if you typed in "Musee du Louvre" in the search box of the Maps application. To do this, the DataUri should be set to:
geo:0,0?q='Musee du Louvre'
The make a text block creates a text exactly like this, only the text after "q=" will be the choice made by the user.
Once the DataUri is set, ActivityStarter1.StartActivity launches the Maps app.
Test this behavior. Restart the app and click the "Choose Destinations" button again. When you choose one of the destinations, does a map of that destination appear? Can you click the back button to return to your app to choose again (you may have to click a couple of times to leave the Maps app).
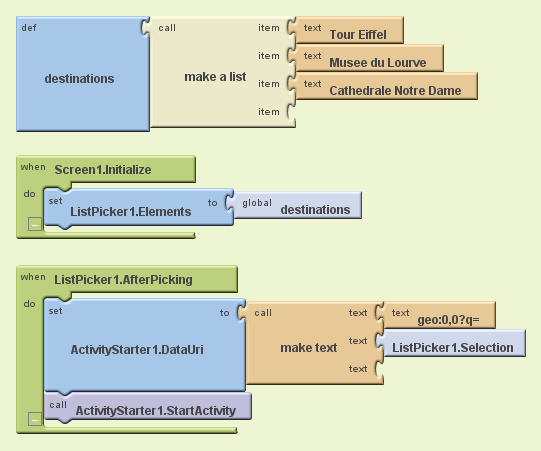
Map Tour, Final Program
Review
Here are some of the ideas covered in this tutorial:
- The ListPicker component lets the user choose from a list of items. ListPicker' s Elements property holds the list, the Selection property holds the selected item, and the AfterPicking event is triggered when the user chooses.
- The ActivityStarter component allows your app to launch other apps. This tutorial demonstrated its use with the Maps application, but you can launch a browser or any other Android app as well-- even another one of your own.
- See the reference page on Activity Starter for more details.
- Learn more sophisticated uses of the ActivityStarter and the ListPicker components in MapTour Part 2.
Scan the Sample App to your Phone
Scan the following barcode onto your phone to install and run the sample app.

Download Source Code
If you'd like to work with this sample in App Inventor, download the source code to your computer, then open App Inventor, go to the My Projects page, and choose More Actions | Upload Source.
MIT and Google are grateful to Professor David Wolber, CS Professor at The University of San Francisco, for developing this tutorial.

Done with MapTour? Return to the other tutorials here.
MIT App Inventor


This work is licensed under a Creative Commons Attribution-ShareAlike 4.0 International License.
Terms of Service and Privacy Policy
Other inquiries: Email
GitHub: mit-cml
Accessibility: accessibility.mit.edu


