Get the Gold
App Inventor Classic • App Inventor Classic • FOR APP INVENTOR 2 CLICK HERE• App Inventor Classic • App Inventor Classic
This information pertains to App Inventor 1 (Classic). For tutorials about App Inventor 2, go to the App Inventor 2 Tutorials.
What You're Building

By building the Get The Gold App you will get practice with setting visibility, using Clock components and Timers, and detecting collisions in App Inventor. You'll program an application that has a pirate ship whose goal is to collect all the gold on the screen.
Getting Started
Connect to the App Inventor web site and start a new project. Name it GetTheGold, and also set the screen's Title to "GetTheGold". Open the Blocks Editor and connect to a device or emulator.
Introduction
This tutorial introduces the following skills, useful for future game development:
- Using the Clock component
- Using Clock.Timer to move sprites
- Using Sprite.Flung to move a sprite
- Using collision detection
Getting Ready
For this game, you will have two types of imagesprites: pirate and gold coin. Click below to download the image file for your sprites.

Set up the Components
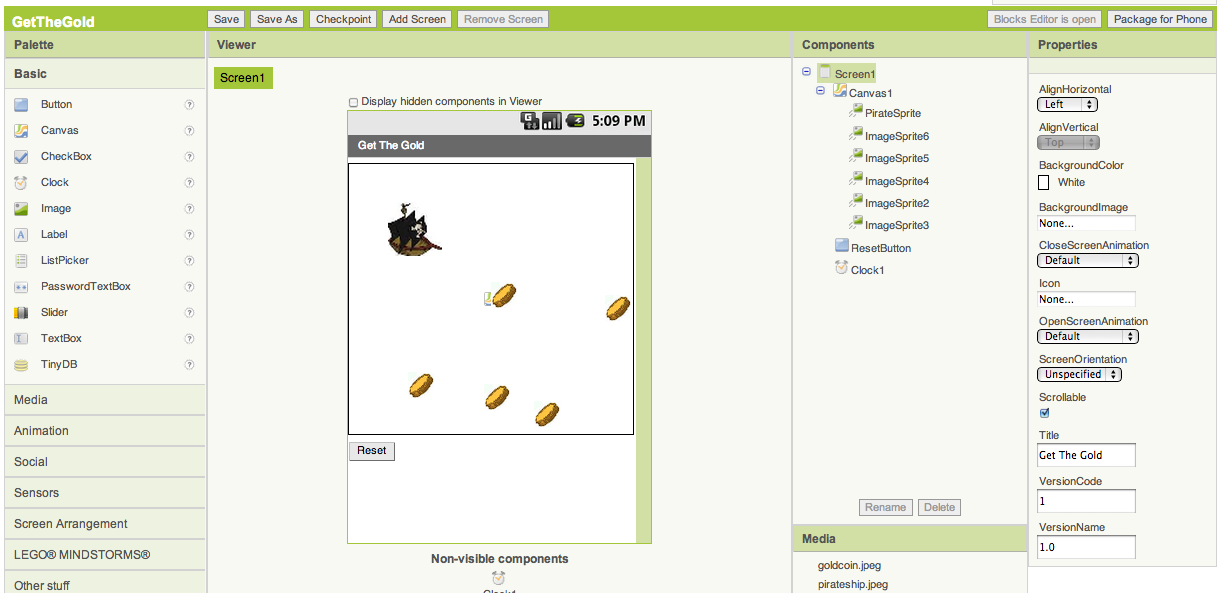
Use the component designer to create the interface for GetTheGold. When you finish, it should look something like the snapshot below (more detailed instructions below the snapshot).

To create this interface, put the following components into the Designer by dragging them from the Component Palette into the Viewer.
| Component Type | Palette Group | What you'll name it | Purpose of Component |
| Canvas | Basic | Canvas1 | The background that we will be putting our imagesprites on |
| ImageSprite | Animation | PirateSprite | The pirate ship in our game |
| ImageSprite | Animation | ImageSprite2 | One of the gold coins in the game |
| ImageSprite | Animation | ImageSprite3 | One of the gold coins in the game |
| ImageSprite | Animation | ImageSprite4 | One of the gold coins in the game |
| ImageSprite | Animation | ImageSprite5 | One of the gold coins in the game |
| ImageSprite | Animation | ImageSprite6 | One of the gold coins in the game |
| Clock | Basic | Clock1 | We use the Clock for its Timer method to move the coins |
| Button | Basic | ResetButton | To reset the game so the player can play again |
Set the properties of the components as described below:
| Component | Action | |
| ResetButton | Change Text property to "Reset". | |
| PirateSprite | Change Speed property to 6. | Upload the pirateship image and set Picture property to pirateship. |
| ImageSprite(2,3,4,5,6) | Upload the goldcoin image and set Picture property to goldcoin. | |
| Clock | Change TimerInterval property to 2000. |
Moving the Pirate
To move the PirateSprite, we want the user to be able to "fling" the sprite in the direction that they choose. To do this, we will use the PirateSprite.Flung event handler.
You may notice that PirateSprite.Flung takes in 6 attributes: x, y, xvel, yvel, speed, and heading. We want to reassign PirateSprite's current heading to the heading given to us from PirateSprite.Flung. This means that the user can now control the direction of the pirate ship with their fingers by flinging on the screen.
To prevent the pirate from moving off the screen, we will also use PirateSprite.Bounce when an edge is reached.
Moving the Coins
We want the coins to move to random positions on the screen. We will use Clock1.Timer and the ImageSprite's MoveTo method to do this.
When the Clock1.Timer goes off, we want all of our gold coin ImageSprites to move to a new random location on the Canvas. We will do this by using the Sprite.MoveTo block. MoveTo takes in two arguments: the x and y coordinates on the canvas of the new position we want the sprite to move to. We want the Sprite to move to a new random location so we will use the random integer block found in the Math box. Since we want each Gold ImageSprite to move to a new location, we repeat this process for each sprite's MoveTo function.
For ImageSprite2, we want x to be a random integer from 0 to Canvas1.Width-ImageSprite2.Width and y to be a random integer from 0 to Canvas1.Height-ImageSprite2.Height. This is to be repeated for all the Gold Image Sprites.
Remember that sprites are measured at the upper left corner as (0,0) so if we don't want them to go off the screen, we need to take the sprite's height/width into account when setting the range for our random numbers.
We will do this by setting up our blocks as in the image below:

Detecting Collisions
App Inventor detects collisions by checking for an intersection between the bounding rectangles of each ImageSprite. We call this rectangle-based collision detection. As you can see in the image below, sprites with circular or polygon shape will appear to collide because of the rectangular bounds around them when they might not actually be colliding.

We can use the PirateSprite.CollidedWith event handler to detect whenever the pirate ship collides with another sprite or gold coin. You may notice that PirateSprite.CollidedWith takes in an argument. This argument is the object that PirateSprite just collided with. We will be testing inside the handler for which object so the name of this argument is not significant. You can name it other.
Whenever the pirate collides with a gold coin, we want the coin to disappear. We can do this by setting the coin's visibility to false. To find which coin the pirate collided with, we will use the PirateSprite.CollidingWith.
We can use PirateSprite.CollidingWith to take in a component (each of the gold coin sprites) to detect which sprite was hit. This is a component block and NOT a text block with the words ImageSprite inside. The component block can be found in the drawer for each component. If a sprite was hit, we will set its visibility to false.
Reset Button
After the user hits all of the gold sprites with the pirate ship, none of them will be visible. The reset button should set all of the gold sprites' visibility to true.

Complete Program
Here's the complete GetTheGold program.

Package the final version of the app by choosing Package For Phone | Barcode from the Component Designer menu. When the barcode appears, use the barcode scanner on your phone to download and install the app.
Variations
Once you get this program running, you may want to do the following additional features to extend it. For example,
- Create a label to display the time that it took you to get all the gold
- Change the speed of the ship or gold coins
- Add an enemy sprite that when collided with, causes your pirate to lose speed
- Use one of the phone's sensors to control movement of the pirate ship
Scan the Sample App to your Phone
Scan the following barcode onto your phone to install and run the sample app.

Download Source Code
If you'd like to work with this sample in App Inventor, download the source code to your computer, then open App Inventor, go to the My Projects page, and choose More Actions | Upload Source.
Done with GetTheGold? Return to to the other modules here or the tutorials here.


