Tilt A Color
What you're building
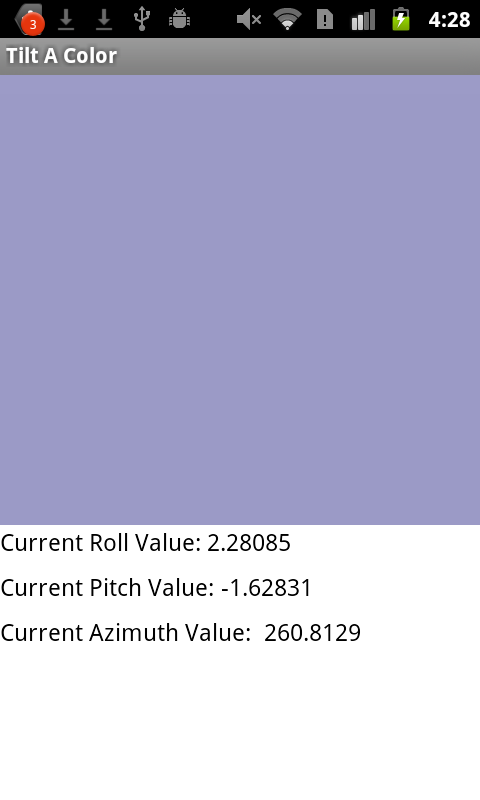
By building the Tilt-A-Color App you will get practice with events, colors, and the orientation sensor in App Inventor. You'll program an application that changes the color of the screen when a user changes the orientation of the phone. You will do this using the OrientationSensor component and its attributes pitch, roll, and azimuth.
Getting Started
Connect to the App Inventor web site and start a new project. Name it TiltAColor, and also set the screen's Title to "TiltAColor". Open the Blocks Editor and connect to a device or emulator.
Introduction
This tutorial introduces the following skills, useful for future game development:
- Using the OrientationSensor.
- Using different orientations of the phone measured by pitch, roll, and azimuth.
- User-initiated events tilting the phone in a different way
- How to make new colors using make color
Explanation of the OrientationSensor
The OrientationSensor is a component found under the Sensors box on the designer screen. It has one eventhandler, OrientationSensor1.OrientationChanged that gets called whenever pitch, roll, or azimuth have changed. All three of these values provide information about the phone's physical orientation in 3D. They are all measured in degress from 0 to 360.
Pitch is the phone's up/down orientation. 0 degree when the device is level, increasing to 90 degrees as the device is tilted so its top is pointing down, then decreasing to 0 degree as it gets turned over. Similarly, as the device is tilted so its bottom points down, pitch decreases to -90 degrees, then increases to 0 degree as it gets turned all the way over.
Roll is the phone's sideways orientation. 0 degree when the device is level, increasing to 90 degrees as the device is tilted up onto its left side, and decreasing to -90 degrees when the device is tilted up onto its right side.
Azimuth is the phone's orientation with respect to North/East/South/West. 0 degree when the top of the device is pointing north, 90 degrees when it is pointing east, 180 degrees when it is pointing south, -90 degrees when it is pointing west, etc.
All of these attributes have values that go between -180 and 180 degrees.Set up the Components
Use the component designer to create the interface for TiltAColor. When you finish, it should look something like the snapshot below (more detailed instructions below the snapshot).
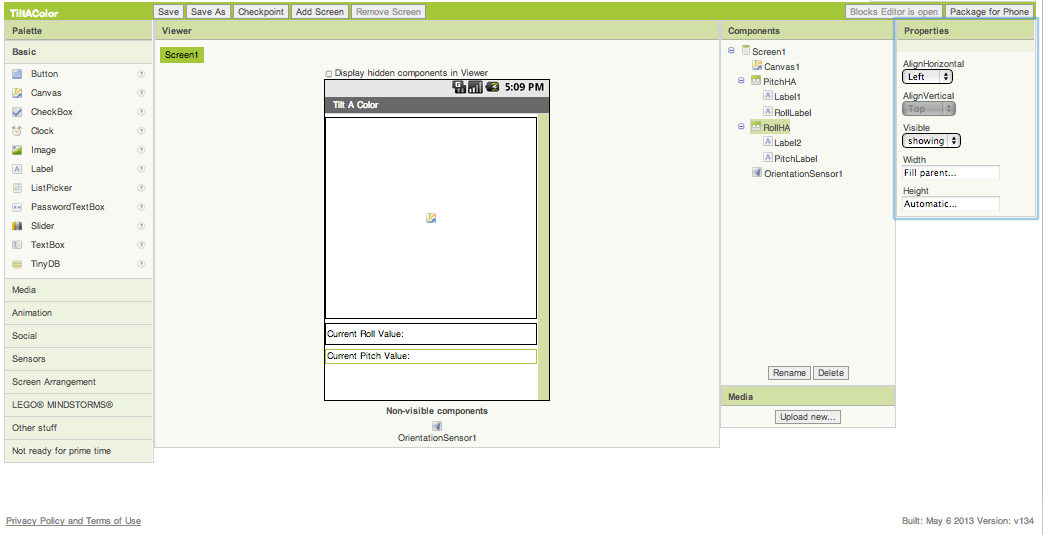
To create this interface, put the following components into the Designer by dragging them from the Component Palette into the Viewer.
| Component Type | Palette Group | What you'll name it | Purpose of Component |
| Canvas | Basic | Canvas1 | The background that we will be changing the color of |
| OrientationSensor | Sensors | OrientationSensor1 | The sensor that we will be using the tell if the orienation of the phone has changed. |
| HorizontalArrangement | Screen Arrangement | RollHA | Organizes Label1 and RollLabel horizontally |
| Label | Basic | Label1 | Contains the words "Current Roll Value" |
| Label | Basic | RollLabel | Shows the value of the roll of the phone |
| HorizontalArrangement | Screen Arrangement | PitchHA | Organizes Label2 and PitchLabel horizontally |
| Label | Basic | Label2 | Contains the words "Current Pitch Value" |
| Label | Basic | PitchLabel | Shows the value of the pitch of the phone |
| HorizontalArrangement | Screen Arrangement | AzimuthHA | Organizes Label3 and AzimuthLabel horizontally |
| Label | Basic | Label3 | Contains the words "Current Azimuth Value" |
| Label | Basic | AzimuthLabel | Shows the value of the azimuth of the phone |
| Component | Action |
| Label1 | Change Text property to "Current Roll Value: ". On the Viewer screen, move this label into RollHA. |
| Label2 | Change Text property to "Current Pitch Value: ". On the Viewer screen, move this label into PitchHA. |
| Label3 | Change Text property to "Current Azimuth Value: ". On the Viewer screen, move this label into AzimuthHA. |
| RollLabel | Change Text property to " " (blank). On the Viewer screen, move this label into RollHA. |
| PitchLabel | Change Text property to " " (blank). On the Viewer screen, move this label into PitchHA. |
| AzimuthLabel | Change Text property to " " (blank). On the Viewer screen, move this label into AzimuthHA. |
Component Behaviors and Event Handlers
We want actions to happen after three different events: the user tilting the phone from side to side (changing the roll), the user tilting the phone back and forth (changing the pitch), and the user spinning the phone (changing the azimuth). Each time either the pitch, azimuth or the roll changes direction we want the respective label to be updated with the value. To implement these features, we will use the OrientationSensor1.OrientationChanged event handler and use a block called make color.
Add A OrientationChanged Handler
The color of the canvas should change whenever the user tilts the phone in a different direction. So here we will set up the blocks for recognizing if the orientation of the phone changes.
We also want the labels to display the current azimuth, pitch and roll of the phone.
Drag out a OrientationSensor1.OrientationChanged block. Notice how this block provides arguments for pitch, roll, and azimuth of the phone. We want to see if the orientation has changed to be able to change the color of the canvas and update the values stored for pitch, roll, and azimuth.
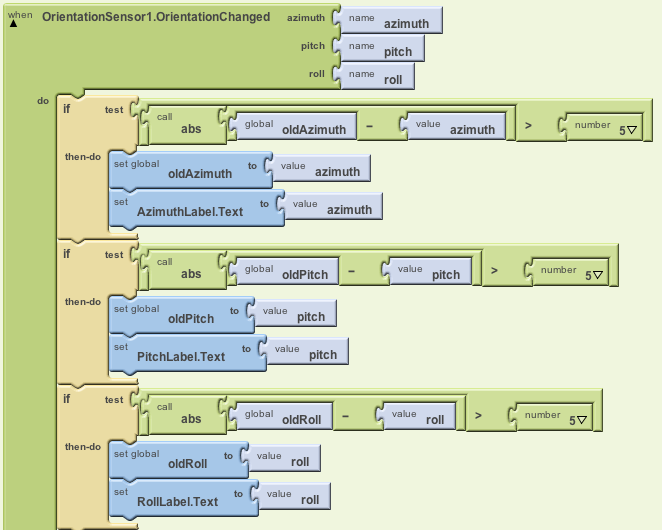
Because the phone is extremely sensitive and often notices even the smallest of changes in orientation, we don't want the color to always change. We want to monitor the changes and check to see if the change is bigger than a certain value before we update the color. We will check to see if the change between the old and current value is bigger than epsilon, or in this case: 5. If the change is bigger than 5, we will update the labels that display pitch, roll, and azimuth.
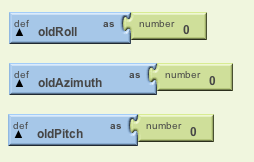
To be able to use the old value, we will first create global variables for oldRoll, oldAzimuth, and oldPitch. We create global variables by going to Built-In, Definitions, then dragging out a block that says variable. Double clicking on the block will allow you to change the name of the block. We will initialize these values to 0. The blocks should look like this:
We will now use these variables to reference the old value of roll, pitch, and azimuth. Each time that the orientation changes, we will check to see if the difference between pitch and oldPitch, roll and oldRoll, azimuth and oldAzimuth is bigger. Using the absolute value of the difference insures that our difference will be positive. If the difference is larger than 5, we will update our variable and update the Label for that variable. The blocks should look like this:
Now we're ready to change the color.
Using Make Color
Now we need to set up the blocks to make the color change.
Under the OrientationChanged event handler, we will change the background color of Canvas. We will do this using a new block called make color found in the Colors box.
make color takes a list as an argument. This list is composed of a R, G, B, and alpha value. Make color creates a color using the RGB Color Model. The R, G, B and alpha values all contribute to creating a color. Essentially R represents how much red in your new color, G is how much green is in your new color, and B is how much blue is in your new color. Alpha is how strong (saturated vs light) your color is. For more info, click here to read the wiki page on RGB Color Model.
We want the color to show something about the orientation of the phone so we will make each R, G, and B value dependent on oldRoll, oldPitch, and oldAzimuth so that the color will only change when we've assured that the change between values is big enough not to be sensitivity. R/G/B values will range from 0 to 255 while roll/pitch/azimuth will range from -180 to 180 degrees. To get a value from 0 to 255, we will divide each roll/pitch/azimuth by 180 and multiply by 255. We will also need to make sure the final value is both positive and an integer.
Assemble the blocks as shown.

Complete Program
Here's the complete TiltAColor program.
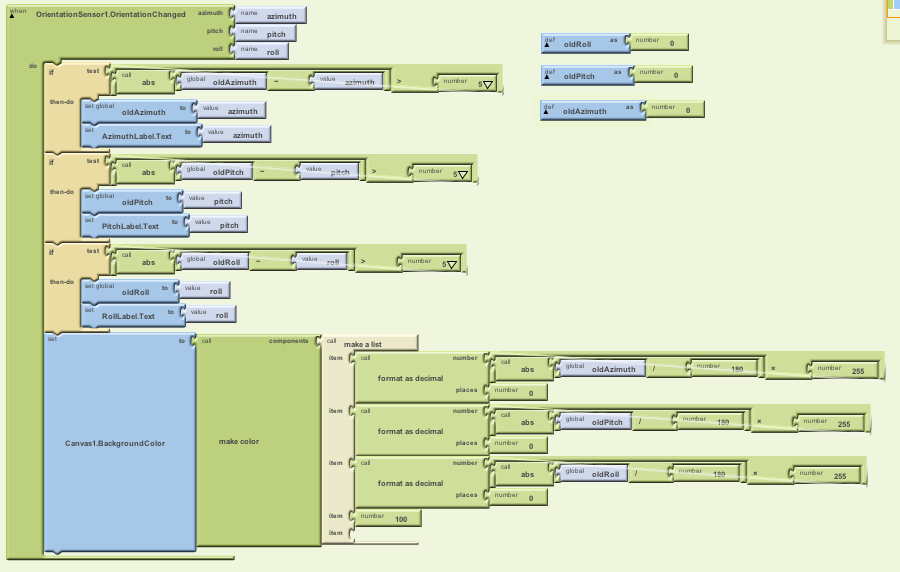
Package the final version of the app by choosing Package For Phone | Barcode from the Component Designer menu. When the barcode appears, use the barcode scanner on your phone to download and install the app.
Variations
Once you get this program running, you may want to do the following additional features to extend it. For example,
- Add a feature that rolls a ball sprite on the screen by tilting the phone
- Add a feature that displays the current direction the user is facing by using azimuth
- Try different variations of numbers and use make color to see what happens to the background color
Scan the Sample App to your Phone
Scan the following barcode onto your phone to install and run the sample app.

Download Source Code
If you'd like to work with this sample in App Inventor, download the source code to your computer, then open App Inventor, go to the My Projects page, and choose More Actions | Upload Source.
Done with TiltAColor? Return to to the other modules here or the tutorials here.


