Pong

Pong is a simple game, which consists of a paddle (which is controlled by the user) and a ball. The ball bounces off the paddle and three walls. If the ball hits the paddle, the user gains points; if the ball hits behind the paddle, the game is over.
Learning Goals
Completing this app will help you learn about:
- App Inventor environment: designer, blocks editor, emulator and/or physical phone
- App Inventor components: canvas, buttons, labels, animation sprites, procedures with no parameters, global variables, and conditionals
Materials
- a selection of images and sounds in the App Inventor Media Library
- supporting hard copy materials
- video snippets to assist students through this lesson (credit: K.Roy)
Lesson Details
DESIGN: App Inventor Designer
- To open the App Inventor Designer window, go to http://appinventor.mit.edu and sign in with a Google ID (Gmail account).
- Download and save an image of a paddle and a ding sound file from the Media Library
- On the left column of the Designer, open the Basic palette, and first drag a Label component over to the Viewer (#1). Under the Components pane, highlight the Label1 component and change its name to "ScoreLabel" (#2). Under the Properties pane (right hand side), delete the display text of Label1 component to replace with Score" (#3) and change its font size to 18, its width to 150 pixels, and height to be 30 pixels.

- From the Basic palette, drag two Buttons to the Viewer under the labels. Rename the first button to "StartButton" and change its text field to "Start." Rename the second button to "ResetButton" and change its text field to "Reset."
- Under the Screen Arrangement palette, drag a Horizontal Arrangement component to the viewer. Drag the ScoreLabel into the Horizontal Arrangement first, then drag the two buttons into the Horizontal Arrangement component next to the ScoreLabel component (you can see this under the Components pane too).
- From the Basic palette, drag a Canvas component and set the width to 300 and the height to 390 pixels under the Properties pane. You can change the background color of the canvas to any color you like.
- Under the the Animation pane, drag a Ball and Image Sprite components onto the Canvas component in the Viewer(#1). Highlight the Image Sprite component (#2) and change its image to paddle.gif (#3). You can download the image here if you have not downloaded it yet.

- Highlight the Ball1 in the Components pane and go to the Properties pane to set the heading to 30, interval to 50, radius to 20, and speed to 5. You can change the color of the ball (PaintColor) to any color you like.
BUILD: Blocks Editor
In the upper right corner of the Designer, click on the Blocks Editor button. Wait for a few moments while the blocks editor loads. This takes some time, and often requires you to click accept, ok, or keep as the java program downloads to your computer. If you are having trouble loading the Blocks Editor, visit http://www.java.com to see if you have java installed, or to troubleshoot your installation. There is more information on launching the Blocks Editor in the Setup Instructions.
Once the Blocks Editor is open, there are several options running along the left side of the screen.
- From the My Blocks palette, open the Canvas1 drawer and drag the Canvas1.Touched block into the work area. This block automatically comes with three blocks: the name x, name y, and name touchedSprite blocks.
- From the My Blocks palette, open the ImageSprite1 drawer and drag the set ImageSprite1.x block into the "do" socket of the Canvas1.Touched block.
- From the My Blocks palette, open the My Definitions drawer and drag the value x block into the edge of the set ImageSprite1.x block. They will click together like magnetic puzzle pieces.
The value x and value y blocks were automatically added to your My Definitions drawer when you put the Canvas1.Touched block in your blocks editor work area. Whenver a touch is detected on Canvas1, these "variables" will be assigned the values of the x and y coordinates of the location of the touch.
- From the My Blocks palette, open the Ball1 drawer and drag the Ball1.EdgeReached block over the work area, as well as the Ball1.Bounce block. After this is done, open the My Definitions drawer and insert the edge block into the socket of the Ball1.Bounce block that is asking for an edge value. Bounce is a built-in function for sprites. It tells the sprite to bounce off the wall.

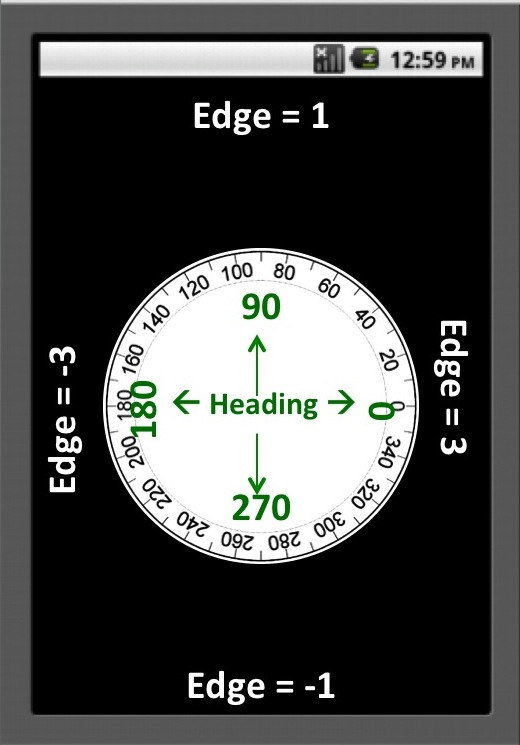
The Ball1.EdgeReached block automatically generates the edge variable under My Definitions. When the ball reaches an edge it needs a way to report that information to the main program. It does this by storing a number in the edge variable. See the image below to learn about App Inventor canvas edge values.
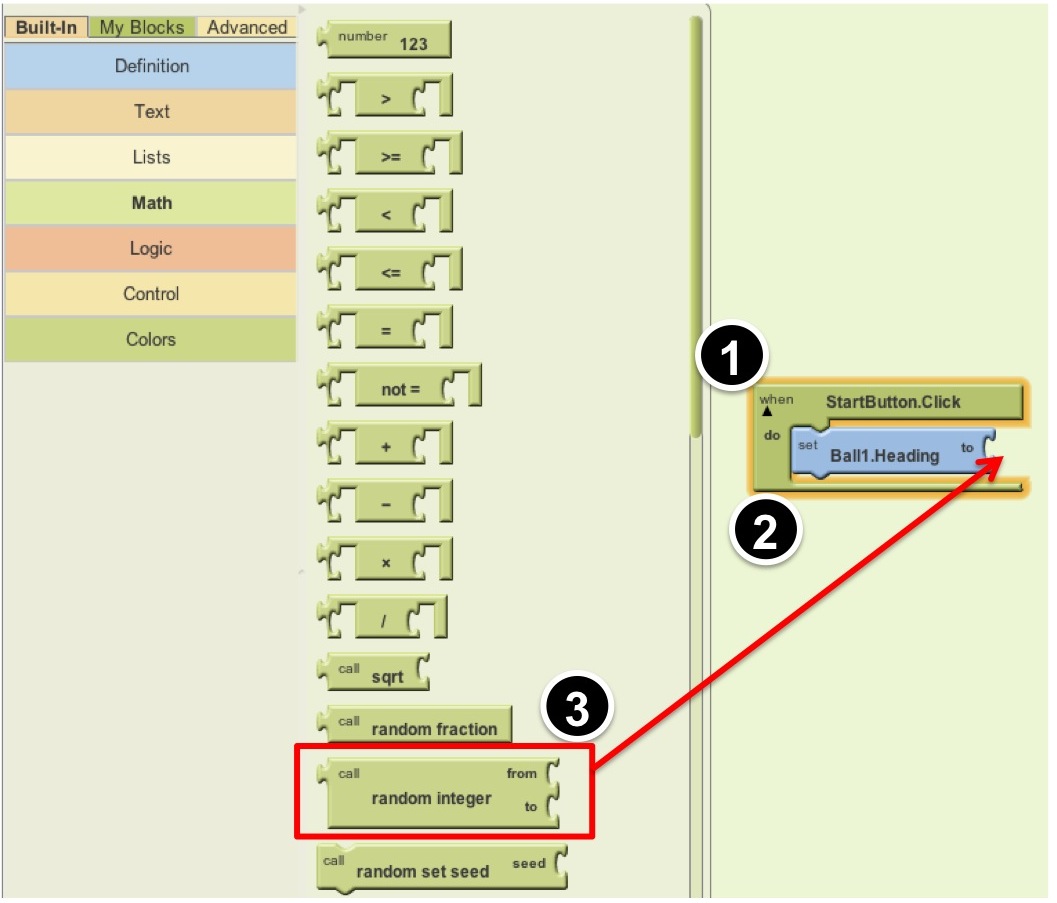
- From the My Blocks palette, open the StartButton drawer and drag the StartButton.Click block over to the Viewer (#1). Click on the Ball1 drawer and drag out a set Ball1.Heading to block and place it at the "do" section of the StartButton.Click block (#2). From the Built-In palette's Math drawer, drag out the call random integer block and add it to the end of the Ball1.Heading block (#3).
 Pull out a number 123 block from the Built-In palette's Math drawer. Plug it into the first to the "from" area and type "225" into the block in place of the "123." Do this again for the "to" area and type "315." This will make the ball take on a heading between 225 and 315 degrees when the start button is clicked (see heading diagram above).
 - From the Ball1 drawer, drag out a set Ball1.Speed to block and place it under the set Ball1.Heading to block. Put a number 123 block in the "to" socket and type in the value 5. This will move the ball 5 pixels in the direction of its heading each time its internal clock ticks. The "internal clock" of an object is called its interval. The Interval of a ball sprite is initially set at 1000 milliseconds (= 1 second) but you can change this in the properties of the sprite. Remember, at the beginning of this tutorial we changed the Interval property of Ball1 to 50ms.
- From the Ball1 drawer, drag out a Ball1.MoveTo block and put it under the Ball1.Speed block. From the Math drawer, drag out a division ( / ) block and put that in the "x" socket in the Ball1.MoveTo block. From the My Blocks palette, open the Screen1 drawer and drag out a Screen1.Width block and drop that in the first blank area in the division block. Click on the second blank area and type "2" (a number 123 block appears with "2" in the text box). From the Ball1 drawer, drag out a Ball.Radius block and drop that into the "y" area of the Ball1.MoveTo block. This will start the ball in the middle of the screen near the top each time you hit the start button. (Do you understand why? The "MoveTo" block tells Ball1 to move to the x coordinate that is half the width of the screen, and the y coordinate that is equal to the radius of the ball itself -- which is a low number so the ball will appear very close to the top of the screen.)
- From the Ball1 drawer, drag out a set Ball1.Enabled to block. Click on the screen right next to the block and click on "Logic" from the small colored menu that pops up, then click on "true". This will start the ball moving.
- From the Ball1 drawer, drag out a set Ball1.Interval to block and set it to the number 10. This will cause the ball to move every 10 milliseconds (and it will move the number of pixels specified in the "speed" property). After the interval block is created, move the set Ball1.Enabled and Ball1.Interval blocks onto the top of the Ball1.Heading block, so that they appear as the first blocks in the StartButton.Click event block.

- From the ImageSprite1 drawer, drag out a when ImageSprite1.Dragged block and drop it in the work area. From the same drawer, drag out a ImageSprite1.MoveTo and drop it in the when ImageSprite1.Dragged. Click on the My Definitions drawer, and drag out a currentX value block and drop it at the "x" slot. From the ImageSprite1 drawer, drag out a ImageSprite1.Y block and drop it at the "y" slot. This will move the paddle in x (horizontally) when you drag it, but not move it in y (vertically).
- From the Ball1 drawer, drag out a when Ball1.CollidedWith block and drop it in an open area. Click on the word "other" in the name block and type "ImageSprite1" (you must type the name of your image sprite exactly).
- From the Ball1 drawer, drag out a set Ball1.Heading to block and drop it inside the Ball1.CollidedWith block. Click on the Built-In palette and open the Math drawer, and drag out a subtraction block. Click in the first blank area and type "360". Click on the My Blocks palette, open the Ball1 drawer, and then drag out a Ball1.Heading block and drop it in the second blank area. This will reverse the ball when it hits the paddle. (Do you understand why? Look at the heading diagram above to see what happens when you subtract 360 from any heading. Headings must be between 0 and 360, and a negative number is treated as if it is positive.)
- In your workspace, find the place where you put the when Ball1.EdgeReached block. We're going to add some new blocks to this event, so for now drag the Ball1.Bounce block away from Ball1.EdgeReached so that it becomes separated. Leave the Ball1.Bounce block loose in the work area for now. Under the Built-In palette, open the Control drawer and drag out an ifelse block. From the Math drawer, drag out an equal (=) block and drop it into the "test" socket. Open the My Definitions drawer and drag out a value edge block and drop it in the first blank area. Click on the second blank area and type "-1" (for the bottom or southern edge). This will test to see if the edge that was reached is the bottom edge of the canvas.
- From the Ball1 drawer, drag out a set Ball1.Enabled to block and drop it in the "then-do" area of the ifelse block. Click to the right of that to get the popup menu, then click on "Logic" and choose "false". This will stop the ball from moving when it gets past the paddle. In addition, drag out a set scoreLabel.Text block from the ScoreLabel drawer, and attach it underneath the set Ball1.Enabled block. From the Built-In palette, open the Text drawer, and drag out a text block and drop it after the "to" (you can also click the work area to get the popup menu and choose text). Click the text and change it to "Game Over!" This text will appear on the screen in the ScoreLabel when the ball gets past the paddle.
- Now grab the orphaned Ball1.Bounce block that has been sitting alone in your workspace and drop it into the "else-do" socket of the ifelse block. It should still have the value edge block attached to its "edge" socket. This entire ifelse block will cause the ball to bounce off of all edges except the bottom (southern) one. Steps 13 through 15 should make a set of blocks that looks like this:

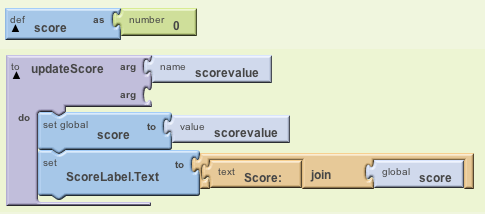
- From the Built-In palette, open the Definition drawer, drag out a def variable as block and drop it in an open area. Click on "variable" and type "score" to change the name of the variable to score. Put a number block with the value 0 in it into the "as" socket. This creates a variable named "score" and sets its value to 0.
- Under the Built-In palette, open the Definition drawer, and drag out a procedure block and drop it in an open area. Click on "procedure" and rename it to "updateScore". Then from the Definition drawer, drag out a name block and then click on the "name" and type "scorevalue". This creates a parameter for the procedure that is named "scorevalue". A parameter is a temporary variable that holds a value for a procedure. The value is specified when the procedure is called. From the My Blocks palette, open the My Definitions and drag out a set global score to block and drop it in "do" area of the updateScore procedure. From My Definitions drag out a value scorevalue block and drop it in the "to" area. This sets the score variable to the passed value.
- From the ScoreLabel drawer, drag out a set scoreLabel.Text block and drop it after the previous block. From the Built-In palette, open the Text drawer, and drag out a join block and drop it after the "to". Set the first blank area to the text "Score:" and set the second blank area to global score from the My Blocks palette and the My Definitions drawer. This will set the text of the score label to a string that joins together "Score:" and the actual value of the score variable.

- Under the My Blocks palette, open the My Definitions drawer, and drag out a call updateScore block and drop it at the end of the StartButton.Click next to the block and type 0 to update the score to 0.

- Under the My Blocks palette, open the My Definitions drawer, drag out another call updateScore and drop it in the Ball1.CollidedWith block. Under the Built-In palette, open the Math drawer drag out an addition (+) block and drop it at the end of the call updateScore block. From the My Definitions drawer, drag out a global score block and drop it in the first blank area. Click in the second blank area and type 1. This will increment the score by 1.

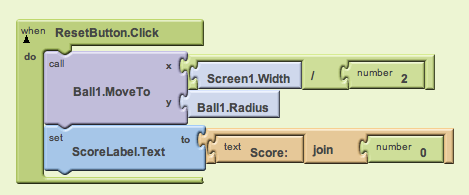
- Under the My Blocks palette, open the ResetButton drawer and drag out the when ResetButton.Click to the open area. Go back to the set of blocks surrounded by the StartButton.Click block that you created before and highlight the entire procedure block by clicking once on the green StartButton.Click block, Ball1.Move to, and hit control (ctrl) key and c key together to copy the block. Then click the open area (anywhere) and hit control (ctrl) and v key together to paste the block you copied. Drag the whole copied block in the ResetButton.Click.
From the ScoreLabel drawer, drag the ScoreLabel.Text to block and place it under the previous block. Type "0" and drag the "0" block to the empty socket of the ScoreLabel.Text to block. In addition, open the Text drawer under the Built-In palette and drag out a join block and drop it after the ScoreLabel.Text. Set the first blank area to the text "Score:" and set the second blank area to the number zero. (Note: Would it also work to call the procedure UpdateScore with 0 as the scorevalue parameter? Why or why not?)
 Done! For a little fun, try changing the color or size of the ball or paddle to personalize your app.
| App Inventor assigns numeric values to the edges of a canvas as follows: top = 1, right = 3, bottom = -1, left = -3 Heading values for animated objects go in a full circle like a compass, with values between 0 and 360 degrees. An object moving toward the top of the screen is said to have a heading of 90 degrees. |
 |
Package the App to Your Phone!
Notice that your app disappears when you plug your phone out from the USB cable. It is because the app is still stored in the server and not in your phone. Follow these instructions and package your app to your phone!
Challenge 1: Changing the speed and the size of the ball!
Can you increase the speed of the ball and decreases the size of the ball when the score increases an increment of 10 ? (Hint: Under the Math drawer, the remainder block (a,b) returns the result of dividing a by b and taking the remainder. For example, remainder(11,5) = 1, remainder(-11, 5) = -1, remainder(11, -5) = 1, and remainder(-11, -5) = -1).
Challenge 2: Adding sounds!
Download the audio files from the App Inventor Media Library page, and upload them to the Designer. Make the "noink" sound play when the ball hits the edge of the wall, the "ta-da" sound when the speed of the ball increases, and the buzzer sound when the ball hits behind the paddle.
More Challenges:
- Give the player three lives so that they get three tries before "Game Over".
- If you program multiple lives, decrease the score by 1 each time the player loses a life.
- Investigate what happens if you change the range of random numbers for the start heading when the start button is clicked.
- Try making the app respond to titling of the phone instead of dragging the paddle
Improve this game - fix the "bug" that happens if you click the start button after a game is over:
Notice that when the game is over, if the player clicks "start" instead of "refresh", the message "Game Over" remains on the screen until the player scores the first point. How can this be fixed? Is it really necessary to have a start button and reset button?
Done with Pong? Return to module one.


