Fling It Template
This is a modified version of the Mini Golf App. Some of the app has already been completed for you in the following template. It demonstrates how to use the Fling, TouchUp, and TouchDown gestures for Sprites
Note that these event handlers are also available for the Canvas.
If you are interested in completing the full tutorial, click here

To play this mini golf app, the player first positions his/her ball within the confines of the tee, and then flings the ball toward the hole. The ball will bounce off of the rectangular obstacle and the sides of the course. For each fling of the ball, the stroke count goes up by one. The total score is the number of strokes it takes to complete the entire course.
This tutorial covers:
- Using the Sprite component and the TouchUp, TouchDown, and Flung events
- Sprite Collisions
- Using EdgeReached
Part I: Continue to build the app by making a ball that responds to fling events
Download the template file . Upload this file to your projects page
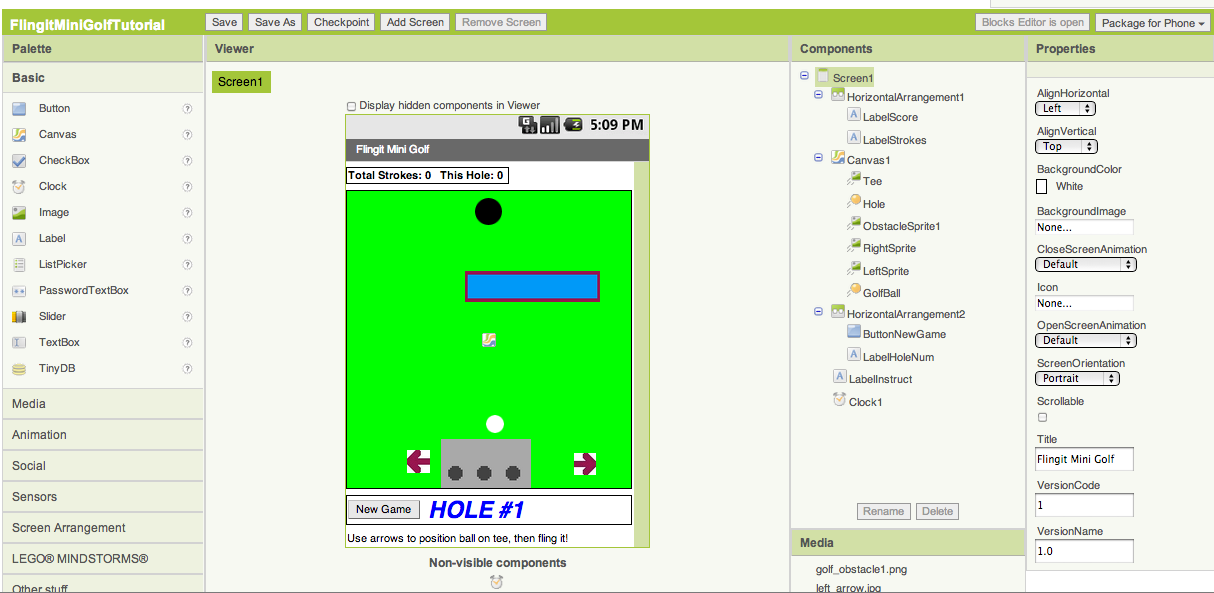
All of the components should already be added in the Designer. Double check to make sure your designer looks like this:
Open the Blocks Editor
Program the behavior of the Ball:
First, use the GolfBall.Flung event handler to move the golf ball when it is flung. Essentially, set the GolfBall sprite’s speed and heading to match the speed and heading of the player’s fling gesture. You may want to scale up the speed a little bit because the speed of the fling is a little slower than how a golf ball would move. You can play with this "scaling factor" to make the ball more or less responsive to a fling.

Program the Behavior of the Hole: When the ball collides with the hole, the ball disappears and resets at the bottom of the screen.
Note: setupNewHole, a procedure to be called when a hole is scored has already been written for you in the template.
Note: When you first drag out the GolfBall.CollidedWith event handler, the named parameter is called "other". You can rename this by clicking once on the word "other" and typing in something new. Use a name that makes sense, as in this example where we use "ObjectHitByGolfBall". Notice that the if then block tests to see if the object involved in the collision with the golf ball (ObjectHitByGolfBall) is the black ball sprite representing the hole. You can't just put a text block with the word Hole in it, you must use the component Hole block, that can be found in the MyBlocks palette in the My Definitions drawer. Do not use a text block here.

Test this Behavior. Connect your device to AppInventor, or start the emulator to load your app. When you fling the ball it should move in the direction of your fling, with a speed similar to the strength of your fling. The ball should slow down as it moves, eventually stopping. When the ball hits the hole, the ball should reset at the bottom of the screen and the hole should move to a new random location.
Does your ball get stuck if it hits the edge?
This is easy to fix with the when EdgeReached event. Note that you can find the "edge" value block under My Definitions. You can also use a developer’s shortcut by clicking anywhere on the workspace background and typing the word "edge". You’ll see a dropdown box appear. If you click the word "edge" you’ll see the value edge block appear on the screen. Big time saver!

Double check to make sure your code is right: fling the ball a few times and see that that ball now bounces off the edges of the course.
Part II: Keeping Score
Games are more fun if you have a way to see how you’re doing. Let’s add a stroke counter. In mini golf your score goes up as you take more strokes. The goal is to have the lowest score possible. Let’s show the player how many strokes she or he has taken on this hole. Let’s also show the number of strokes taken during the whole game.
Go back to the Designer and set up the following components:
Component Type |
Palette Group |
What You’ll Name It |
Purpose |
Properties |
Horizontal Arrangement |
Screen Arrangement |
HorizontalArrangement1 |
Contains LabelScore and LabelStroke |
Place at top of screen |
Label1 |
Basic |
LabelScore |
Displays the total stroke count for the entire game |
|
Label2 |
Basic |
LabelStroke |
Displays the stroke count for the hole the player is currently on |
In the Blocks Editor, you can program updates to the Score and Stroke labels. First, set two new global variables called StrokeCount and Score, and set their initial values to 0.

Then add the following blocks to the GolfBall.Flung event (red rectangle indicates new blocks):

Next add the following blocks to the Event that handles the ball hitting the hole:

Test the behavior. With these new changes, you should have a "Total Strokes" count and "This Hole" count at the top of the screen. When you fling the ball, the "This Hole" count and "Total Strokes" count should both increase by one, and when you make the ball go into the hole the "This Hole" count should reset to 0.
Part III: Positioning Ball on Tee using TouchUp and TouchDown events
Ok, so now you’ve got a working game! Now let’s make it a little more interesting and fun. First we’ll add a Tee and let the player position the golf ball on the tee before they fling the ball.
We have already programmed for you the setup of the size of the canvas, and the placement of the ball and image sprites on the canvas on the screen in the template using Screen1.Initialize. Try to gain an understandering of all of these blocks before you move on.
Position the Golf Ball on the Tee using TouchUp and TouchDown on the Arrow sprites:
To handle this, first set up two global variables that are toggled each time an arrow is pressed.

Program the behavior of the Right and Left Arrows
The left and right arrows are image sprites, so they come equipped with the ability to know when the player is is holding his/her finger down on them. The following blocks toggle the global variables based on whether the user is pressing either of these arrows.
![]()
On each new course, players can position the ball on the tee before attempting to fling the ball toward the hole. To program this, you first have to check to make sure this is a new course and the ball has not been flung yet. If StrokeCount = 0 then we know this course is brand new and the player has not yet attempted to get the ball into the hole.

As the blocks above show, after verifying that the StrokeCount is 0, you then want to proceed to move the golf ball left or right depending on which arrow is being pressed.
In the template, a procedure called MoveBallOnTee has been provided for you. MoveBallOnTee makes the golf ball move left or right on the tee depending on the global variables. A procedure called MoveBallOnCourse has also been provided. This procedure slows down the ball while its on the course.
Test the behavior. Make sure your app is doing what you expect: play the game on your device or emulator. Before you tee off, are you able to move the ball left and right on the tee by using the left and right arrows? After you tee off, you should no longer be able to use the left and right arrows (pressing them will do nothing). After the ball goes into the hole and the screen resets, you should then be able to move the ball left and right on the tee before teeing off again.
NoteCode to keep track of the number of holes played, and allow a game reset has been provided for you in the template for ButtonNewGame.Click
Part IV: Introduce an Obstacle
Most mini golf courses have obstacles on them. Let’s add a simple rectangular obstacle that will randomly position itself on the course somewhere between the Tee and the Hole. Each time a new course is presented, the obstacle will move, just the same way the Hole moves each time a new course is set up.
Add the following component in the Designer:
Component Type |
Palette Group |
What You’ll Name It |
Purpose |
Properties |
ImageSprite |
Animation |
ObstacleSprite1 |
This sprite will be somewhere between the golf ball and hole and will make it harder to get the ball into the hole |
Upload the obstacle (rectangle) graphic (right click on this link, or see below). |
Program the behavior of the obstacle in the blocks editor. First, set the behavior for when the ball hits the obstacle. *Note: Using Heading = 0 - heading works because we are dealing with bouncing off of horizonal surfaces, this will not work for bouncing off of vertical or inclined surfaces. For our purposes, it works all right. See Challenge #2 below for more information.
![]()
Each time the course is reset, position the obstacle will be positioned randomly. Add these blocks to the SetupNewHole procedure:

Part V: Challenges
Here are some extra challenges to make your game better.
Challenge 1: Program the Ball to Hole collision so that the ball only goes into the hole if the golf ball’s speed is not too fast. In real mini golf, the ball will bounce right over the hole if you hit the ball too hard.
Challenge 2: There is a slight bug when the ball hits the vertical sides of obstacle. Figure out how to program the ball to obstacle collision so that it bounces the way you would expect when the ball hits the vertical sides.
Challenge 3: Limit the number of holes per game. Keep track of the number of holes and end the game after a set number. (A typical mini golf course has 18 holes.)
Below is a summary of all of the components, and a screen shot of all the blocks (some are collapsed to save space.)


Scan the following barcode onto your phone to install and run the sample app.

Download Source Code
If you'd like to work with this sample in App Inventor, download the source code to your computer, then open App Inventor, go to the My Projects page, and choose More Actions | Upload Source.
Done with the Mini Golf Template Tutorial? Return back to the other modules.
MIT App Inventor


This work is licensed under a Creative Commons Attribution-ShareAlike 4.0 International License.
Terms of Service and Privacy Policy
Other inquiries: Email
GitHub: mit-cml
Accessibility: accessibility.mit.edu


