TextGroup
App Inventor Classic • App Inventor Classic • FOR APP INVENTOR 2 CLICK HERE• App Inventor Classic • App Inventor Classic
This information pertains to App Inventor 1 (Classic). For tutorials about App Inventor 2, go to the App Inventor 2 Tutorials.
TextGroup
What you're building

This tutorial introduces the Texting component for sending and processing SMS text messages.You'll build an app that texts a message to a list of phone numbers. This tutorial assumes you are familiar with the basics of App Inventor: using the Component Designer to build a user interface, and using the Blocks Editor to specify event handlers. If you are not familiar with the basics, try stepping through some of the basic tutorials before continuing.
Getting started
Connect to the App Inventor web site and start a new project. Name it TextGroup, and also set the screen's Title to "TextGroup." Open the Blocks Editor and connect to the phone.
Introduction
You'll design the TextGroup app so that clicking on a button texts a message to a list of phone numbers. The app introduces the following App Inventor concepts:
- The Texting component for sending texts and processing SMS texts.
- List variables to keep track of the numbers to text.
- The Timer block for repeating operations on a list of data (the list of phone numbers)
Set up the components
The user interface for TextGroup is simple: it has a text box for entering the message to send, a button to send the message, a label that reports when the message is sent, and a Texting component. Use the Component Designer to create this interface. When you finish, it should look something like the snapshot below (there are also more detailed instructions below the snapshot).
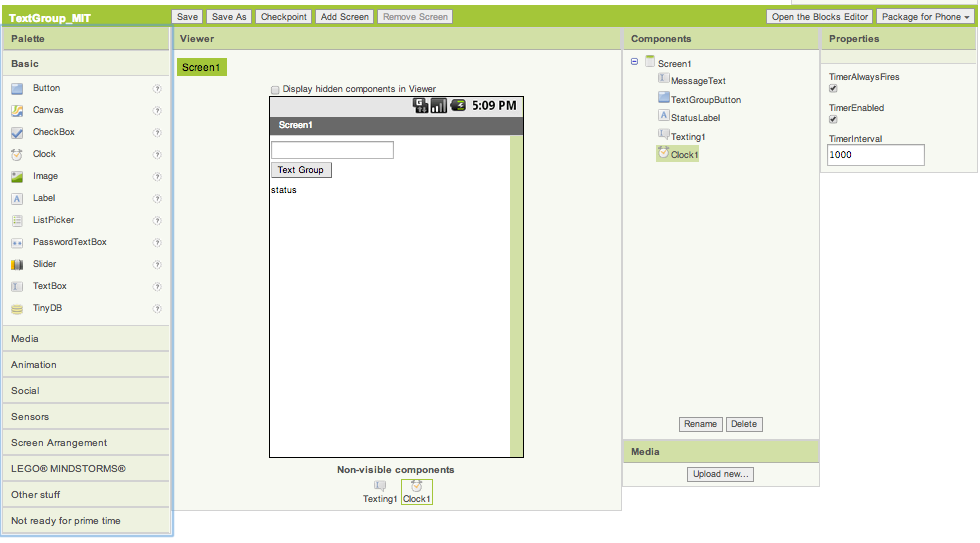
The following table describes the components you need. Drag each component from the Palette into the Viewer and name it as specified below:
| Component Type | Palette Group | What you'll name it | Purpose of Component |
| TextBox | Basic | MessageText | User will enter message here |
| Button | Basic | TextGroupButton | User will click here after entering the message |
| Label | Basic | StatusLabel | Reports when texts have been sent |
| Texting | Social | Texting1 | The component that sends the texts |
| Clock | Basic | Clock1 | Used to designate when to send the texts |
Set the properties of the components in the following way:
- Set the the Hint of MessageText to "enter a message"
- Set the Text of TextGroupButton to "Text Group"
- Set the Text of StatusLabel to "status"
- Set the TimerEnabled of Clock1 to "false"
Add behaviors to the components
TextGroup's behavior is as follows: when the user clicks the TextGroupButton, the app should text the message entered by the user in MessageText to all the numbers in a list of phone numbers. When all are sent, it should report the last message sent in the StatusLabel.
Text the entered message to one phone number.
To introduce yourself to the Texting component, begin by creating a simplified version that texts the message entered by the user to your own phone. To send a text, you need to set two properties of the Texting component: the PhoneNumber and the Message. Once these properties are set, you call the SendMessage function to actually send the text.
Open the Blocks Editor and drag out the following blocks:
| Block Type | Drawer | Purpose |
| TextGroupButton.Click | TextGroupButton | When the user clicks the button, this event handler is triggered. |
| set Texting1.Message to | Texting1 | Set the Message property before sending |
| MessageText.Text | MessageText | This is the message the user has entered. |
| set Texting1.PhoneNumber to | Texting1 | Set the PhoneNumber property before sending |
| text ("1112222") | Text | Put your own phone number as the text. |
| Texting1.SendMessage | Texting1 | Send the message |
The blocks should look like this (but with a real phone number instead of "1112222")
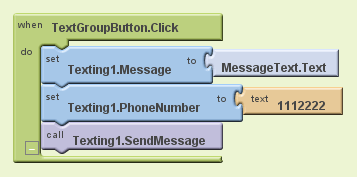
How the blocks work
When the user clicks the TextGroupButton, the event-handler is triggered. The first row of blocks gets the text entered by the user (MessageText.Text) and places it into the Message property of the Texting1 component. The second row of blocks sets the PhoneNumber property of the Texting1 component. After the first two rows of blocks, Texting1 knows what to send and who to send it to; the last block just instructs Texting1 to actually send the message.
Test this behavior. If your phone is connected, the app should appear with the MessageText box and button. Enter a message and click on the TextGroupButton. Does the text get sent? Check your phone (or the phone you sent the text to) to see.
Texting a list
Next, you'll modify the blocks to text more than one number at a time. You'll first define a global variable to store the data for the app: the phone numbers. Global variables are not seen by the user; they are the app's "hidden" memory. In this case, you'll define the list of phone numbers to which the text is sent.
You'll need the following blocks to build a list of phone numbers:
| Block Type | Drawer | Purpose |
| def variable | Definitions | Defines the PhoneNumbers variable (rename it) |
| make a list | Lists | Used to define the items of the list |
| text (3) | Text | The actual phone numbers |
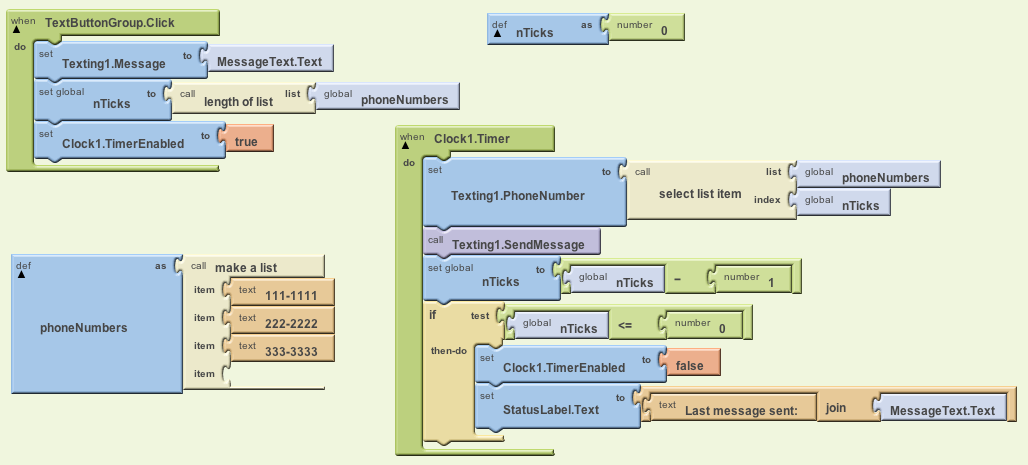
The blocks should look like this, but with two or three phone numbers of your friends.
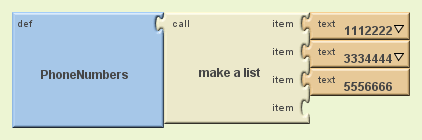
Note that text blocks are used for the phone numbers, not number blocks. This will allow for dashes, which are not allowed in number blocks. number blocks are used for data on which you want to perform mathematical computations.
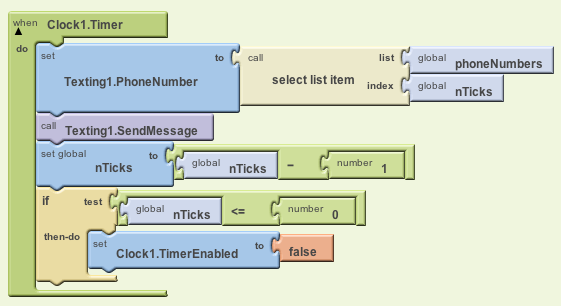
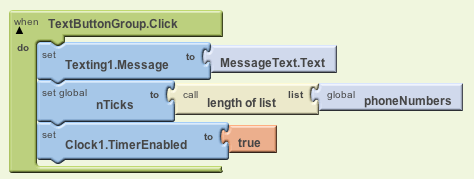
Now you're ready to modify the TextGroupButton event-handler so that it texts each number in the variable PhoneNumbers. You'll need to set up a timer to send a text message to each number in the list.
A timer performs some action each time the clock ticks. To
control the timer, define a global variable named nTicks. We will set this variable initially to the number of phone numbers in the
list.  And then we will subtract 1 from the variable each time we send a message.

A timer is done in two parts.  In TextGroupButton.Click
we will no longer send the message. Instead, we will initialize the global nTicks variable to the length of
the phoneNumbers list.  And we will enable the Clock1.

The second part is done using a Clock1.Timer block. This block will contain the Texting1.SendMessage
command. Each time the clock ticks the following steps will be performed:
- Select a number from the phoneNumbers list using the nTicks as the index.
- Set the Texting1.PhoneNumber to the selected number.
- Send the text message using Texting1.SendMessage.
- Subtract 1 from the nTicks variable.
- If the nTicks is less than or equal to 0, disable the clock . This will stop the timer.
Reconfigure the Clock.Timer block so it looks like this:
Reconfigure the TextGroupButton.Click block so it looks like this:
How the blocks work
When the TextGroupButton is clicked, the Texting1.Message property is set to the message entered by the user in MessageText. Then the nTicks variable is set to the length of the phoneNumbers list and the Clock1.TimerEnabled is set to true. This will start the clock ticking. Then in the Clock1.Timer block, the message will be sent to the target phone number and the global variable nTicks will be decremented by 1. The clock will continue ticking and sending messages until nTicks at which point the Clock1.TimerEnabled will be set to false thereby stopping the timer.
Test the behavior. Click the TextGroupButton on the phone. Is the text sent to all the numbers in the list?
Reporting the Status of the app
It's always a good idea to give the user feedback when they initiate an operation. In the app you've built thus far, the user clicks on the TextGroupButton and nothing changes in the app's user interface. Though the user might hear the phone's chime for transmitting the text, it's still better to report a status directly in the app.
Modify the blocks so that the status label reports the last message sent. You'll need the following blocks:
| Block Type | Drawer | Purpose |
| set StatusLabel.Text to | StatusLabel | This is where status will appear |
| join | Text | To concatenate the two parts of the status message |
| text | Text | Put "last message sent:" in this text block |
| MessageText.Text | MessageText | The message just sent |
The updated Clock1.Timer blocks should look like this:
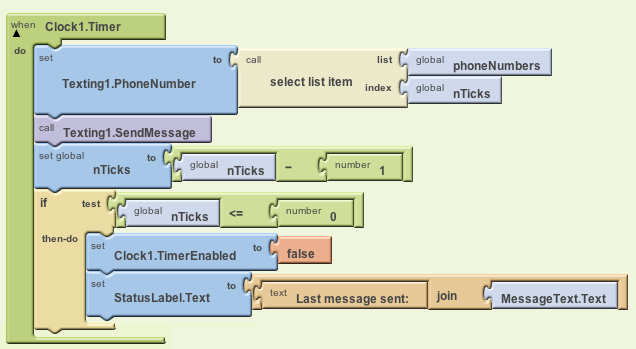
How the blocks work
The join block is used to concatenate two pieces of text. You need it when you want to join data from a variable or property with some other text. If you want to piece together more than two texts, there is also a make text block.
Test the status behavior. Does the status message report the message that was sent?
Final program
TextGroup, Final Version
Variations
Once you get the TextGroup app working, you might want to explore some variations. For example,
- Write a "random date" version that randomly chooses a number in the list to call. You won't need a Clock.Timer block, but you will need the pick random item function in the Lists drawer.
- Write a version in which "Missing You" is sent to the list of numbers as soon as the app begins (on the Screen.Initialize event). This will allow for quick texting without clicking an additional button.
- Write a version that allows the user to enter the numbers in the list. This way you don't need to re-program the blocks to change the group you are texting and your app can be used by others! You'll need to use TinyDB to store the numbers after they are entered.
Review
Here are some of the ideas covered in this tutorial:
- Instead of placing data directly in event handlers, you can create list variables and program event handlers to process the list.
- An app can repeat functions on all items of a list using the Clock.Timer block.
Scan the Sample App to your Phone
Scan the following barcode onto your phone to install and run the sample app.

Download Source Code
If you'd like to work with this sample in App Inventor, download the source code to your computer, then open App Inventor, go to the My Projects page, and choose More Actions | Upload Source.
MIT and Google are grateful to Professor David Wolber, CS Professor at The University of San Francisco, for developing this tutorial.

Done with TextGroup? Return to the other tutorials here.
MIT App Inventor


This work is licensed under a Creative Commons Attribution-ShareAlike 4.0 International License.
Terms of Service and Privacy Policy
Other inquiries: Email
GitHub: mit-cml
Accessibility: accessibility.mit.edu


