Post Documentation
Posting Content with the Web Component
The Web component allows you to post text and files to the web through the PostText, PostTextWithEncoding, PostFile, and UploadImage blocks.
Posting Text and Files
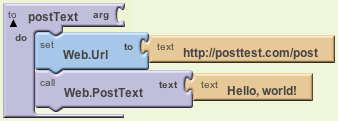
PostText
To successfully post text or a file, the Web component URL property must be set to the URL where you wish to send your post. To post text, add the text you wish to send to the PostText block in the text socket.
PostTextWithEncoding
To post text with a character encoding other than the default UTF-8, you can use the PostTextWithEncoding block. Add the text you want to post to the text socket, and a valid character set (charset) encoding to the encoding socket.

Table 1. Common Character Sets
| Common Charsets |
| UTF-8 |
| UTF-16 |
| ISO-8859-1 |
| US-ASCII |
PostFile
To post a file, the Request Headers must be set to reflect the type of file you are sending. A Request Headers is represented as a two-item list composed of a key value pair. You must add a header with a text key value pair -- Content-Type (case sensitive) and the internet media type that represents the kind of file being sent (Table 2). You can include additional Request Headers before or after the Content-Type header, but only the Content-Type header is necessary. To post the file, use the PostFile block and add the path of the file on the phone to the path socket.
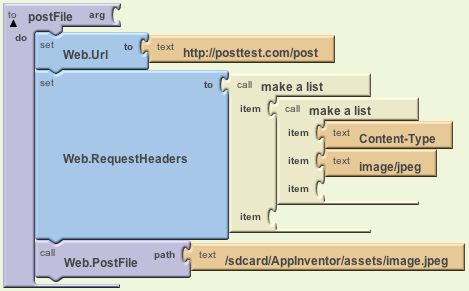
Table 2. Common Internet Media Types:
| File Type | Internet Media Type |
| GIF image | image/gif |
| JPEG image | image/jpeg |
| PNG image | image/png |
| JSON text | application/json |
| application/pdf | |
| ZIP archive file | application/zip |
| MP4 audio | audio/mp4 |
| MP3 or other MPEG audio | audio/mpeg |
| WAV audio | audio/vnd.wave |
| Windows Media Audio | audio/x-ms-wma |
| CSS text | text/css |
| CSV | text/csv |
| HTML | text/html |
| plain text | text/plain |
Uploading to Photo Sharing Sites
The Web Component allows you to upload photos and images to an account on Flickr, Picasa, or Facebook through the UploadImage block. The images that you upload will be associated with the account that the user logs in to once the block is executed. To upload a photo you must first register your app with the service you want to use.
Picasa Registration:
- Go to https://code.google.com/apis/console and log in with a gmail account.
- If you have no previous projects, click on the Create project... button. Otherwise skip this step.
- On the left side of the page, click on the API Access tab.
- If you have no previous project, click on Create an OAuth 2.0 client ID.... Otherwise click on the Edit Settings option of a previous Client ID, or click on Create another Client ID if you are making a new app.
- Choose a name for your app and enter it in the Product name box. If you want to upload an app logo, put the URL to the logo in the Product logo box. Click next.
- Under Application type, choose Web application.
- Under Your site or hostname, change www.example.com to localhost. Click Create client ID.
- You now have a registered app. Your consumer key is the Client ID (including the .apps.googleusercontent.com), and your consumer secret is the Client secret. You are now ready to use the PostPicture block with Picasa.
Flickr Registration:
- Go to http://www.flickr.com/services/apps/create and click on Request an API Key under Get your API Key and log in with a Flickr account.
- Click on APPLY FOR A NON-COMMERCIAL KEY.
- Input a name for your app and a brief description of what it does/will do. Read and check the boxes, then click SUBMIT.
- You now have a registered app. Your consumer key is in the first box and your consumer secret is in the second box.
Facebook Registration:
- Go to http://developers.facebook.com/apps and log in.
- On the Developers App page, click on the Go to App button.
- On the App page, click on + Create New App.
- Enter the name of your app and click Continue.
- Type in the security check and click Submit.
- You may have to verify your account with a mobile phone number or credit card number. If so, go through the verification process and start again at step 3.
- On the Basic Setting page of your new App, under Select how your app integrates with Facebook, click on Website with Facebook Login. In the Site URL textbox write http://localhost. Click Save Changes.
- You now have a registered app. At the top of the page, the App ID is your consumer key, and the App Secret is your consumer secret.
Once you have registered your app and have a valid consumer key and secret, you are ready to use the UploadImage block. In your UploadImage block, add the service you wish to use (flickr, picasa, or facebook) in the service socket and the path of the file on the phone to the path socket. Copy your consumer key and secret into the appropriate sockets in the block. Make sure they appear exactly as they were given from the service.

Sample App of Posting a Camera Picture

MIT App Inventor


This work is licensed under a Creative Commons Attribution-ShareAlike 4.0 International License.
Terms of Service and Privacy Policy
Other inquiries: Email
GitHub: mit-cml
Accessibility: accessibility.mit.edu


