No Text While Driving
App Inventor Classic • App Inventor Classic • FOR APP INVENTOR 2 CLICK HERE• App Inventor Classic • App Inventor Classic
This information pertains to App Inventor 1 (Classic). For tutorials about App Inventor 2, go to the App Inventor 2 Tutorials.
No Text While Driving
 Download Refined Version (Book Chapter PDF)
This tutorial demonstrates how an app can respond to text messages automatically. You'll build an app that sends back a response when a text message is received. The idea for the app came from University of San Franciso student Daniel Finnegan.
This tutorial assumes you are familiar with the basics of App Inventor-- using the Component Designer to build a user interface, and using the Blocks Editor to specify event-handlers.If you are not familiar with the basics, try stepping through some of the basic tutorials before continuing.
Getting Started
Connect to the App Inventor web site and start a new project. Name it NoTextWhileDriving, and also set the screen's Title to "NoTextWhileDriving". Open the Blocks Editor and connect to the phone.
Introduction
You'll design the app so that it sends a response to any text message received. You'll also allow the user to customize the response sent.
The tutorial introduces the following App Inventor concepts:
- The Texting component for sending texts and processing received texts.
- The TinyDB database component for saving the customized message even after the app is closed.
Set up the Components
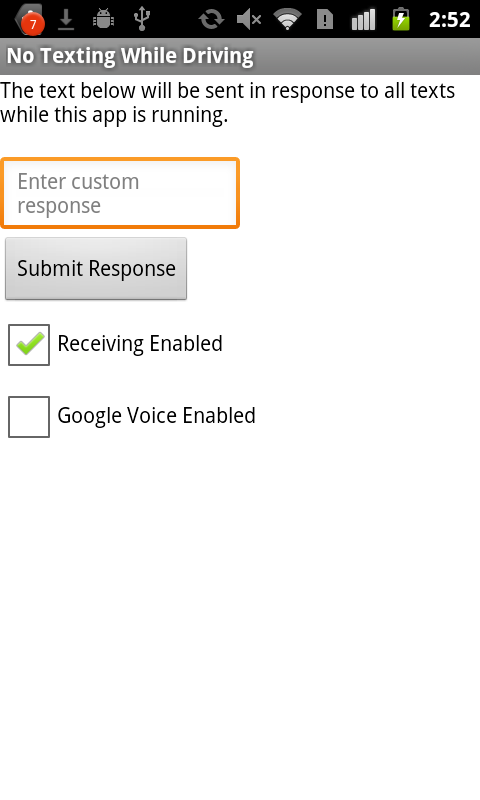
The user interface for NoTextWhileDriving is simple: it has a text box for the response message and a button for submitting a change to this message. It also has two checkboxes: one to decide whether or not you want to be receiving messages and one to choose to enable Google Voice. This is useful for texting if your phone doesn't have a SIM card. Visit the Texting over Google Voice tutorial to learn more about this.
You'll also need a Texting component and a TinyDB component, both of which will appear in the "non-visual" component area. A table of detailed instructions for designing the components is below, but you can also build it from the following picture of what it should look like:
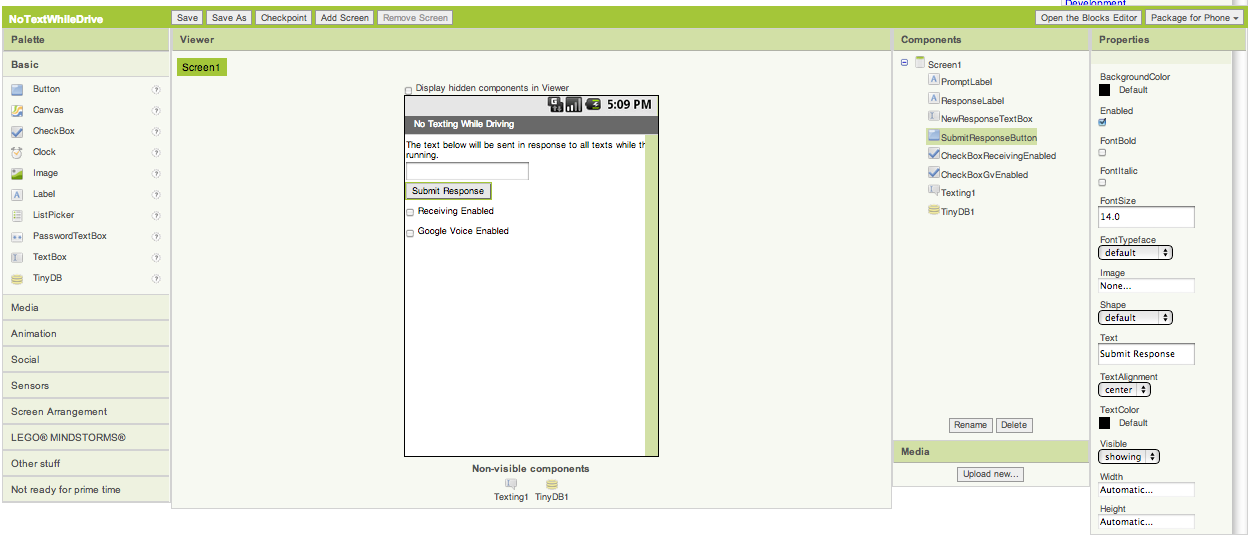
The components listed below were used to create the designer window shown above. Drag each component from the Palette into the Viewer and name it as specified below:
| Component Type | Palette Group | What you'll name it | Purpose of Component | Component Settings |
| Label | Basic | PromptLabel | Let the user know how the app works | Set the Text to "The text below will be sent in response to all texts while this app is running." |
| Label | Basic | ResponseLabel | Displays what text will be sent to incoming messages. | |
| TextBox | Basic | NewResponseTextbox | User will enter custom response here | Set the Hint to "Enter custom response." |
| Button | Basic | SubmitResponseButton | User clicks this to submit new response | Set the text to "Submit Response." |
| CheckBox | Basic | CheckBoxReceivingEnabled | Let the user choose if they want to receive messages. | |
| CheckBox | Basic | CheckBoxGvEnabled | Let the user choose if they want to respond using Google Voice. | |
| Texting | Social | Texting1 | The component that processes the texts | |
| TinyDB | Basic | TinyDB1 | The component that will store the response in the database |
Add behaviors to the components
NoTextWhileDriving has the following behaviors:
- When a text is received, the message displayed in ResponseLabel is sent as a text message response to the sender.
- When the user modifies the custom message in NewResponseTextbox and clicks the SubmitResponseButton , the new message is saved persisently in the phone's database.
- When the app begins, the custom message is loaded from the database into ResponseLabel.
1. Responding to a text
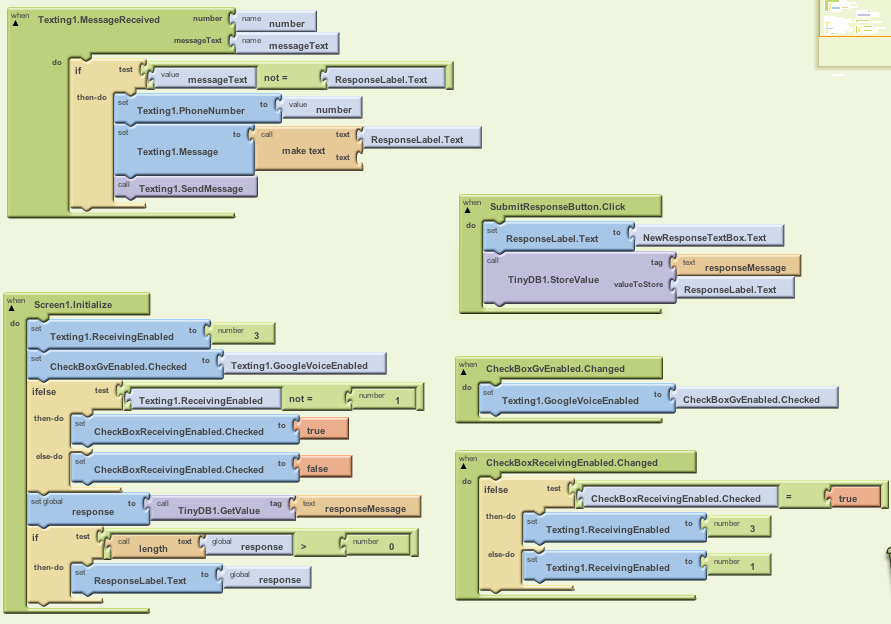
When a text message is received by the phone, the Texting.MessageReceived event is triggered. Your app should handle this event by setting the PhoneNumber and Message properties of the Texting component appropriately and sending the response text.
You'll need the following blocks:
| Block type | Drawer | Purpose |
| Texting1.MessageReceived | Texting1 | Event-handler triggered when the phone receives a text |
| set Texting1.PhoneNumber to | Texting1 | Set the PhoneNumber property before sending |
| value number | My Definitions | This is the phone number of the person who sent the text |
| set Texting1.Message to | Texting1 | Set the Message property before sending |
| ResponseLabel.Text | ResponseLabel | This is the message the user has entered |
| Texting1.SendMessage | Texting1 | Send the message |
The blocks should look like this:

How the Blocks Work
When the phone receives any text message, the Texting1.MessageReceived event is triggered. The phone number of the sender is in the argument number, and the sender's message is in the argument messageText.
In response, the app sends a text message to the sender. To send a text, the app sets the two key properties of the Texting component: PhoneNumber and Message. Texting.PhoneNumber is set to the number of the sender, and Texting.Message is set to the text in ResponseLabel -- this might be the default, "I'm driving right now, I'll contact you shortly.", or the user may have modified it. Once these properties are set, Texting1.SendMessage is called to actually send the response text message.
The if block prevents the app from sending the automatic reply if it receives its own message. This would happen, for example, if the user is texting their own number to test the app.
Test the behavior. You'll need a second phone to test this behavior. From the second phone, send a text to the phone that is running the app. You can set up one phone with Google Voice or start two emulators to communicate with one another to test this behavior. Does the second phone receive the response text? If that works, try modifying the response message and sending another message from the second phone. Is the new response sent?
2. Storing the custom response
The app so far works, but if you close the app and reopen it, the custom message will be lost. To make things more convenient for the user, store the custom response message they enter into a database using the TinyDB component.
TinyDB provides two blocks: StoreValue and GetValue . The former allows you to store a tagged piece of information, while the latter let's you retrieve one.
You'll need the following blocks to store the custom message:
| Block type | Drawer | Purpose |
| SubmitResponseButton.Click | SubmitResponseButton | User clicks this button to submit new response message |
| ResponseLabel.Text | ResponseLabel | Sets the response to be what the user inputs. |
| NewResponseTextbox.Text | NewResponseTextbox | The response message entered by the user is here |
| TinyDB1.StoreValue | TinyDB1 | Store the custom message in the phone's database |
| text ("responseMessage") | Text | Use this as the tag for the data |
| ResponseLabel.Text | ResponseLabel | The response message entered by the user is displayed here after the user submits their new response. |
The blocks should look like this:
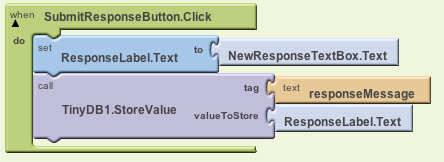
How the Blocks Work
When the user clicks the SubmitResponseButton, the app will store the response message entered by the user as the shown text that will be sent. The text in this label (ResponseLabel.Text) will be stored in TinyDB. The text responseMessage is used as a tag to uniquely identify the information-- later, you'll use that same tag to retrieve the message from the database.
3. Retrieving the saved response message
Program the Screen1.Initialize event-handler so that the saved custom response message is retrieved from the database and placed in ResponseLabel. Check the retrieved data to make sure there's something there-- after all, the first time the app is used, the database will not have any message saved. If there is a stored message, place it in the ResponseLabel so that the user can see it and so that it will be used to respond to incoming texts.
You'll need the following blocks:
| Block type | Drawer | Purpose |
| def variable ("response") | Definitions | A temporary variable to hold the retrieved data |
| text (blank) | Text | Initial value for the variable can be anything |
| Screen1.Initialize | Screen1 | This is triggered when app begins |
| Texting1.ReceivingEnabled | Texting1 | Sets the app so that it receives SMS text messages |
| number (3) | Number | The app is initialized to receive text messages while the app is running or when it's not |
| CheckBoxGvEnabled.Checked | CheckBoxGvEnabled | Sets status of the Google Voice Enabled checkbox |
| Texting1.GoogleVoiceEnabled | Texting1 | If Google Voice is enabled, SMS messages will be sent over Google Voice |
| if else test | Control | To ask if texting should be enabled. |
| not= block | Math | Check if the retrieved value is not equal to (=) 1 |
| Texting1.ReceivingEnabled | Texting1 | Lets the user decide whether or not the app will received SMS messages |
| CheckBoxReceivingEnabled.Checked(x2) | CheckBoxReceivingEnabled | Sets status of the Receiving Enabled checkbox. |
| true | Logic | Sets the app to receive text messages |
| false | Logic | Sets the app to not receive text messages |
| set Response | Definitions | Sets the variable to the value retrieved from db. | TinyDB1.GetValue | TinyDB1 | Get the stored response text from the database |
| text ("responseMessage") | Text | Plug into tag slot of GetValue, make sure text is same as was used in StoreValue above |
| if test | Control | To ask if the retrieved value has some text |
| > block | Math | Check if length of retrieved value is greater than (>) 0 |
| length test | Text | Check if length of retrieved value is greater than 0 |
| global response (x2) | My Definitions | This variable holds the value retrieved from GetValue |
| number (0) | Math | To compare with length of response |
| set ResponseLabel.Text to | Message | If we retrieved something, place it in ResponseLabel |
The blocks should look like this:
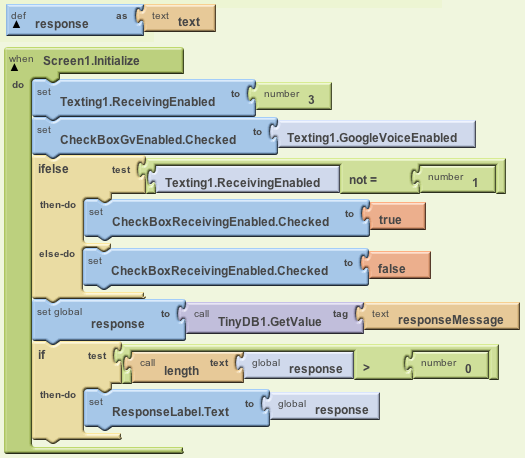
How the Blocks Work
When the app begins, the Screen1.Initialize event is triggered. The app calls the TinyDB1.GetValue with a tag of responseMessage-- the same tag used when you stored the user's entry earlier. The resulting value is placed in the variable response. When the app starts, we set the Texting component to have receiving enabled, but not Google Voice, which is displayed on the user interface. ReceivingEnabled takes a number value 1 (receiving disabled), 2 (receiving enabled while app is running), or 3 (receiving enabled when app is running and is not running)
The variable response is used so that the value returned from the database can be checked. If it has a length of 0, then there was no database entry with a tag of responseMessage-- something that will occur the first time a user runs this app. But if the length is greater than 0, the app knows that a custom response has been stored previously, and the retrieved value can be placed in the ResponseLabel which the user will see and which is used as the message for any response texts sent.
Test the app. Enter a new response message in the NewResponseTextbox and click the SubmitResponseButton. Then restart the app by clicking the Restart App button in the Blocks Editor. This will cause the app to re-initialize just like it will when a user closes the app and reopens it later. Does the custom message you entered appear?
Selecting Response Settings
The user interface has two checkboxes that the user can toggle: whether Receiving is enabled and whether Google Voice is enabled. The first allows the user to decide whether or not they want to be receiving messages. The second lets the user decide if they want to send messages from their own phone number or from a Google Voice account. When the user toggles these switches, the changes are communicated to the Texting component which enables or disables these properties as marked.
You'll need the following blocks.
| Block type | Drawer | Purpose |
| CheckBoxGvEnabled.Changed | CheckBoxGvEnabled | Detects if the user toggles this control. |
| Texting1.GoogleVoiceEnabled | Texting1 | Sets whether or not Google Voice is enabled |
| CheckBoxGvEnabled.Checked | CheckBoxGvEnabled | Returns true or false value. | CheckBoxReceivingEnabled.Changed | CheckBoxReceivingEnabled | Detects if the user toggles this control. |
| if else block | Control | Checks whether or not receiving is enabled. |
| = block | Math | Checks whether or not receiving is enabled. |
| true | Logic | Checks whether or not receiving is enabled. |
| CheckBoxReceivingEnabled.Checked | CheckBoxReceivingEnabled | Returns true or false value. |
| Texting1.ReceivingEnabled(x2) | Texting1 | Sets whether or not receiving is enabled. |
| number(1) | Math | Sets ReceivingEnabled as false. |
| number(3) | Math | Sets ReceivingEnabled as true. |
The blocks should look like this:
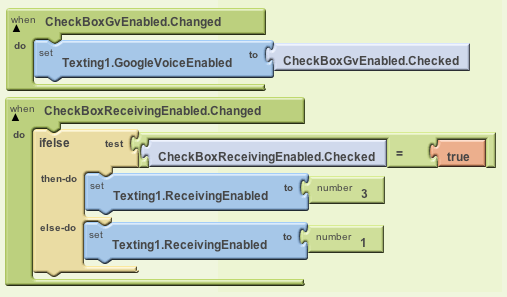
Test the app. Try texting your Android device when the "Receiving Enabled" is checked and then when it is not checked. Do you receive texts when it is unchecked? Try texting over Google Voice. If any of these features aren't working like you expect them to, go back and look at the blocks again!
No Text While Driving, Final Program
Variations
Once you get the No Text While Driving app working, you might want to explore some variations. For example,
- Write a version that speaks the received texts aloud. You'll need to use the TextToSpeech component.
- Write a version that lets the user define custom responses for particular phone numbers.
- Write a version that sends custom responses based on the user's location (e.g., I'm in church...)
Review
Here are some of the ideas covered in this tutorial:
- The Texting component can be used both to send text messages and process the ones that are received.
- The TinyDB component is used to store information persistently, in the phone's database, so that it there each time the app is opened.
Scan the Sample App to your Phone
Scan the following barcode onto your phone to install and run the sample app.

Download Source Code
If you'd like to work with this sample in App Inventor, download the source code to your computer, then open App Inventor, go to the My Projects page, and choose More Actions | Upload Source.
MIT and Google are grateful to Professor David Wolber, CS Professor at The University of San Francisco, for developing this tutorial.

Done with No Text While Driving? Return to the other tutorials here.
MIT App Inventor


This work is licensed under a Creative Commons Attribution-ShareAlike 4.0 International License.
Terms of Service and Privacy Policy
Other inquiries: Email
GitHub: mit-cml
Accessibility: accessibility.mit.edu


