Map Tour Part 2
What You're Building
This tutorial extends the MapTour app described in a previous tutorial. Whereas that app launched Maps with simple search terms, this app will launch specific maps showing zoomed in views of the Eiffel Tower and Louvre, and a street view map of Notre Dame. You'll learn more sophisticated use of the ActivityStarter and ListPicker component and you'll learn in general how to add links to specifically chosen maps to your apps.
Getting Started
Connect to the App Inventor web site, SaveAs the MapTour app into MapTourSpecific, and also set the screen's Title to Map Tour Specific. Open the Blocks Editor and connect to the phone.
Introduction
As in Part I, this app will use Parisian landmarks for the destinations. When the user chooses one, Google Maps will still be launched, but instead of a simple search, it will display a specific zoomed or street-view map of the destination.
The general idea is to first use Google Maps to find or create topic-specific maps, then use App Inventor to integrate these maps into an informational app you are building.
The tutorial covers more sophisticated use of the following App Inventor components:
- TheActivityStarter component for launching Android apps from your app.
- The ListPicker component for allowing the user to choose from a list of choices.
Set up the Components
The user interface for MapTourSpecific is exactly the same as in Part 1 of this tutorial. You can also leave the properties of ActivityStarter exactly the same.
Finding the DataUri for specific maps
The key to this application is finding the maps you want to show and setting the ActivityStarter.DataURI property accordingly for each of the landmarks. The maps for this sample were found in the following way:
- On your computer, browse to maps.google.com
- Search for a landmark (e.g., Eiffel Tower)
- Zoom in to the level you desire, perhaps choosing Street View.
- Click on the Link button near the top-right of the Maps window and copy the URL for the map. You'll use this URL or parts of it to launch a map from App Inventor.
Using this scheme, the following Maps URLs were discovered:
| Landmark | Maps URL |
| Eiffel Tower |
http://maps.google.com/maps?f=q&source=s_q&hl=en&geocode=&q=eiffel+tower&sll=37.0625,-95.677068
&sspn=48.909425,72.333984&ie=UTF8&hq=Tour+Eiffel&hnear=Tour+Eiffel,+Quai+Branly,+75007+Paris,+Ile-de-France,+France&ll=48.857942,2.294748&spn=0.001249,0.002207&t=h&z=19 |
| Musee Louvre |
http://maps.google.com/maps?f=q&source=s_q&hl=en&q=louvre&sll=48.86096,2.335421&sspn=0.002499,0.004415&ie=UTF8&t=h&split=1
|
|
Notre Dame,
|
http://maps.google.com/maps?f=q&source=s_q&hl=en&q=french+landmarks&sll=48.853252,2.349111&sspn=0.002411,0.004415
|
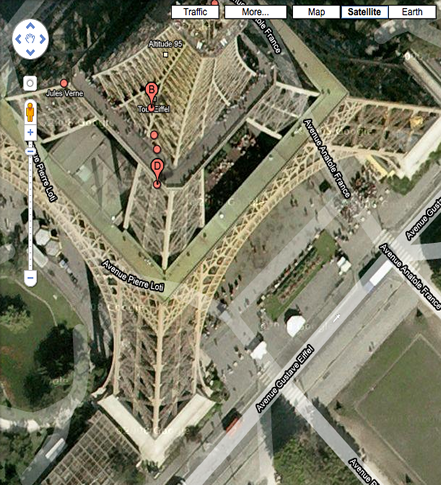
To see what these maps look like, paste the URLs above into a browser. The first two are regular maps zoomed in, while the last is a street view.
MapTourSpecific allows the user to choose one of these landmarks from a list and see the corresponding map appear on the phone. You'll need to use the data in the URLs of the maps above to set the DataUri of the ActivityStarter. You can either use an entire URL as the DataUri, or use the latitude and longitude data from a URL, placing it into the DataUri in the following format:
geo:latitude, longitude
For instance, you could show the Eiffel Tower map with the following:
geo:48.857942,2.294748?t=h&z=19
The "t=h" parameter specifies that the map is a hybrid showing both satellite and address views. The "z=19" sets the zoom level. Note that the latitude and longitude numbers come from the "ll" parameter of the URL shown above.
You can also place the entire URL of a map into the ActivityStarter.DataUri property. This technique will be used for the third map (the map of Notre Dame).
Defining the dataUri List
You'll need a list named dataURIs, one for each of the maps you want to show. Create this list so that the items correspond to the items in the destinations list-- the first dataURI should correspond to the first destination (Tour Eiffel) and so on. The list should look like this:

The first two items shown are DataURIs for the Eiffel Tower and the Louvre. They both use the "geo:" prototcol. The third DataURI is not shown completely as the block is too long for this page. You should copy this URL from the entry for "Notre Dame, Street View" in the table above and place it in a text block.
Modify the ListPicker.AfterPicking Behavior
In Part I of this tutorial, the ListPicker.AfterPicking Behavior set the DataUri to the concatenation of "geo:0,0?q=" and the destination the user chose from the list, e.g., Tour Eiffel. In this second part, the AfterPicking behavior must be more sophisticated. Specifically, when the user chooses one of the items from the ListPicker, you need to know the index of the choice. You can then use that index to select the correct DataUri from the dataURIs list.
You'll need the following blocks:
| Block Type | Drawer | Purpose |
| def variable ("index") | Definitions | this variable will hold the index of the user's choice |
| number(1) | Math | initialize the index variable to 1 |
| ListPicker1.AfterPicking | ListPicker1 | this event is triggered when the user chooses an item |
| set index to | My Definitions | set this variable to the position of the selected item |
| position in list | Lists | gets the position (index) of a selected item |
| ListPicker1.Selection | ListPicker1 | the selected item, e.g., "Tour Eiffel". Plug into the thing slot of position in list. |
| global destinations | My Definitions | plug this into the list slot of position in list |
| set ActivityStarter.DataUri | ActivityStarter | set this before starting activity to open map |
| select list item | Lists | need to select an item from the DataURIs list |
| global DataURIs | My Definitions | the list of DataURIs |
| global index | My Definitions | this variable holds the position of the chosen item |
| ActivityStarter.StartActivity | ActivityStarter | launch the Maps app |
The blocks should look like this:

How the Blocks Work
When the user chooses an item from the ListPicker, the AfterPicking event is triggered. The chosen item, e.g., "Tour Eiffel" is in ListPicker.Selection . The event-handler first uses the position in list block to find the position of the selected item in the list of destinations. If "Tour Eiffel" is chosen, index will be 1, if "Musee du Louvre" is chosen, index will be 2", and if "Cathedrale Notre Dame" is chosen, index will be 3.
The index is then used to select an item from the other list, dataURIs, and to set that entry as the ActivityStarter's DataUri. Once this is set, the map can be launched with ActivityStarter.StartActivity.
Test this behavior. On the phone, click the button labeled "Choose Destination". The list picker should appear with the three items. Choose one of the items and see what map appears.
Final Blocks
This is what your final app should look like. Note that the url for NotreDame is too long to fit completely in the image.
Review
Here are some of the ideas covered in this tutorial:- The ListPicker component lets the user choose from a list of items. The Elements property holds the list, the Selection property holds the selected item, and the AfterPicking event is triggered when the user chooses. You can also identify the index of the chosen item by calling position in list to find the position of Selection in the list.
- The ActivityStarter component allows your app to launch other apps. Maps is one such application-- you can launch it and provide a DataUri which specifies the specific map to open. That DataUri can be the URL of a specific map, or it can be a query for specific search terms.
Scan the Sample App to your Phone
Scan the following barcode onto your phone to install and run the sample app.

Download Source Code
If you'd like to work with this sample in App Inventor, download the source code to your computer, then open App Inventor, go to the My Projects page, and choose More Actions | Upload Source.
MIT App Inventor


This work is licensed under a Creative Commons Attribution-ShareAlike 4.0 International License.
Terms of Service and Privacy Policy
Other inquiries: Email
GitHub: mit-cml
Accessibility: accessibility.mit.edu


