Bouncing Ball - Experimenting with Ball Sprite’s Heading
What you're building
By building the Bouncing Ball App you will discover how sprite headings work in App Inventor. You'll program a ball sprite to change heading when the player flings the ball or when the ball bounces off of one of the four walls. This tutorial shows how to use the BallSprite component and some of its methods (Bounce, Heading).
Getting Started
Connect to the App Inventor web site and start a new project. Name it BouncingBall, and also set the screen's Title to "BouncingBall". Open the Blocks Editor and connect to a device or emulator.
Introduction
This tutorial introduces the following skills, useful for future game development:
- Using the Ball Sprite.
- Using sprite heading as a feature in a game.
- User-initiated events flinging the ball in a new direction across the screen
- Automatic events making the ball "bounce" off the wall
Set up the Components
Use the component designer to create the interface for BouncingBall. When you finish, it should look something like the snapshot below (more detailed instructions below the snapshot).
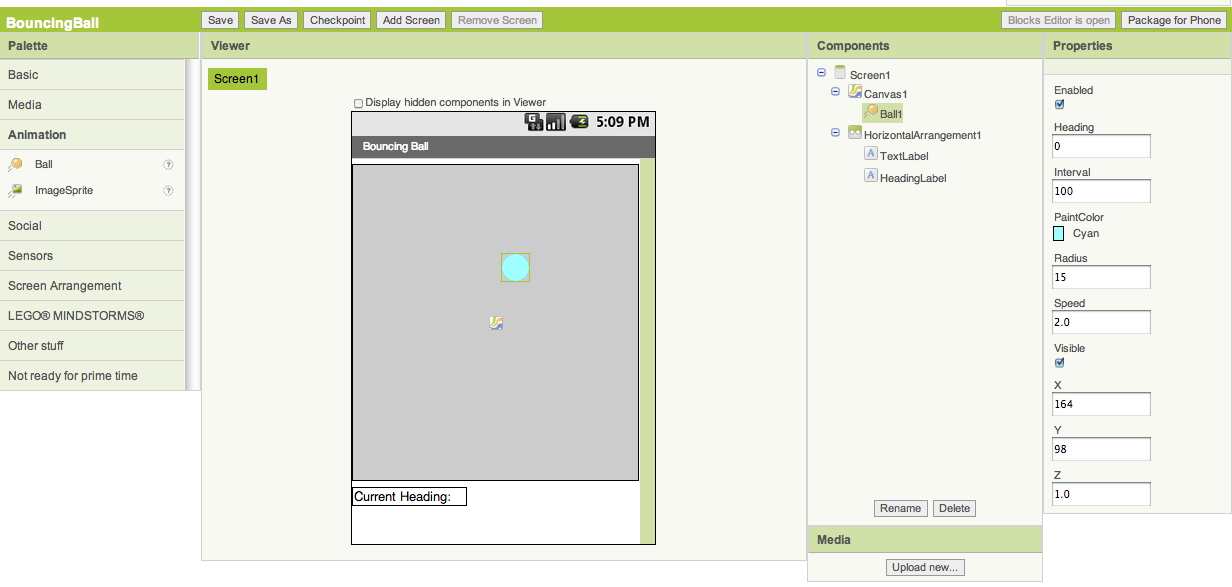
To create this interface, put the following components into the Designer by dragging them from the Component Palette into the Viewer.
| Component Type | Palette Group | What you'll name it | Purpose of Component |
| Canvas | Basic | Canvas1 | The background of the game |
| Ball | Animation | Ball1 | The ball sprite Note: sprites can only be placed on top of a canvas, not directly onto the screen. |
| HorizontalArrangement | Screen Arrangement | HorizontalArrangement1 | Organizes TextLabel and HeadingLabel horizontally |
| Label | Basic | TextLabel | Contains the words "Current Heading" |
| Label | Basic | HeadingLabel | Shows the value of the heading |
| Component | Action |
| Ball1 | Set its Radius property to 15. Change the Speed property to 8. |
| TextLabel | Change Text property to "Current Heading: ". On the Viewer screen, move this label into HorizontalArrangement1. |
| HeadingLabel | Change Text property to " " (blank). On the Viewer screen, move this label into HorizontalArrangement1. |
Component Behaviors and Event Handlers
We want actions to happen after two different events: the ball hitting a wall and the ball being flung by the user. Each time the ball changes direction we want the heading label to be updated. To implement all three of these features, we will use the Ball1.Flung event handler, the Ball1.EdgeReached event handler, and create a new procedure called UpdateLabel.
Defining a New Procedure: UpdateLabel
Define a new procedure that updates the heading in the HeadingLabel. Drag out a new procedure block and name it UpdateLabel.
Build the UpdateLabel procedure. The completed blocks should look like this:

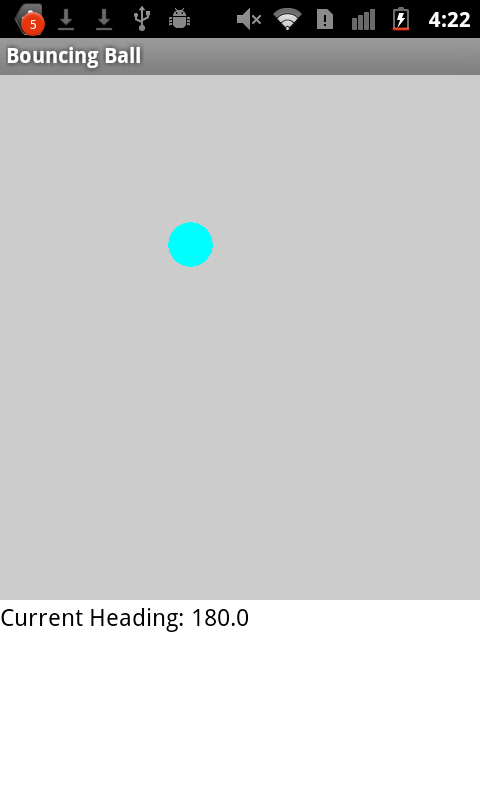
Leave the arg socket open because UpdateLabel does not take any input (also called arguments). Observe how the blocks fit together. UpdateLabel sets the HeadingLabel.Text to the value of Ball1's heading. Heading is a number that represents the direction in degrees of the path that ball is following.
Headings start at 0 degrees at the right side, positive x-axis as in the diagram shown below, and continue to 360 degrees. If you've taken Geometry, this is how the unit circle assigns degrees. When you start playing with the app watch how the numbers change and see if you can make sense of how heading is represented by the numbers you see.

Add A Ball Fling Handler
The ball should change direction when the player flings it. The ball's new direction will be in the same direction as the fling gesture.
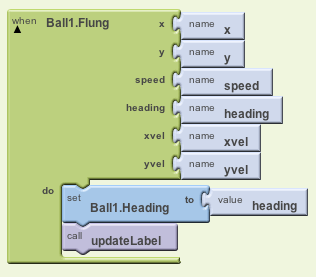
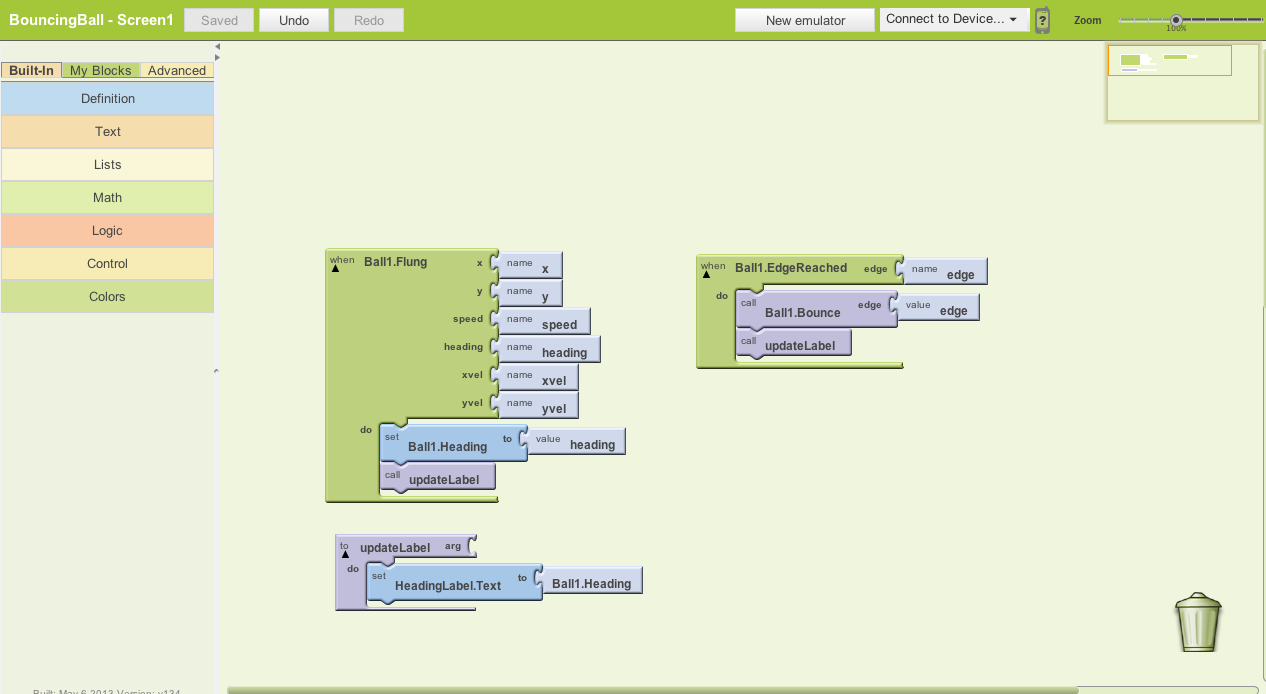
Drag out a Ball1.Flung block. Notice how this block provides arguments for x, y, xvel, yvel, heading, and speed of the fling. We want to update the heading of the ball to whatever heading is reported by the Flung event. When a fling happens, we also want to update the heading number displayed on screen by calling UpdateLabel.
Assemble the blocks as shown.
Add A Ball Edge Reached Handler
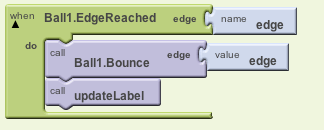
The ball should change direction when it hits one of the four walls, also called "edges". Ball sprites have a method called Ball1.EdgeReached. This block provides an "argument" (a piece of information passed along from the method) that says which edge has been reached. Ball1 also has a method called Ball1.Bounce which takes in an edge argument as input and also changes the heading of the ball to make it bounce appropriately. We will use both of these blocks to update the heading. We also need to update the heading label by calling UpdateLabel.
Here's what it looks like in blocks. Go ahead and assemble the blocks as shown.
Complete Program
Here's the complete BouncingBall program.
Package the final version of the app by choosing Package For Phone | Barcode from the Component Designer menu. When the barcode appears, use the barcode scanner on your phone to download and install the app.
Variations
Once you get this program running, you may want to do the following additional features to extend it. For example,
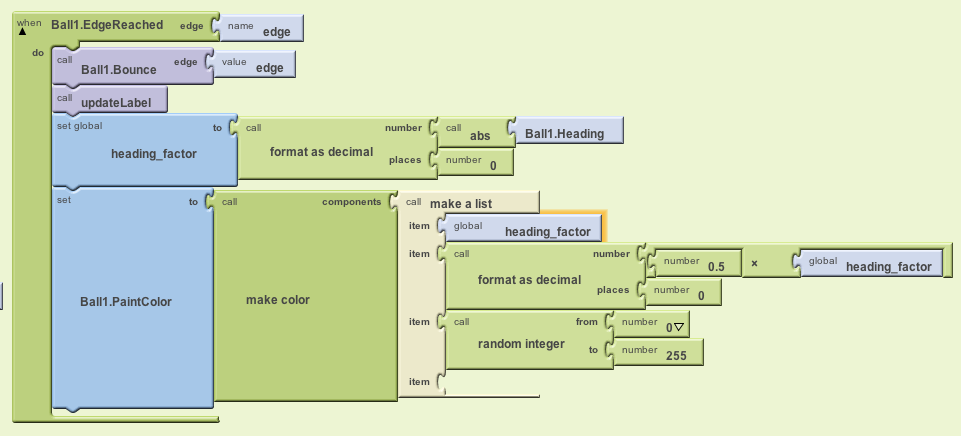
- Add a feature that changes the ball's color based on the value of the heading. For help, look at the screenshot of blocks available here
- Choose a random new heading when the user touches the ball (use the Ball.Touched method, rather than the Ball.Flung method).
- Add additional balls and make something happen whenever two balls collide by using the Ball1.CollidingWith block
- Experiment changing the speed when a user touches or flings a ball.
Scan the Sample App to your Phone
Scan the following barcode onto your phone to install and run the sample app.

Download Source Code
If you'd like to work with this sample in App Inventor, download the source code to your computer, then open App Inventor, go to the My Projects page, and choose More Actions | Upload Source.
Done with BouncingBall? Try following the Mini Golf tutorial where you can experiment with heading even more. Return to to the other modules here or the tutorials here.MIT App Inventor


This work is licensed under a Creative Commons Attribution-ShareAlike 4.0 International License.
Terms of Service and Privacy Policy
Other inquiries: Email
GitHub: mit-cml
Accessibility: accessibility.mit.edu


