Mole Mash V2 with Sprite Layering
What You're Building

This tutorial shows you how to build a game similar to the Whac-A-Mole™ arcade game. The goal is to tap a mole that randomly pops out of one of five fixed holes. Every time you succeed, your score is increased by one point.
In order to highlight App Inventor features Any Component and ImageSprite Z-layering, this app takes a slightly different approach than the original Mole Mash tutorial, which you do not need to have completed in order to complete this one. You should, however, be familiar with the basics of App Inventor, using the Designer to build a user interface and using the Blocks Editor to code an app's behavior. If you are not familiar with the basics, try stepping through some of the basic tutorials before continuing.
Introduction
This tutorial includes:
- Adding components in the Designer
- Using Any Component functionality to get and set properties of ImageSprite components
- Controlling game play with the Clock component
- Using Sprite Z-layering to ensure that one ImageSprite appears in front of another
Getting Started
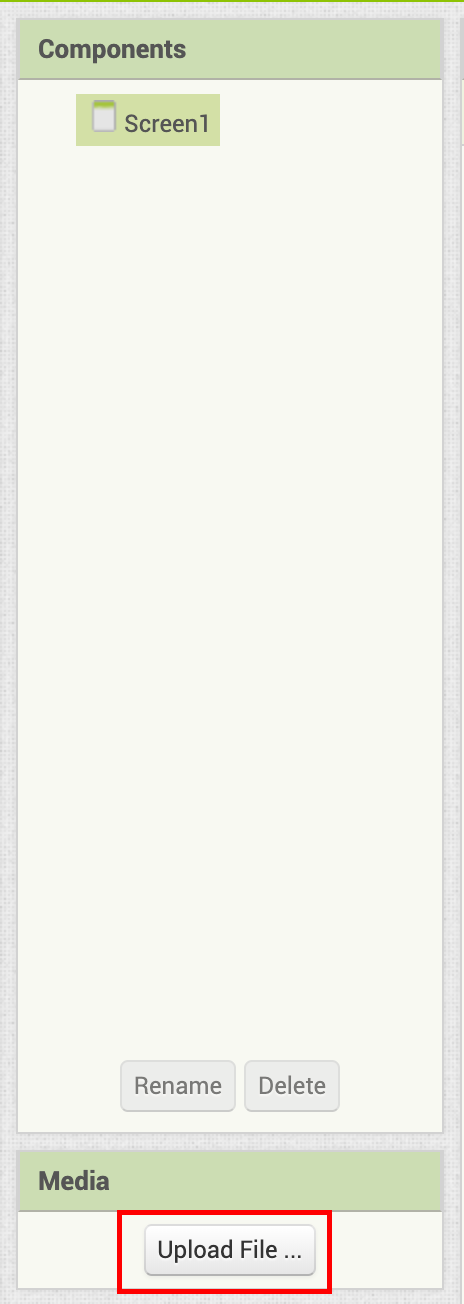
Open ai2.appinventor.mit.edu and start a new project. Set the screen's Title property to an appropriate name, such as "Mole Mash". Download the image files below (created by Yun Miao) to your computer by right-clicking on them, and then add them to your project by pressing the "Upload File ..." button in the Media pane.
Hole: 
Mole: 
Set up the Components
The user interface will contain a total of 6 ImageSprites: 5 unmoving holes and 1 mole. The mole will move on top of the holes. Use the Designer to create the user interface. When you are done, it should look something like the picture below. Don't worry about lining up the holes evenly. You will specify their locations through their X and Y properties. Additional instructions are below the image.
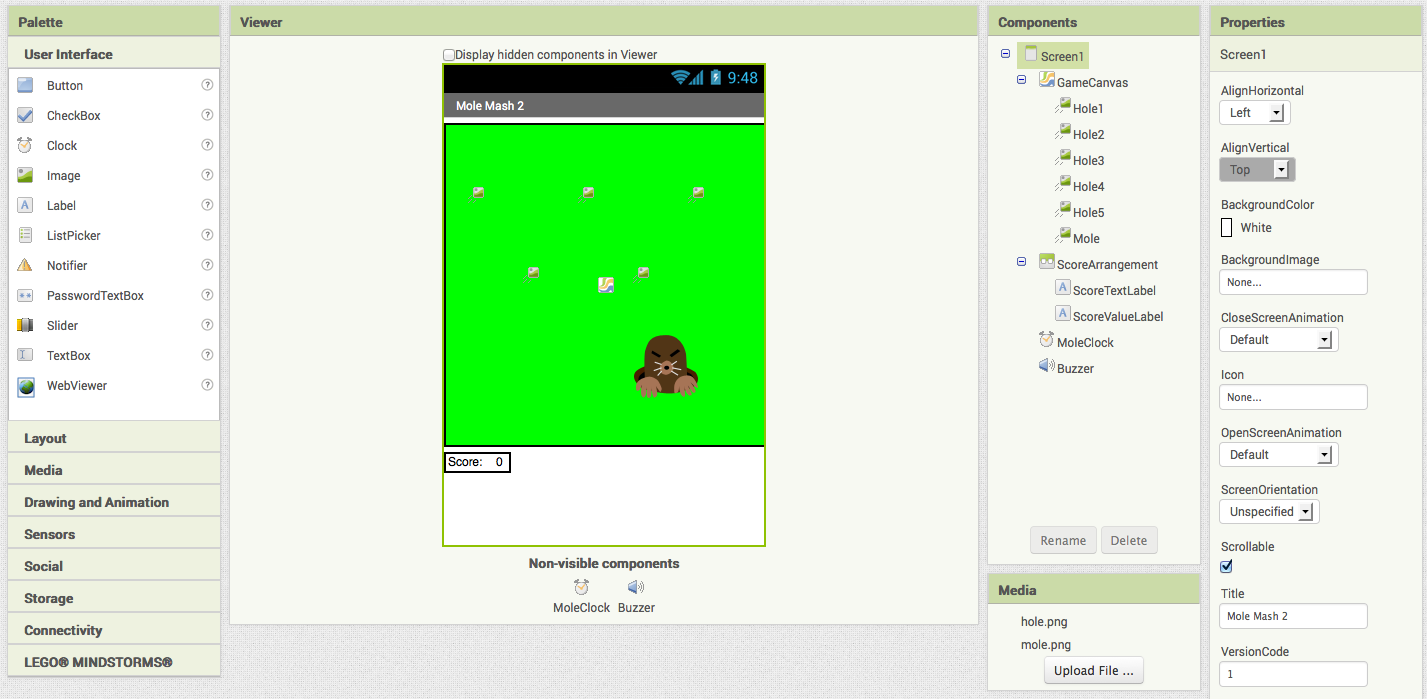
The following is the list of components you will add:
| Component Type | Palette Group | What you'll name it | Purpose of Component |
|---|---|---|---|
| Canvas | Drawing and Animation | GameCanvas | The game field |
| ImageSprite (5) | Drawing and Animation | Hole1 ... Hole5 | Holes from which the mole can appear |
| ImageSprite | Drawing and Animation | Mole | The mole |
| HorizontalArrangement | Layout | ScoreArrangement | To display the score |
| Label | User Interface | ScoreTextLabel | To hold "Score: " |
| Label | User Interface | ScoreValueLabel | To hold the score (# of times the mole was hit) |
| Clock | User Interface | MoleClock | To control the mole's movement |
| Sound | Media | Buzzer | To vibrate when the mole is touched |
Make the following changes to the components' properties:
| Component | Action |
|---|---|
| Canvas1 | Set BackgroundColor to Green. Set Width to 320 pixels. Set Height to 320 pixels. |
| Hole1 | Set X to 20 and Y to 60 (upper left). |
| Hole2 | Set X to 130 and Y to 60 (upper center). |
| Hole3 | Set X to 240 and Y to 60 (upper right) |
| Hole4 | Set X to 75 and Y to 140 (lower left). |
| Hole5 | Set X to 185 and Y to 140 (lower right). |
| Mole | Set Picture to "mole.png". Set Z to 2 so the mole appears in front of the other ImageSprites, which have the default Z value of 1. |
| ScoreTextLabel | Set Text to "Score: ". |
| ScoreTextValue | Set Text to "0". |
Don't worry now about setting the Picture property for the holes; we'll set the property in the Blocks Editor.
Add Behaviors to the Components
Here is an overview of what we need to create blocks to do:
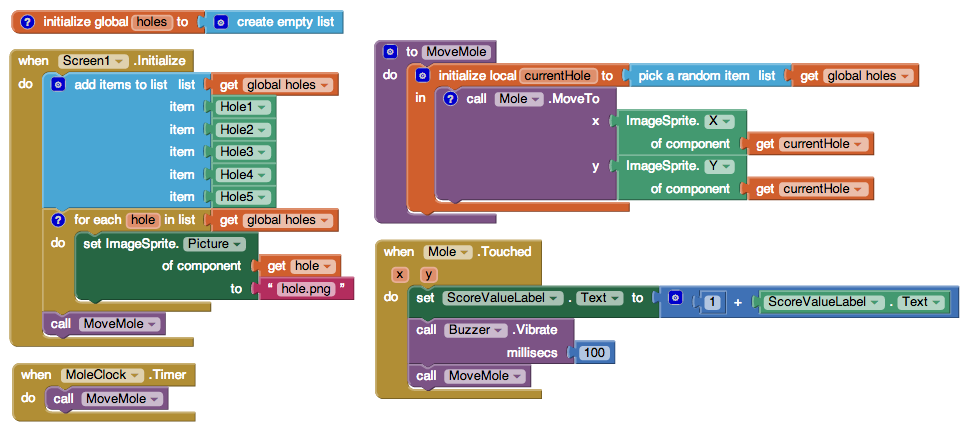
- Create global variable:
- holes: a list of hole ImageSprites
- When the app starts:
- Populate the list of holes.
- Set each hole's Picture property to "hole.png".
- Move the mole randomly to a hole.
- Create a procedure MoveMole to:
- Set local variable currentHole to a random hole from the list holes.
- Move the mole to the location of currentHole.
- When MoleClock.Timer triggers:
- Call MoveMole to move the mole randomly.
- Implement a handler that does the following when the mole is touched:
- Add one to the score.
- Make the phone briefly vibrate.
- Call MoveMole.
To proceed, switch to the Blocks Editor.
Creating Variables
Create the variable and name it holes. For now, we will give it a "dummy" initial value of an empty list. We'll set the real initial value in the Screen1.Initialize event handler, which gets executed each time the app loads the screen. Here is a picture and list of the blocks you will need:

| Block type | Drawer | Purpose |
|---|---|---|
| initialize global holes to | Variables | Hold a list of hole ImageSprites. |
| create empty list | Lists | Create an empty list, to be filled in when the program starts. |
Comments (created by right-clicking on a block) are encouraged but not required.
Starting the App
The first event to occur in any app is Screen1.Initialize, so we will put start-up code in that handler. Specifically, we will add the hole components to the list holes, set each hole's Picture property to "hole.png", and call MoveMole. Since we have not yet written MoveMole, we will create an empty procedure with that name, which we will fill in later.
Below are a table of the blocks you need to create. Note that the "Any ImageSprite" drawer is found under the "Any component" tab at the bottom of the list of Blocks in the Blocks Editor.
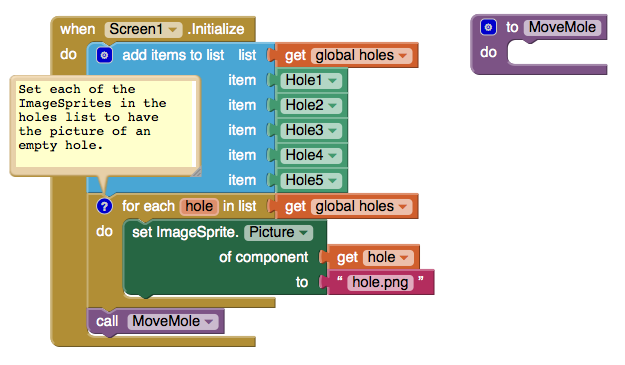
| Block type | Drawer | Purpose |
|---|---|---|
| Screen1.Initialize | Screen1 | Specify what should happen when the app starts. |
| add items to list | Lists | Add the following values to ... |
| get global holes | Variables | ...the list of holes |
| Hole1 | Hole1 | -the upper left hole |
| Hole2 | Hole2 | -the upper center hole |
| Hole3 | Hole3 | -the upper right hole |
| Hole4 | Hole4 | -the lower left hole |
| Hole5 | Hole5 | -the lower right hole |
| for each hole in list | Control | Iterate through the holes list. |
| set ImageSprite.Picture of component ... to | Any ImageSprite | Set the Picture property of... |
| get global hole | Variables | ...the current hole ImageSprite |
| " " (hole.png) | Text | ...to the picture of the empty hole. |
| to procedure (MoveMole) | Procedures | Create a procedure, to be filled in later, for moving the mole. |
| call MoveMole | Procedures | Call MoveMole to make the first placement of the mole. |
Compare the for each block to the equivalent blocks that would be necessary without it:
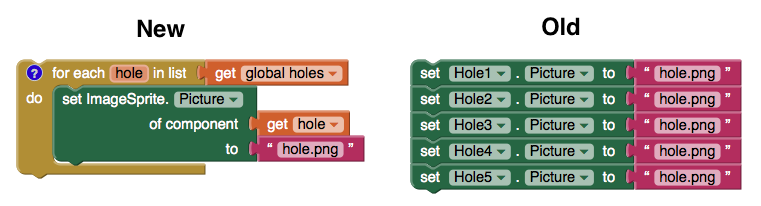
Not only is the left set of blocks shorter, it is less repetitious, sparing the programmer from semi-mindless copy-and-pasting and making it easier to modify, for example, if the name of the picture is changed.
Moving the Mole
Now let's fill in the body of the procedure MoveMole, which we'll call when the program starts, when the mole gets touched, and when our Timer goes off every second. The procedure should pick a random hole and move the mole on top of it. Here are the compiled blocks and a table of the blocks used:
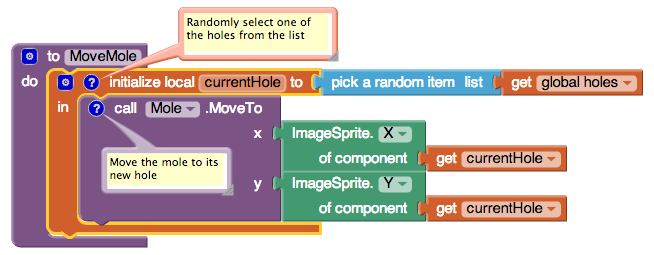
| Block type | Drawer | Purpose |
|---|---|---|
| initialize local currentHole to (there are two types of 'initialize local': take the one that fits the procedure block) |
Variables | Store the value of the current hole for use in the procedure. |
| pick a random item | Lists | randomly select a hole from the list |
| get global holes | Variables | list of hole ImageSprites |
| call Mole.MoveTo | Mole | Move the mole to the... |
| ImageSprite.X of component | Any ImageSprite | ..x-coordinate of... |
| get local currentHole | Variables | ...the chosen hole... |
| ImageSprite.Y of component | Any ImageSprite | ...and the y-coordinate. |
We now need to specify that MoveMole should be called whenever MoleClock's Timer goes off. We just need two blocks to accomplish that:
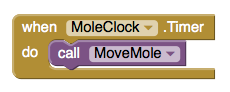
| Block type | Drawer | Purpose |
|---|---|---|
| when MoleClock.Timer | MoleClock | When the Timer goes off... |
| call MoveMole | Procedures | ...move the mole. |
Registering Touches
Finally, we need to specify what happens when the mole is touched. Specifically, we want to:
- Increment the score.
- Make the phone vibrate briefly.
- Move the mole.
We can easily translate these to blocks:
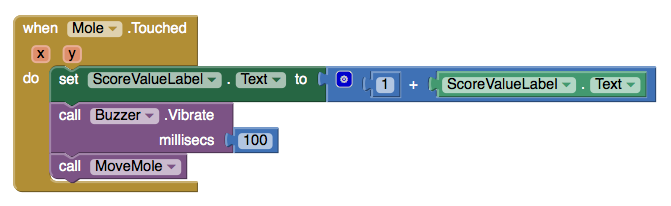
| Block type | Drawer | Purpose |
|---|---|---|
| when Mole.Touched | Mole | When the mole is touched... |
| set ScoreValueLabel.Text to | ScoreValueLabel | ...update the visible score to... |
| + | Math | ...the result of adding... |
| 1 | Math | ...1 [and]... |
| ScoreValueLabel.Text | ScoreValueLabel | ...the previous score. |
| call Buzzer.Vibrate | Buzzer | Make the phone vibrate for... |
| 100 | Math | ...100 milliseconds. |
| call MoveMole | Procedures | Move the mole to a new location. |
Final Program
Variations
Here are some variations you might want to implement:
- Adding a Reset button to set the score back to 0.
- Having the score depend not just on the number of hits but also the number of misses and escaped moles.
- Increasing the speed of the game of mole movement if the player is doing well and decreasing it if the player is doing poorly.
- Adding a second mole on a different timer.
You can see how to implement the first two variations in the original Mole Mash tutorial.
Review
Here are some of the concepts covered in this tutorial:
- Putting components in a List.
- Performing an operation on every component in a List using the for each block and Any Component features.
- Placing an ImageSprite on top of another, using their Z propertt to control which goes in front.
- Using the Clock component to control game play.
- Creating a procedure and calling it from multiple places.
Done with MoleMash 2? Return to the other tutorials here.
Scan the Sample App to your Phone
Scan the following barcode onto your phone to install and run the sample app.

Download Source Code
If you'd like to work with this sample in App Inventor, download the source code to your computer, then open App Inventor, click Projects, choose Import project (.aia) from my computer..., and select the source code you just downloaded.
MIT App Inventor


This work is licensed under a Creative Commons Attribution-ShareAlike 4.0 International License.
Terms of Service and Privacy Policy
Other inquiries: Email
GitHub: mit-cml
Accessibility: accessibility.mit.edu


