LEGO EV3 Pet Robot Tutorial
Click here for a version of this page on which you can comment.
For questions, comments, or suggestions, please contact: Lokhin Cheng, lcheng96@mit.edu
What it does:
Using voice commands, the user instructs an EV3 LEGO robot to do certain maneuvers and actions.
The user can pick one of several commands: forward, backward (reverse), stop, forward slow, forward fast, disconnect, circles, right turn (turn right), left turn (turn left).
The robot will follow the user’s voice commands and perform the action for half a second before prompting the user for another command. If the user provides no commands, the previous command will be executed until another command is registered.
Demonstration Video
What it teaches:
Teaches the programming concepts such as conditional statements with a LEGO EV3 robot.
Uses non-visible components such as Clock, SpeechRecognizer, BluetoothClient, Ev3Motors, and Ev3Sound.
Allows room for programmable extensions of this application for the Ev3 Robot.
Making the application in the Designer:
Drag a VerticalArrangement onto the Designer. This component will enclose all of your buttons and labels for the application.
Change the Height property to “Fill parent”. This makes the height of the VerticalArrangement as big as the user’s screen.
Change the Width property to “Fill parent”. This makes the width of the VerticalArrangement as big as the user’s screen.
Drag a Label onto the Designer and within the VerticalArranagement. This Label will be used to tell the user whether or not he or she is connected to the Ev3 Robot.
Rename the Label in the Component Tree to “ConnectLabel”.
Change the Width property to “Fill parent”. This makes the width of the Label as big as the user’s screen.
Change the Text property to “Not Connected”. I also changed the FontSize to 16 to make it more visible.
Change the TextAlignment property to “Center”.

Drag a ListPicker onto the Designer, within the VerticalArranagement and below the first Label. This component will show the application user the list of Bluetooth addresses and names to choose from.
Rename the ListPicker in the Component Tree to “ConnectListPicker1”.
Change the Width property to “Fill parent”.
Change the Text property to “Connect!”. Again, I changed the FontSize to 16 to make it more visible.
Change the TextAlignment property to “Center”.


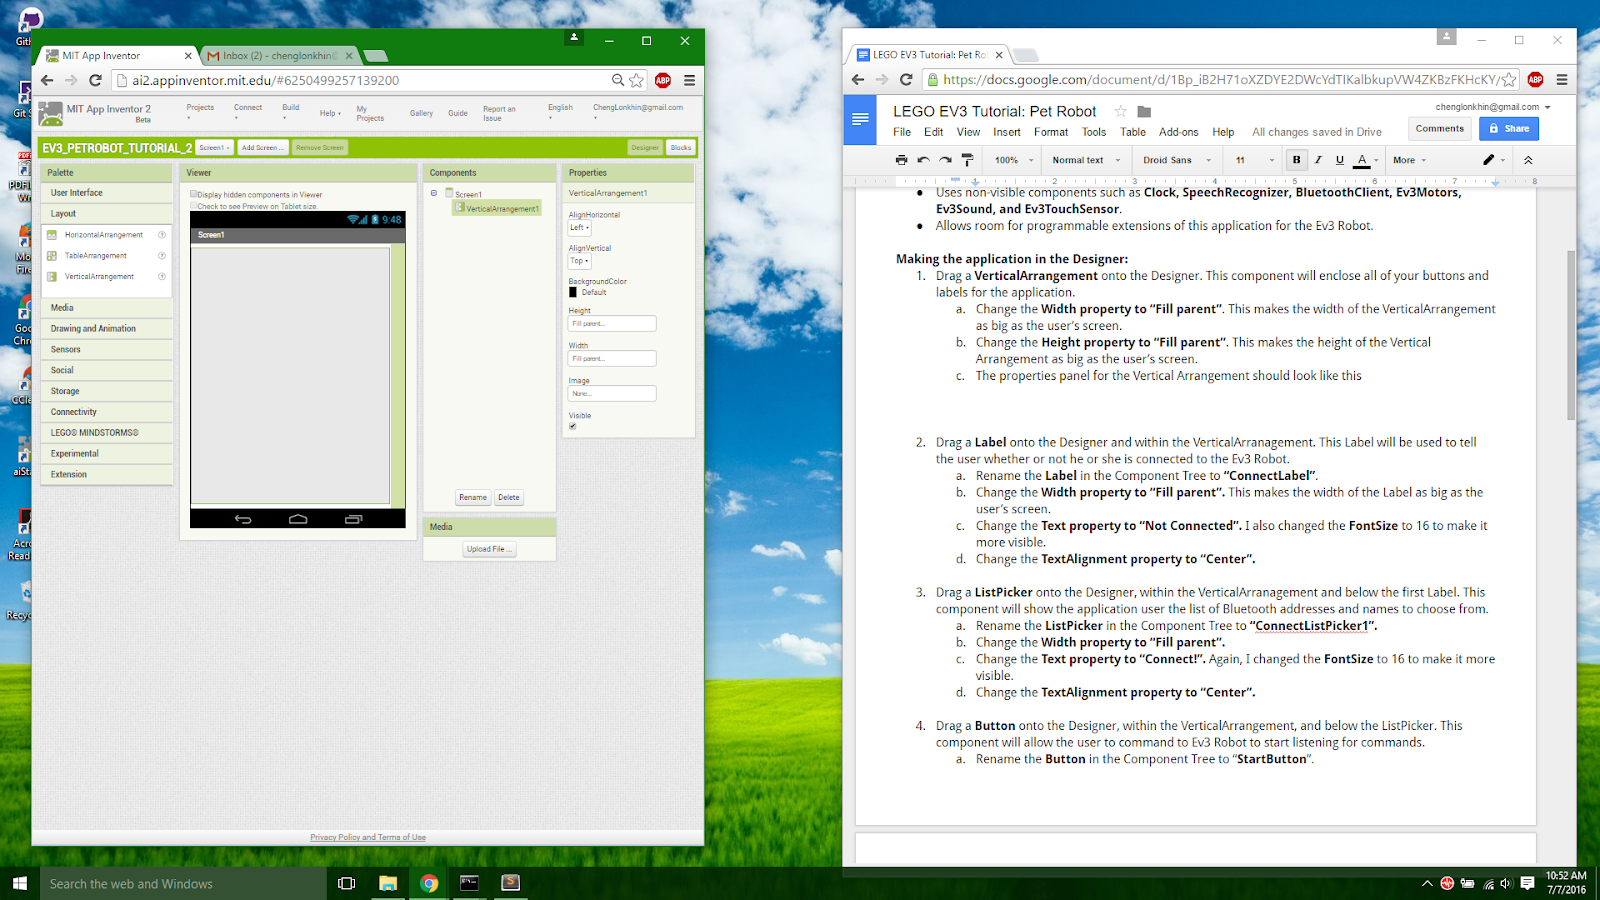
Drag a Button onto the Designer, within the VerticalArrangement, and below the ListPicker. This component will allow the user to command to Ev3 Robot to start listening for commands.
Rename the Button in the Component Tree to “StartButton”.
Uncheck the Enabled box in the Properties panel. This prevents the users from clicking the button before they connect to the robot.
Change the Width property to “Fill parent”.
Change the Text property to “Start Listening”. Again, I changed the FontSize to 16.
Change the TextAlignment property to “Center”.

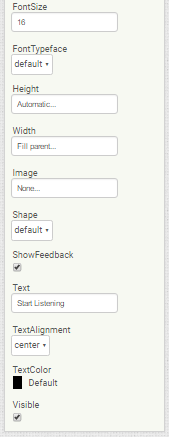
Drag another Button onto the Designer, within the VerticalArranagement, and below the Button created in Step 4. This component will allow the user to Disconnect the Ev3 Robot when they are finished commanding it.
Rename the Button in the Component Tree to “DisconnectButton”.
Uncheck the Enabled box in the Properties panel. This prevents the user from clicking the button to disconnect before they connected to the robot.
Change the Width property to “Fill parent”.
Change the Text property to “Disconnect”. Again, I changed the FontSize to 16.
Change the TextAlignment property to “Center”.

Finally, drag a Label onto the Designer, within the VerticalArranagement, and below the Button placed earlier. This component will indicate the action that the Ev3 Robot is currently performing.
Rename the Label in the Component Tree to “ListeningLabel”.
Change the Width property to “Fill parent”.
Change the Height property to “Fill parent”.
Change the Text property to “Not Listening…”. Again, I changed the FontSize to 16.
Change the TextAlignment property to “Center”.

Optional Step: Place another Label within the Vertical Arrangement and above the label created in Step 6. This label will be used for information such as listing the commands that the user voice to control the robot.
Rename the Label in the Component Tree to “InformationLabel”.
Change the Width property to “Fill parent”.
Change the Height property to “Fill parent”.
Change the Text property to whatever commands you want to program. For this application, I’ve programmed to robot to move forward, backward, faster, slower, turn left, turn right, stop, and disconnect, so I changed the text property to “Commands: Forward, Backward (Reverse), Fast Forward, Forward Slow, Left Turn, Right Turn, Stop”. Again, I changed the FontSize to 16.
Change the TextAlignment property to “Center”.

That’s it for the visible components of the application. All that is left to do for the Designer is to add the Non-visible components. All the Non-visible components of the application will appear under the Screen.
Drag a SpeechRecognizer (in the Media category of the Palette) onto the Designer. This component will allow the user to speak into the application and have the command converted to text.
Drag a BluetoothClient (in the Connectivity category of the Palette) onto the Designer. This component will allow the Ev3 Robot to connect with the application.
Drag a Clock (in the Sensors category of the Palette) onto the Designer. This component will ensure that the robot will ask for a command in a given interval of time.
Uncheck the TimeAlwaysFires box.
Uncheck the TimerEnabled box.
Change the TimerInterval to 500. Note that TimerInterval is in milliseconds. This ensures that the clock will fire every half second (1000 millisecond is 1 second).
Drag a Ev3Motors (All of the Ev3 components are in the LEGO MINDSTORMS category of the Palette) onto the Designer. This component will instruct the motors on the Ev3 robot to move.
Choose BluetoothClient1 on the dropdown menu from BluetoothClient property.
Ensure that the MotorPorts property reflects what you have for your own Ev3. For this application and the robot that I have built, the MotorPorts are B and C. So, I put BC into the MotorPorts property.
Drag a Ev3Sound onto the Designer. This component will allow sound to be played from the Ev3 Robot.
Choose BluetoothClient1 on the dropdown menu from the BluetoothClient property.

The Designer, when all the components are completed, should be identical to the following:

Making the application in the Blocks Editor:
First, the blocks for the ConnectListPicker1 will be created. Drag out the “when ConnectListPicker1.BeforePicking do” event handler out of the ConnectListPicker1 drawer.
Open the same drawer to drag out the “set ConnectListPicker1.Elements to” block.
Complete the block by dragging out a BluetoothClient1.AddressesAndNames block into the empty socket.

This block will execute before the user picks an selection and set all the elements (or choices) in the listpicker to be all the Bluetooth Addresses that are picked up by the phone.
Now drag out a “when ConnectListPicker1.AfterPicking do” from the ConnectListPicker1 drawer event handler onto the workspace.
Open the Built-in Control drawer to drag out an “if then” block, placing it in the “do” section.
Open the BluetoothClient1 drawer to drag out the “call BluetoothClient1.Connect” method block and placing it in the “if” socket of the “if then” block.
Open the ConnectListPicker1 drawer to drag out the ConnectListPicker1.Selection block to complete the “call BluetoothClient1.Connect” method block by placing it in the address socket.
Open the StartButton drawer and drag out a “set StartButton.Enabled to” block and place it “then” section of the “if then” block. Complete the block by connecting a “true” block from the Built-in Logic drawer.
Open the ConnectLabel drawer to drag out the “set ConnectLabel.Text to” block in the “then” section of the “if then” block, below the “set StartButton.Enabled to block”. Complete the block by connecting a text block with the text “Connection Successful”.

This block, after the user decides on a selection, will connect to the Bluetooth Address that the user specifies, and once the connection is made, the block will enable the Start Button (so the user can command the robot to start listening) and changes the text from “Not Connected” to “Connection Successful”.
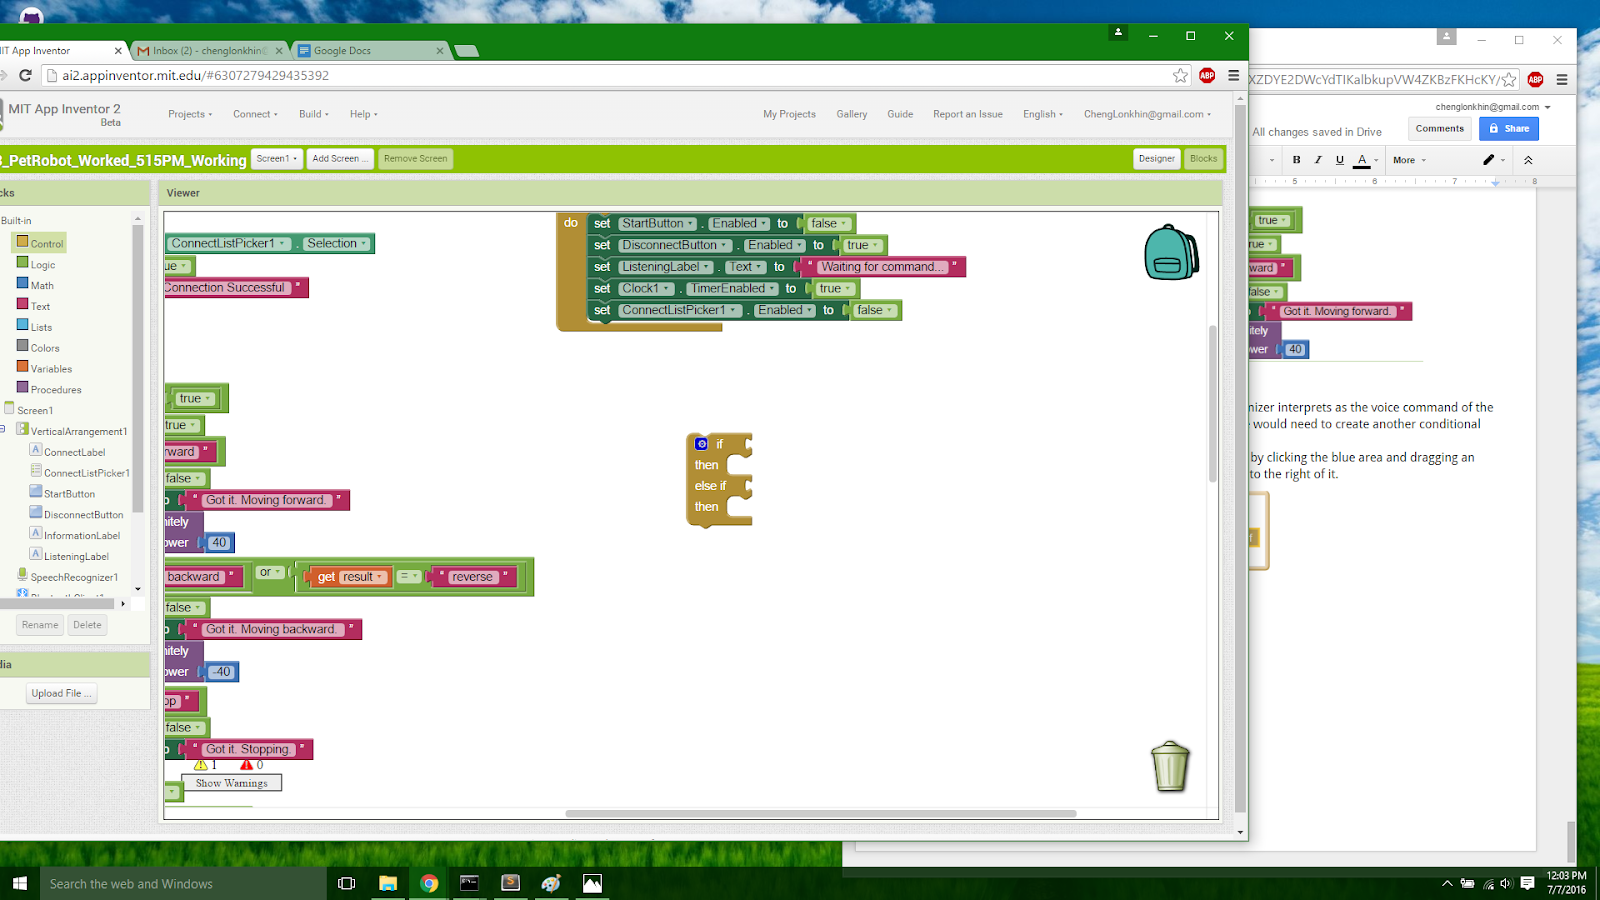
Now the StartButton will be programmed. Drag out a “when StartButton.Click do” event handler from the StartButton drawer onto the workspace.
Drag out a “set StartButton.Enabled to” block from the same drawer and place it in the “do” section of the event handler. Complete the block by connecting it with a “false” block from the Built-in Logic drawer.
Drag out a “set DisconnectButton.Enabled to” block from the DisconnectButton drawer and place it in the “do” section of the event handler. Complete the block by connecting it with a “true” block from the Built-in Logic drawer.
Drag out a “set ListeningLabel.Text to” block from the ListeningLabel drawer and place it in the “do” section of the event handler. Complete the block by connecting it with a text block with the text “Waiting for command…” from the Built-in Text drawer.
Drag out a “set Clock1.TimerEnabled to” block from the Clock1 drawer and place it in the “do” section of the event handler. Complete the block by connecting it with a “true” block from the Built-in Logic drawer.
Drag out a “set ConnectListPicker1.Enabled to” block from the ConnectListPicker1 drawer and place it in the “do” section of the event handler. Complete the block by connecting it with a “false” block from the Built-in Logic drawer.

This block will execute when the StartButton is clicked by the user. It will disable the StartButton (by setting its Enabled property to false) so the user cannot press it again. It will enable the DisconnectButton (by setting its Enabled property to true) so the user can disconnect if he or she wishes to. It sets the text of ListeningLabel to “Waiting for command...,” letting the user know that the Ev3 Robot is waiting for a voice command. It begins the timer, by setting its TimerEnabled property to true. Finally, it disables the ConnectListPicker so the user cannot choose a different address before disconnecting by setting its Enabled property to false.
Now, the DisconnectButton will be programmed.
Drag out a “when DisconnectButton.Click do” event handler from the DisconnectButton drawer and place it on the worksapce.
Drag out a “call BluetoothClient1.Disconnect” method block from the BluetoothClient1 drawer and place it in the “do” section of the DisconnectButton event handler.
Drag out a “set StartButton.Enabled to” block from the StartButton drawer and place it in the “do” section of the event handler. Complete the block by connecting a “false” block from the Built-in Logic drawer.
Drag out a “set ConnectLabel.Text to” block from the ConnectLabel drawer and place it in the “do” section of the event handler. Complete the block by connecting a Text block with the text “Disconnected” from the Built-in Text Drawer.
Drag out a “set DisconnectButton.Enabled to” block from the DisconnectButton drawer and place it in the “do” section of the event handler. Complete the block by attaching a “false” block from the Built-in Logic Drawer.
Drag out a “set ListeningLabel.Text” to block from the ListeningLabel drawer and place it in the “do” section of the event handler. Complete the block by attaching a Text block with the text “Not listening…” from the Built-in Text drawer.
Drag out a “set ConnectListPicker1.Enabled to” block from the ConnectListPicker1 drawer and place it in the “do” section of the event handler. Complete the block by attaching a “True” block from the Built-in Logic drawer.
Drag out a “set Clock1.TimerEnabled” block from the Clock1 drawer and place it in the “do” section of the event handler. Complete the block by attaching a “false” block from the Built-in Logic drawer.

This block will execute when the user clicks on the DisconnectButton. It will first disconnect the BluetoothClient by calling the .Disconnect method. It will then disable the StartButton, the DisconnectButton, and the Clock since these should not be enabled until the application is connected to the Ev3 Robot through Bluetooth. The ConnectLabel is set back to “Disconnected” and the ListeningLabel is set to “Not listening…” since the Ev3 Robot is no longer connected.
Now we can program the Clock component.
First, drag out an “initialize global name to” block from the Built-in Variables drawer. Change the name to “ClockEnabled”. Complete the new variable block by connecting it with a “false” block from the Built-in Logic drawer.
Next, drag out a “when Clock1.Timer do” event handler block from the Clock1 drawer.
Hover over the “ClockEnabled” area in the “initialize global Clock Enabled to false” block. Drag out the “set global ClockEnabled to” block and place it in the “do” section of the Clock1 event handler block. Complete the block by connecting a “true” block from the Built-in Logic drawer.
Drag out a “set Clock1.TimerEnabled to” block from the Clock1 drawer, placing it in the “do” section of the Clock1 event handler block. Complete the block by connecting it with a “false” block from the Built-in Logic drawer.
Drag out the “call SpeechRecognizer1.GetText” method from the SpeechRecognizer1 drawer. Place it in the “do” section of the Clock1 event handler block.

This block will execute each time the Clock goes off (which we specified to be half a second, 500 milliseconds in the Designer). Each time the Clock goes off, the blocks will set the variable ClockEnabled to be true. It will also disable the Clock by setting its TimerEnabled property to false and calls the SpeechRecognizer1.GetText method, which prompts the user for a voice command. We disable the clock from going off again in the case that the user speaks slowly or the SpeechRecognizer fails to understand, he or she won’t be interrupted by another request for a voice command as they are speaking their first command.
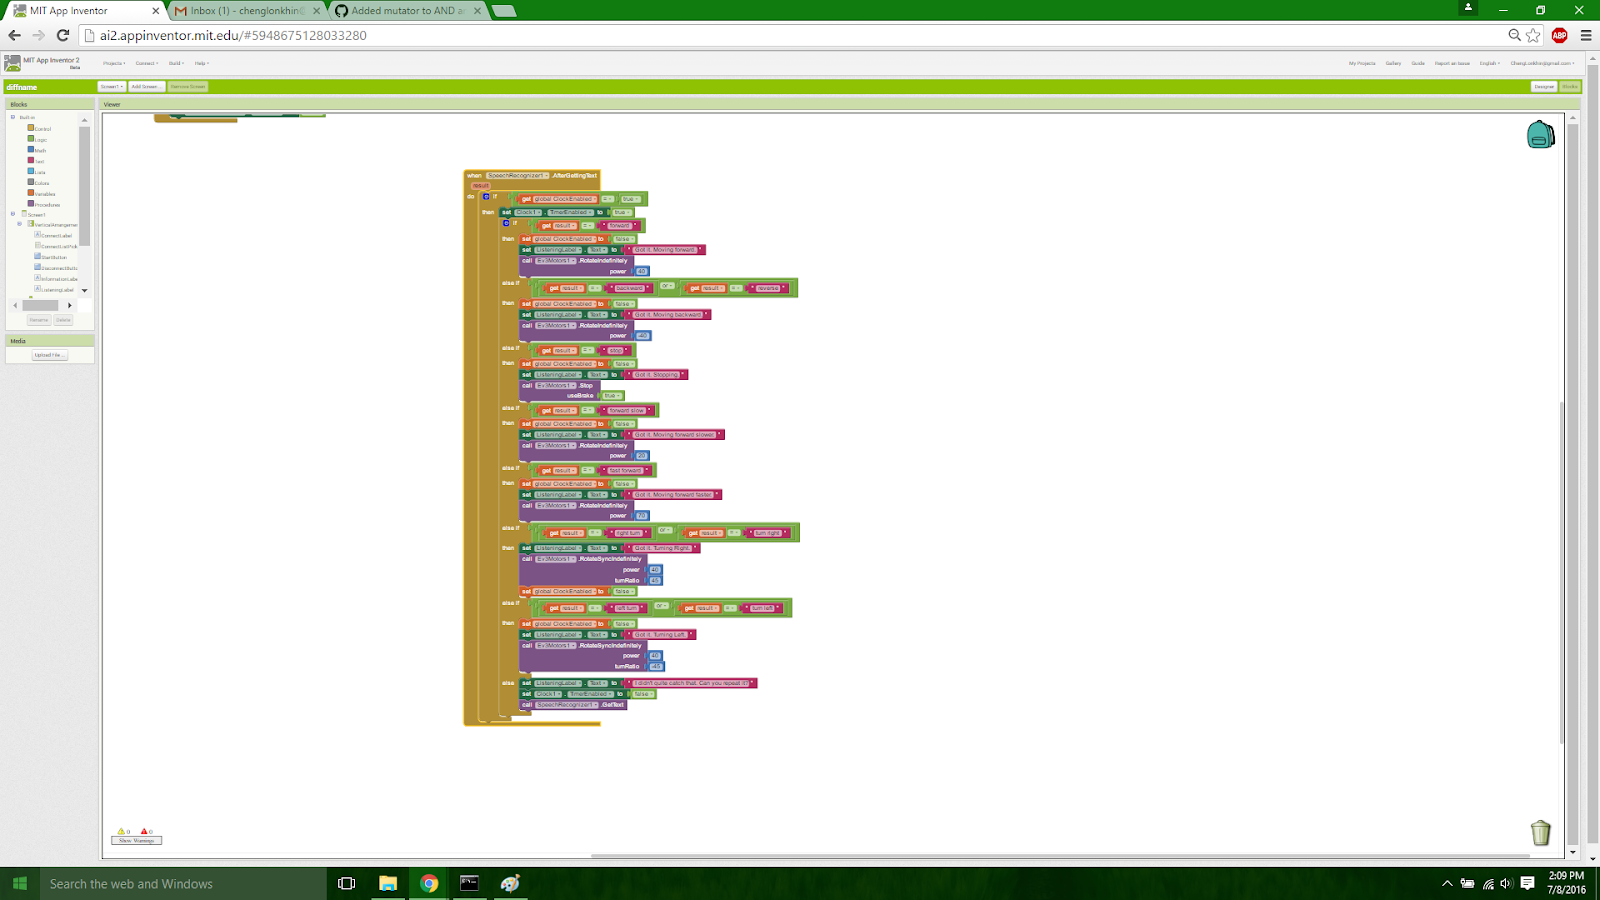
Now, drag out a “when SpeechRecognizer1.AfterGettingText do” event handler out of the SpeechRecognizer1 drawer and place it onto the workspace.
Drag out an “if then” block from the Built-in Control drawer and place it within the “do” section of the SpeechRecognizer1 event handler block. Drag a “=” block form the Built-in Logic drawer and place it in the “if” socket of the “if then” block. Hover over the “initialize global ClockEnabled to false” block to retrieve a “get global ClockEnabled” block. Place this block in the first socket of the “=” block. Place a “true” block from the Built-in Logic drawer in the second socket of the “=” block.
Drag out a “set Clock1.TimerEnabled to” from the Clock1 drawer and place it within the “then” section of the “if then” block. Complete this block by attaching a “true” block from the Built-in Logic drawer.
Now, drag out another “if then block” from the Built-in Control drawer and place it within the “do” section of the SpeechRecognizer1 event handler block but also within the “then” section of the first “if then” block.

This “if then” block is where we will convert voice commands into Ev3 robot actions.
The Forward Command
We need to make an “if else if then” block. We can do this by clicking over the blue area in the “if then” block just created. Drag an “else if” block from that area into “if block” immediately to the right of it to create an “if else if then” block. I will refer to this as “creating another else if section”.
Place a “=” block from the Built-in Logic drawer into the “if” socket. Hover over the pink area labeled “result” in the “when SpeechRecognizer1.AfterGettingText do” event handler to retrieve a “get result” block. Place the “get result” block into the first socket of the “=” block. Place a Text block with the text “forward” into the second socket of the “=” block.
Retrieve a “set global ClockEnabled to” block by hovering over the “initialize global ClockEnabled to false” block and place it in the “then” section of the “if else if then” block. Complete the block by attaching a “false” block from the Built-in Logic drawer.
Drag out a “set ListeningLabel.Text to” block from the ListeningLabel drawer and place it under the “set global ClockEnabled to” block, completing it by attaching it to a Text block with the text “Got it. Moving Forward.”.
Drag out a “call Ev3Motors1.RotateIndefinitely” method from the Ev3Motors1 drawer and place it under the “set ListeningLabel.Text to” block.
Complete the block with a “40” block from the Built-in Math drawer.
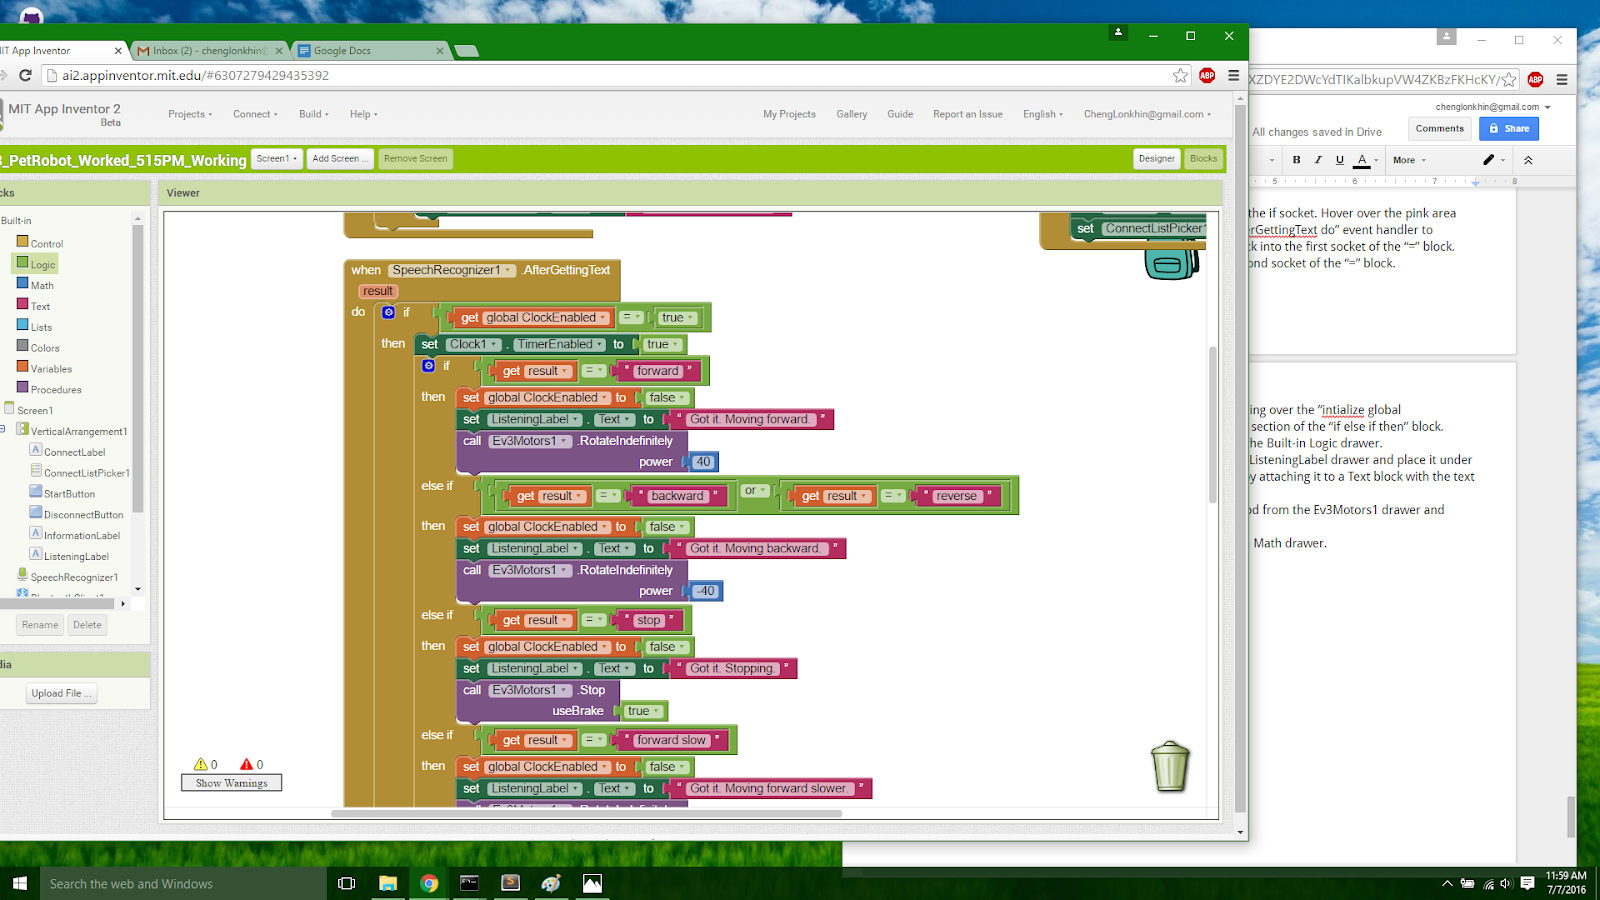
This block will execute whenever the user speaks a voice command into the SpeechRecognizer. If the condition statements are satisfied for the first if then statement (if get global ClockEnabled = true) then it will set the enable the timer to prompt the user for another command. It then will compare the result (what the SpeechRecognizer thinks the user said) to the voice commands programmed. This is where all the voice commands will be programmed. If the result is “forward,” then ListeningLabel’s text will change to acknowledge this command. It will also call the Ev3 Motors method to actually move the robot forward.
The Backward Command
What if the result, which is what the SpeechRecognizer interprets as the voice command of the user isn’t “forward”? What if it was backwards? We would need to create another conditional statement for that situation then.
Make an “else if” section within the “if then” block by clicking the blue area and dragging an “else if” block into the “if then” block immediately to the right of it.

Instead of if “get result = “forward”” we now need if “get result = “backward”” for the backward command. We can just copy the entire “=” block from the forward command and replacing “forward” with “backward”. A block can be copied by right clicking it and clicking “Duplicate”. Drag the duplicated block and place it in the “else if” socket. Complete this new condition by replacing “forward” with “backward”.

Copy the “set global ClockEnabled to false” block from the forward command and place it underneath the “then” section of the “else if” section of the block. This block is needed for all of the commands, so be sure to confirm that this block is present in other commands that will be programmed.
Copy the “set ListeningLabel.Text to” block from the forward command and place it underneath the “then section” of the “else if” section of the block. Again, this block is needed for all of the commands because it sets the text to whatever the Ev3 Robot is commanded to do. For this case, if the voice command is “backward,” the text should be changed to “Got it. Moving backward.” Make this change to the block after duplicating and placing it in the “then” section of the “else if” section of the block.
Copy the “call Ev3Motors1.RotateIndefinitely” method from the forward command and place it underneath the “then section” of the “else if” section of the block. The only difference between moving forward and backward is that the wheels should rotate the opposite direction. Reflect this change by making the “40” block attached to the power to “-40”.
Optional: What if the user says “reverse” instead of backwards? Since reverse and backwards mean the same thing, the else if statement can actually account for both in the blocks:
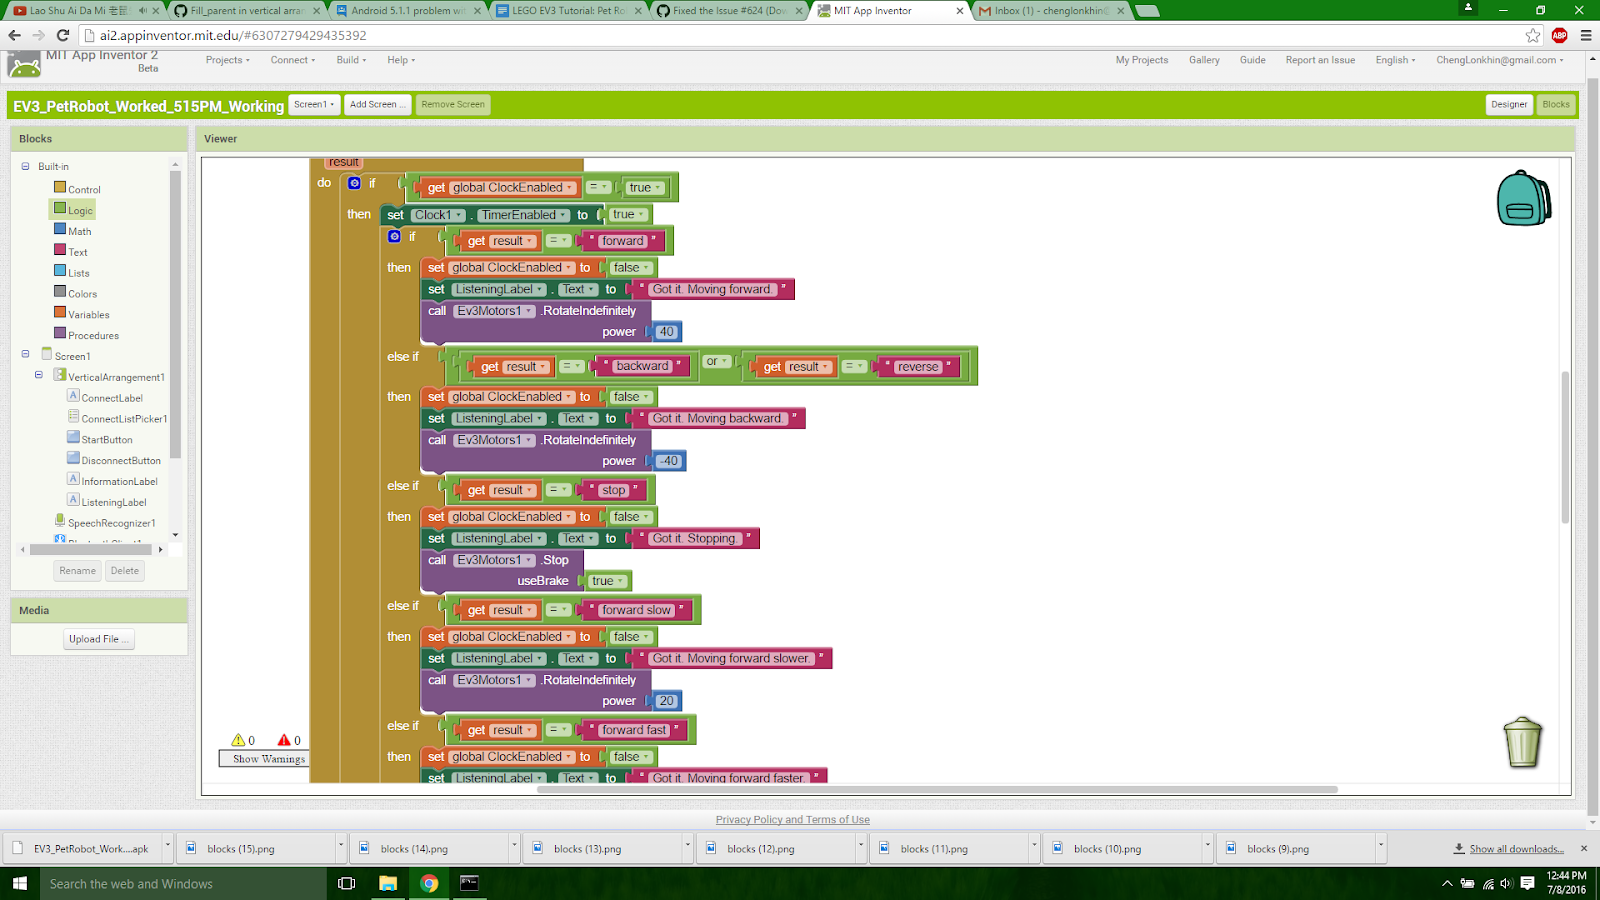
This section of the code will be executed if the result (the text that the SpeechRecognizer interpreted from the user command) is “backward” or “reverse”. Then, the ListeningLabel’s text will be changed to acknowledge that the voice command was understood. It will then call the Ev3Motors’ RotateIndefinitely function to move the robot in reverse. Note that the power argument is -40.
The Stop Command
Make another “else if” condition within the “if else if then” block by clicking over the blue area of the “if else if then” block.
Complete the same actions with the backward command, but change the text to “stop” since this will be programmed for the stop command.
In the stop command, the “get result = “stop”” block will be placed in the “else if” socket.
Instead of “Got it. Moving backwards”, the ListeningLabel.Text will be set to “Got it. Stopping”.
Instead of using the “call Ev3Motors1.RotateIndefinitely” method, you would use the “call Ev3Motors1.Stop” method. Complete the block by placing a “true” block from the Built-in Logic drawer in the useBrake socket.

This part of the if else if block will be executed if the result is “stop”. It will first change the ListeningLabel’s text to tell the user that it understood the voice command. It will then call the Ev3Motor’s Stop method to physically stop the robot.
The Forward Slow Command
The forward slow command is just the forward command, but just slower. The only difference between the forward slow command and the forward command is the difference in power in the “call Ev3Motors1.RotateIndefinitely” method. I used 20 for power, but feel free to experiment as long as the movement is slower than the forward command.
Make sure to change the “set ListeningLabel.Text to” block from “Got it. Moving forward” to “Got it. Moving forward slower”.

This part of the if else if block will be executed if the result is “forward slow.” Note that the only difference between forward slow and forward is that the ListeningLabel text tells the user that it understood the forward slow command and the power argument, 20, for the RotateIndefinitely method is less than the forward command, which was 40.
The Forward Fast Command
The forward fast command is just the forward command, but just faster! The only difference between the forward slow command and the forward command is the difference in power in the “call Ev3Motors1.RotateIndefinitely” method. This is similar to the forward slow command, but the power is now larger than the original forward command. I used 70. Again, feel free to experiment, but make sure that the forward fast command is actually faster than the forward command.
Make sure to change the “set ListeningLabel.Text to” block from “Got it. Moving forward.” to “Got it. Moving forward faster.”
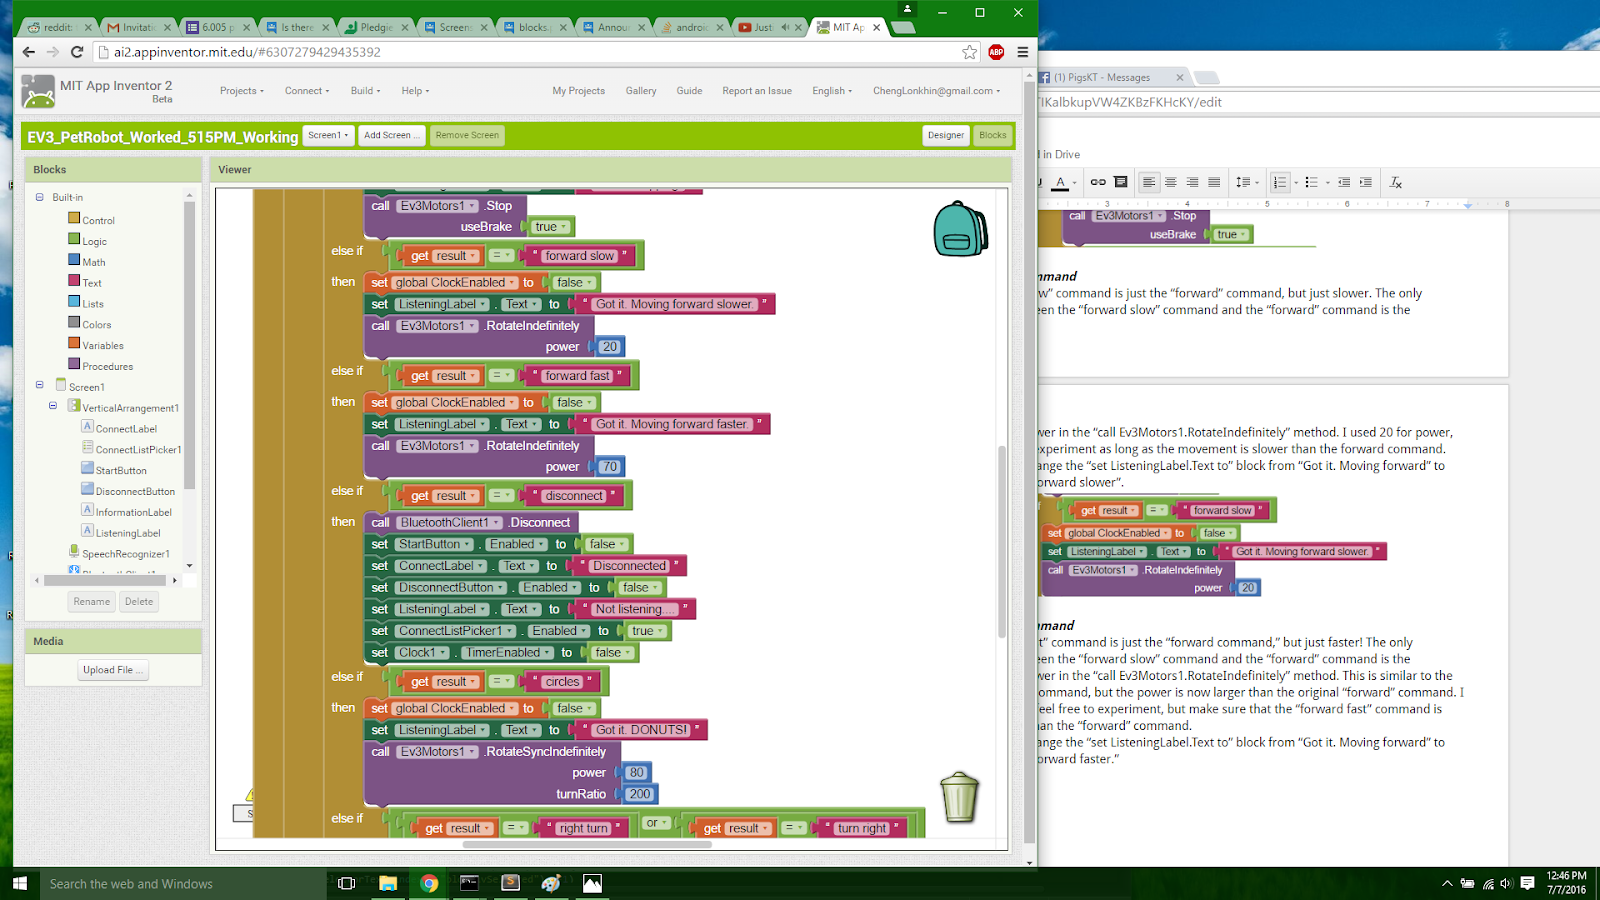
This part of the if else if block will be executed if the result is “forward fast.” Note that the only difference between forward fast and forward is that the ListeningLabel text tells the user that it understood the forward fast command and the power argument, 70, for the RotateIndefinitely method is greater than the forward command, which was 40.
Right and Left Turn Commands
The right and left turn commands will use a different method of the Ev3Motors1 than the ones used in the forward and backward commands. Make two more “else if” condition sections inside the “if else if then” block.
Right Turn Command
For right turn, make sure to change the “else if” condition to “get result = “right turn””. Make sure that the condition is valid still if the user says “turn right” instead of “right turn”. This can be done by creating an “or” block such that the else if state is “get result = “right turn”” OR “get result = “turn right””
Make sure that the “set global ClockEnabled to false” block is in the “then” section of this “else if” statement for a right turn.
Make sure to change the “set ListeningLabel.Text to” text block to “Got it. Turning right”.
Now, the method block used for turning is “call Ev3Motors1.RotateSyncIndefinitely” with the arguments (represented as sockets) power and turnRatio, which can be found in the Ev3Motors1 drawer. Place this method block in the “then” section. Complete the block by placing “40” in the power socket and 45 in the turnRatio socket. I used 40 and 45 respectively for a gradual turn. A sharper turn would require a greater turnRatio.

This part of the if else if block will be executed if the result is “right turn” or “turn right.” It will change the ListeningLabel’s text to tell the user that his or her voice command for a right turn was understood. It then calls Ev3Motor’s RotateSyncIndefinitely to turn right.
Left Turn Command
In short, the only difference between the left turn and right turn command is that the conditional statements need to reflect that the voice command is now “left turn” or “turn left” instead of “right turn” or “turn right”. The “set ListeningLabel.Text to” text block needs to be changed to “Got it. Turning left”.
The same method, callEv3Motors1.SyncRotateIndefinitely, is still used with the arguments “40” for power and “-45” for turnRatio. -45 is used for turnRatio because a left turn is essentially the opposite of a right turn. Again, a sharper turn would require a greater turnRatio.

This part of the if else if block will be executed if the result is “left turn” or “turn left.” It will change the ListeningLabel’s text to tell the user that his or her voice command for a left turn was understood. It will then call Ev3Motor’s RotateSyncIndefinitely method to turn left. Note that the turnRatio argument is now -45 instead of 45 since a left turn is essentially opposite of a right turn.
Else Condition: What happens when the SpeechRecognizer doesn’t understand what the user command was? What if the command didn’t match any of the ones that was programmed (such as the user saying “sideways” when the command hasn’t been programmed)? An else statement is needed to cover all the cases such that the user commands doesn’t match the ones programmed.
Make an “else” section within the “if then” block by clicking the blue area and dragging an “else” block into the “if then” block immediately to the right of it.


Drag out a “set ListeningLabel.Text to” block from the ListeningLabel drawer and place it in the “else” section of the “if then” block. Complete the block by attaching a Text block with the text “I didn’t quite catch that. Can you repeat it?”.
Drag out a “set Clock1.TimerEnabled to” block from the Clock1 drawer and place it into the “else” section of the “if then” block. Complete the block by attaching a “false” block from the Built-in Logic drawer.
Finally, drag out a “call SpeechRecognizer1.GetText” method from the SpeechRecognizer1 drawer and place it in the “else” section of the “if then” block.

The block will execute when the result (what the SpeechRecognizer interprets the user voice command as) doesn’t match any of the programmed commands. It will first set the ListeningLabel to “I didn’t catch that, could you repeat it?”, then disables the Clock so the user wouldn’t be interrupted by another request for a command, and requests for a command by calling the SpeechRecognizer1.GetText. The Clock is disabled so that another request for a command would not interrupt the current request (since the clock will go off every half second, prompting a request for a voice command).
Basic Commands
Forward, Forward Slow, Forward Fast, Backward (Reverse), Left Turn, Right Turn, Stop are some of the basic voice commands that the Ev3 Pet Robot can follow. For debugging purposes, here is the completed blocks for only these commands.

Click the images for a large image.
The final blocks for this application should look like this.

Click the image for larger image.
AIA and APK files:
Instructions for running the application:
Make sure that the MotorPorts that are attached to your own Ev3 Robot matches the ones set in the Designer. For example, if the physical robot’s motors are attached to ports B and C, you would change the MotorPorts property of the Ev3Motors component on the Designer to BC.
The Ev3 Robot must be connected with the phone through Bluetooth first. The passkey is usually 1234. After the Ev3 Robot is connected with the phone, then the application can connect to it using the ConnectListPicker1.
The way that the application was programmed allows the robot to perform the previous action while waiting for a voice command. If the user commanded the robot to turn left, the robot will continue to turn left until it receives another legible voice command.
Notes:
There are a lot of variations of commands that could be programmed. Commands such as “backward fast” or “backward slow” are just variations of the “backward” command.
A “bark” command can be programmed as well using the Ev3Sound component by having the robot place a certain sequences of sounds.
A challenge would be having the Ev3 Robot “bark” at random times, much like a real dog.
Other extensions beyond commands that could be programmed involves the use of other sensors such as the TouchSensor or the ColorSensor.
The pet Ev3 Robot could be commanded to “bark” when it runs into an obstacle such as a wall and then could back up.
The pet Ev3 Robot could be commanded to avoid certain areas of the ground by sensing color. It could move away or turn away when it senses red areas and move freely in green areas.
MIT App Inventor


This work is licensed under a Creative Commons Attribution-ShareAlike 4.0 International License.
Terms of Service and Privacy Policy
Other inquiries: Email
GitHub: mit-cml
Accessibility: accessibility.mit.edu


