Firebase Authentication in App Inventor Using Javascript
The Firebase component that is provided by App Inventor is super useful, especially when you need to update any number of apps with fresh data. In addition to using Firebase as a datastore, you can also leverage its website authentication in your apps to take care of your user management needs. This means, sign-up, email verification, and login. What is more, all the user information is stored and maintained on Firebases servers, so the most difficult problems of user authentication are solved for you.
Firebase provides the javascript code that handles all the necessary steps to setup, and then log in, new and existing users. Read more about the details here. This javascript code can be included in a static HTML file, which you can then add to the apps you create with App Inventor, so long as you also incorporate a WebViewer component to process it for you, AND you make a few simple modifications to it so App Inventor can look inside the running javascript. All of this will be explained in the sections that follow. But first you must set up a Firebase account and set it to allow users to authenticate using an email and their password.
Set Up Firebase to use Email/Password Authentication
Setting up a datastore is really easy once you have a Firebase account. Once you create one and log in, there are only 4 steps required to use Firebase authentication.
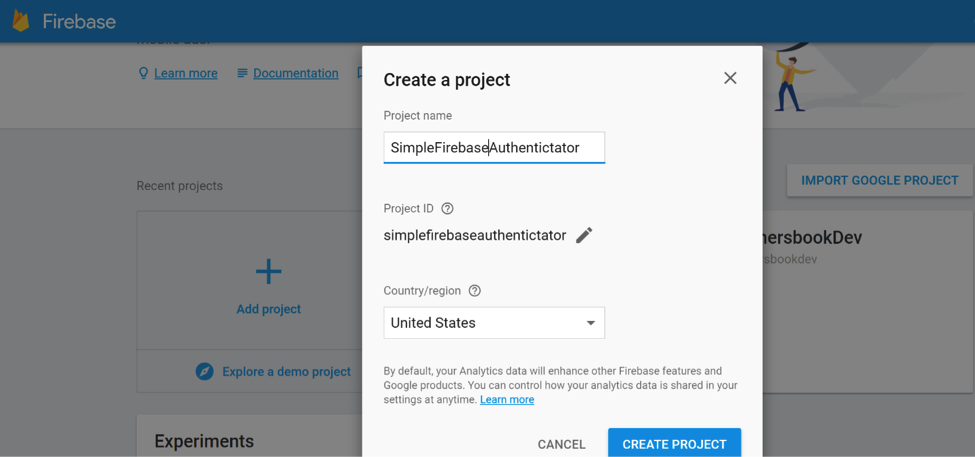
Step 1The first thing you must do to use Firebase authentication is to create a project. This can be completed at https://console.firebase.google.com/. Simply click on the Add project button and you will be presented with the Create a project dialog. Complete the dialogs fields and then click on the CREATE PROJECT button.
 Step 2
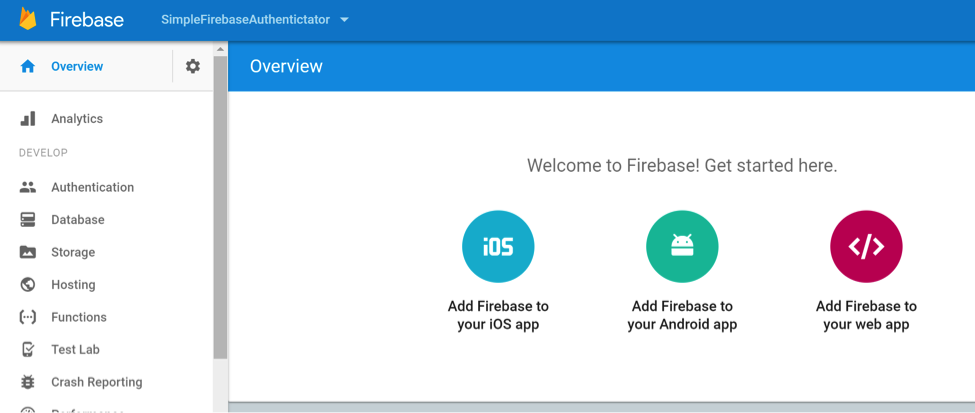
Second, click on the Add Firebase to your web app button that is shown in the image below:
 Step 3
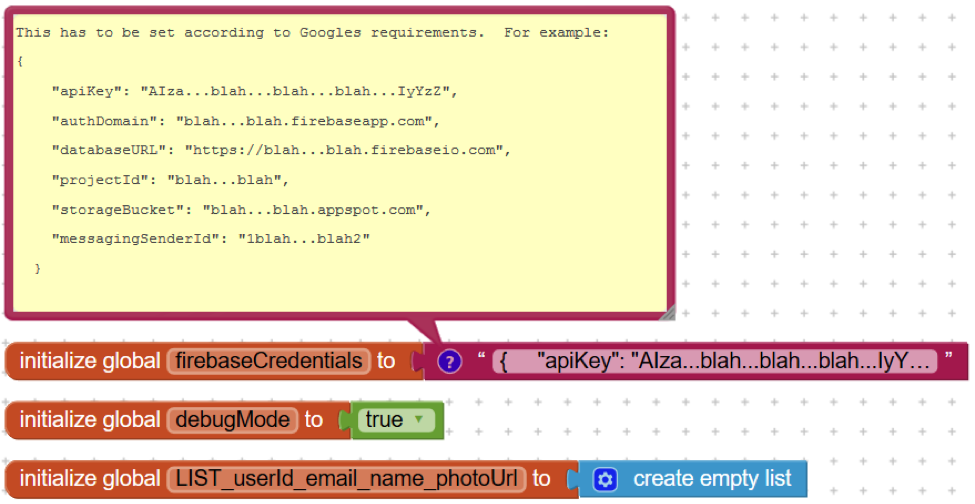
The Add Firebase to your web app dialog shows you all the necessary information that you will need to use Firebases website security in your App Inventor apps. This information includes:
- apiKey
- databaseURL
- storageBucket
- messageSenderId
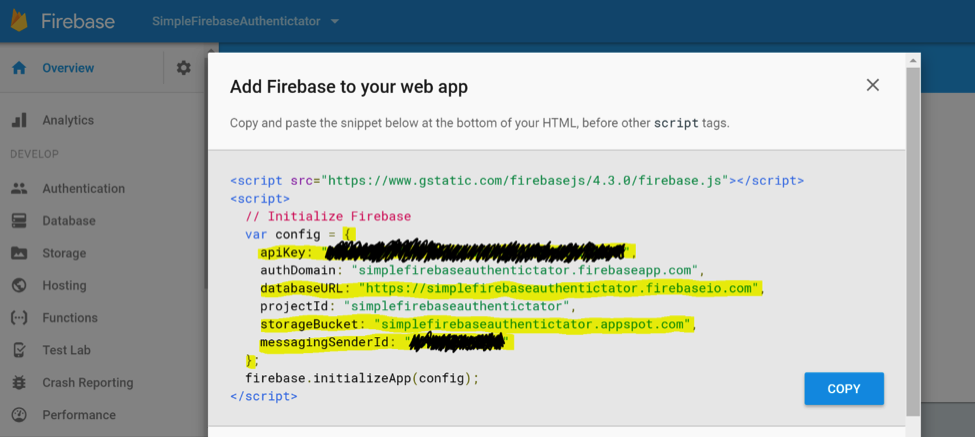
PLEASE NOTE: you can delete the authDomain and projectId key value pairs if you like because they are optional. However, you must remember the surrounding curly braces and the quotes around all the keys and values, as shown below:
	{
		"apiKey":"YOUR_apiKey_HERE",
		"databaseURL":"YOUR_databaseURL_HERE",
		"storageBucket":"YOUR_storageBucket_HERE",
		"messagingSenderId":"YOUR_messagingSenderId_HERE"
	}
Note that all the key/value pairs must have quotes around them. If you copy/paste from the Firebase window, you may have to add quotes. All of this information can be compressed into a single line and it will work just fine:
 Step 4
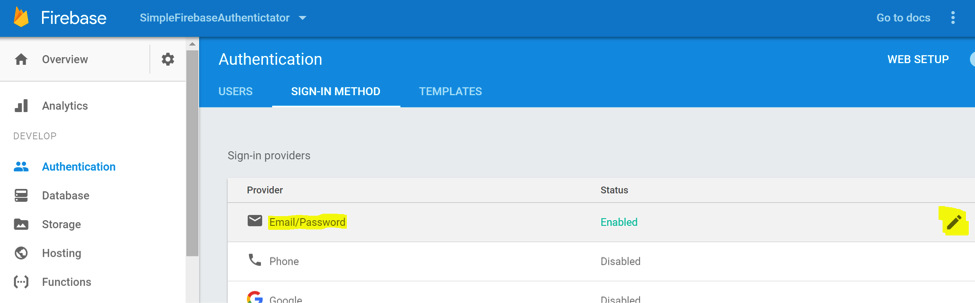
Lastly you must enable the Email/Password SIGN-IN METHOD on Firebases Authentication page. This simply involves selecting the Authentication menu option (on the left) and then clicking on the pencil icon at the end of the Email/Password row as shown below:
Doing so will display the Email/Password dialog as follows:
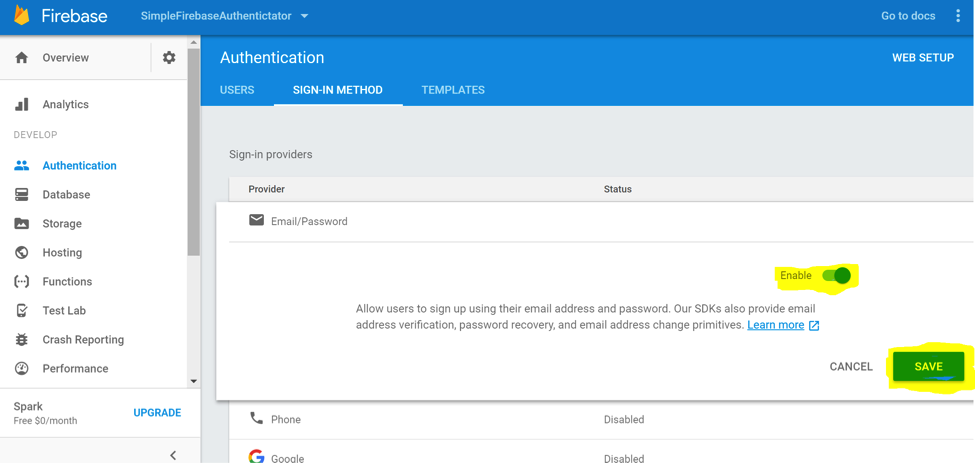
After enabling the Email/Password Authentication, click SAVE and Firebase will then allow your website and your App Inventor apps that use the FirebaseAuthenticator.html page (below) to make use of the features and power of Firebases own security. And that is pretty awesome!
More information about fine tuning Firebases authentication can be found here.
Edit the Firebase Website Authentication HTML file (FirebaseAuthenticator.html)
This example file is almost an exact copy of the original one that can be found here. The changes that have been made are highlighted in yellow below. The reason the changes are necessary is that the WebViewer component understands some special, App Inventor only javascript that allows it to communicate with the javascript as it runs inside web pages. By using Firebases website authentication inside a WebViewer, App Inventor apps can show users a login page as if the app were a real website, and once the user is logged in, the WebViewer can tell the app that the user has been authenticated (or not).
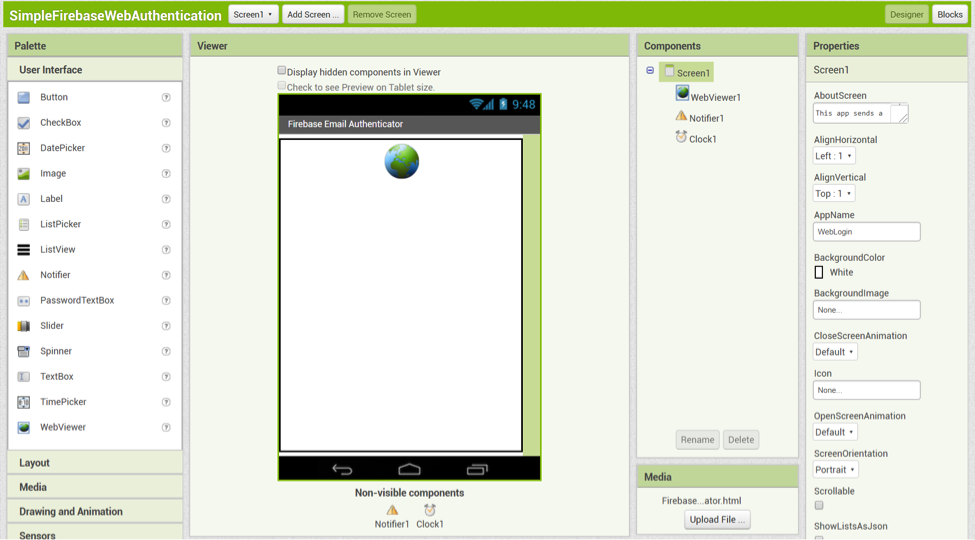
The Designer is really quite simple. There are only three components on Screen1: a WebViewer, a Notifier, and a Clock. There is also an included asset file, FirebaseAuthenticator.html.
You may notice that there are no Buttons or other components needed to start the login process from our App Inventor app. This is because the web page (FirebaseAuthenticator.html) has its own buttons to do that as part of Firebases ready-made login screen! As you can see, the blocks for this app are also quite simple. There are only 3 variables, 2 event handlers, and 1 procedure needed to incorporate Firebases website authentication into an App Inventor app. Each will be explained in individual sections below. The variables needed by the app are as follows:
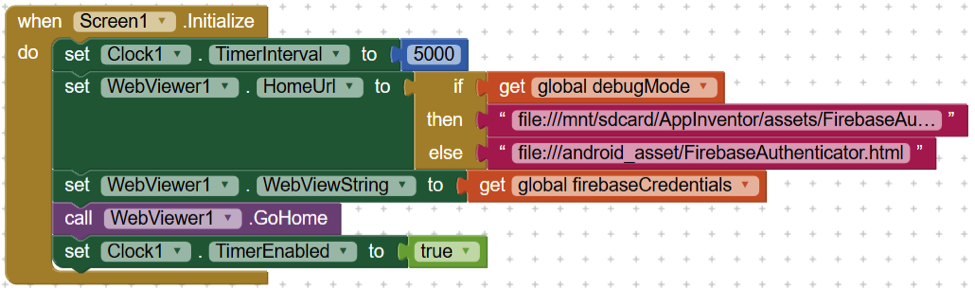
As soon as the app opens, the Screen1.Initialize event is triggered and the following occurs, in order:
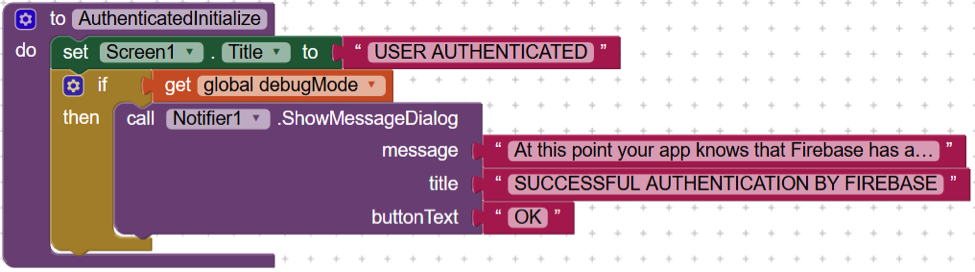
The first time the Clock timer goes off, we want to call WebViewer.GoHome to run the javascript code. Due to time lag, we cant count on Screen1.Initalize to do this, so the 5 second time lag is enough to load the code. We only want this to happen the first time, so well set firstTime to false and continue. This event is where App Inventor repeatedly checks the state of the javascript code that is running in the WebViewer component. Each time the event is triggered, it checks to see if the WebViewer1.WebViewString is not empty and that it is different from the text in the firebaseCredentials variable. If so, then it checks to see if the text is Email Verification Sent!. If it is, then the app knows that the user is setting up an account and Firebase is waiting for the user to confirm their email address, so the app tells the WebViewer component to GoHome, where the rest of the login process can occur. If the WebViewer1.WebViewString contains an @ symbol, then this means that the login was successful, so the WebViewer.Visible and Clock1.TimerEnabled properties are set to false. Also, as soon as the user is authenticated by Firebase, the WebViewer1.WebViewString property contains a comma separated value list of the users userId, email address, user name, and photo URL, and this text is stored in the variable LIST_userId_email_name_photoUrl. Since the user has been authenticated, another procedure is called: AuthenticatedInitialize, and this is where you insert the code you want your app to run immediately after a user logs in. In short, your app really should START with the AuthenticatedInitialize event. If the WebViewer1.WebViewString does not contain an @ symbol, then this means that some other message has been sent from the javascript inside the FirebaseAuthenticator.html file, and it should be shown to the user. These messages are usually about incorrect passwords or user names. Finally, if the WebViewer1.WebViewString was not empty and did not match the text in the firebaseCredentials variable when the Clock1.Timer event was triggered, it is reset to an empty string ("") so that the next time the Clock1.Timer event is triggered, it will only take action if the javascript running inside the FirebaseAuthenticator.html file has set it to some non-empty value. The AuthenticatedInitialize procedure is where the App Inventor app really begins, once a user has been authenticated by Firebase. In our example, this means that the app changes the Screen1.Title property to "AUTHENTICATED USER" to remind you that the users credentials have been authenticated. It also displays a reminder to you in a Notification dialog, so that you remember to add your own blocks. With 3 components, 2 events, and 1 procedure, we have been able to leverage Firebases website security infrastructure for an Android app created with App Inventor. This is enormously powerful, secure, and useful. Thank you Firebase for doing all the heavy lifting for us with your website authentication javascript, and thank you App Inventor for providing the WebViewer component with the ability to look inside any javascript that is running on an HTML page!
*One last pro-tip for all you App Inventors out there: make sure you set the debugMode variable correctly. While you are developing your app using App Inventor, it should be set to true. When you build your apk file, it should be set to false. If you set it incorrectly the app will display an error message about how the FirebaseAuthenticator.html file cannot be found and nobody likes that. :)
<html>
<head>
  <meta charset=utf-8 />
  <meta name="viewport" content="width=device-width, initial-scale=1.0">
  <title>Email/Password Authentication Example</title>

  <!-- Material Design Theming -->
  <link rel="stylesheet" href="https://code.getmdl.io/1.1.3/material.orange-indigo.min.css">
  <link rel="stylesheet" href="https://fonts.googleapis.com/icon?family=Material+Icons">
  <script defer src="https://code.getmdl.io/1.1.3/material.min.js"></script>

  <!-- Firebase -->


<script src="https://www.gstatic.com/firebasejs/3.7.2/firebase.js"></script>
<script>
  // Initialize Firebase

  // Get the Firebase configuration from App Inventor via the WebViewer.WebViewString property
  var config = JSON.parse(window.AppInventor.getWebViewString());

  firebase.initializeApp(config);
</script>

  <script type="text/javascript">
    function tellAppInventor(message) {
        try {
            window.AppInventor.setWebViewString( message );
        } catch(e) {
            console.log("App Inventor Communication Error",e)
        }
    }

    /**
     * Handles the sign in button press.
     */
    function toggleSignIn() {
      if (firebase.auth().currentUser) {
        // [START signout]
        firebase.auth().signOut();
        // [END signout]
      } else {
        var email = document.getElementById('email').value;
        var password = document.getElementById('password').value;
        if (email.length < 4) {
          tellAppInventor('Please enter an email address.');
          return;
        }
        if (password.length < 4) {
          tellAppInventor('Please enter a password.');
          return;
        }
        // Sign in with email and pass.
        // [START authwithemail]
        firebase.auth().signInWithEmailAndPassword(email, password).catch(function(error) {
          // Handle Errors here.
          var errorCode = error.code;
          var errorMessage = error.message;
          // [START_EXCLUDE]
          if (errorCode === 'auth/wrong-password') {
            tellAppInventor('Wrong password.');
          } else {
            tellAppInventor(errorMessage);
          }
          console.log(error);
          document.getElementById('quickstart-sign-in').disabled = false;
          // [END_EXCLUDE]
        });
        // [END authwithemail]
      }
      document.getElementById('quickstart-sign-in').disabled = true;
    }
    /**
     * Handles the sign up button press.
     */
    function handleSignUp() {
      var email = document.getElementById('email').value;
      var password = document.getElementById('password').value;
      if (email.length < 4) {
        tellAppInventor('Please enter an email address.');
        return;
      }
      if (password.length < 4) {
        tellAppInventor('Please enter a password of 4 or more characters.');
        return;
      }
      // Sign in with email and pass.
      // [START createwithemail]
      firebase.auth().createUserWithEmailAndPassword(email, password).catch(function(error) {
        // Handle Errors here.
        var errorCode = error.code;
        var errorMessage = error.message;
        // [START_EXCLUDE]
        if (errorCode == 'auth/weak-password') {
          tellAppInventor('The password is too weak.');
        } else {
          tellAppInventor(errorMessage);
        }
        console.log(error);
        // [END_EXCLUDE]
      });
      // [END createwithemail]
    }
    /**
     * Sends an email verification to the user.
     */
    function sendEmailVerification() {
      // [START sendemailverification]
      firebase.auth().currentUser.sendEmailVerification().then(function() {
        // Email Verification sent!
        // [START_EXCLUDE]
        tellAppInventor('Email Verification Sent!');
        // [END_EXCLUDE]
      });
      // [END sendemailverification]
    }
    function sendPasswordReset() {
      var email = document.getElementById('email').value;
      // [START sendpasswordemail]
      firebase.auth().sendPasswordResetEmail(email).then(function() {
        // Password Reset Email Sent!
        // [START_EXCLUDE]
        tellAppInventor('Password Reset Email Sent!');
        // [END_EXCLUDE]
      }).catch(function(error) {
        // Handle Errors here.
        var errorCode = error.code;
        var errorMessage = error.message;
        // [START_EXCLUDE]
        if (errorCode == 'auth/invalid-email') {
          tellAppInventor(errorMessage);
        } else if (errorCode == 'auth/user-not-found') {
          tellAppInventor(errorMessage);
        }
        console.log(error);
        // [END_EXCLUDE]
      });
      // [END sendpasswordemail];
    }
    /**
     * initApp handles setting up UI event listeners and registering Firebase auth listeners:
     *  - firebase.auth().onAuthStateChanged: This listener is called when the user is signed in or
     *    out, and that is where we update the UI.
     */
    function initApp() {
      // Listening for auth state changes.
      // [START authstatelistener]
      firebase.auth().onAuthStateChanged(function(user) {
        // [START_EXCLUDE silent]
        document.getElementById('quickstart-verify-email').disabled = true;
        // [END_EXCLUDE]
        if (user) {
          // User is signed in.
          var displayName = user.displayName;
          var email = user.email;
          var emailVerified = user.emailVerified;
          var photoURL = user.photoURL;
          var isAnonymous = user.isAnonymous;
          var uid = user.uid;
          var providerData = user.providerData;

          if (emailVerified && !isAnonymous) {
                tellAppInventor( uid + ',' + email + ',' + displayName + ',' + photoURL );
            } else if (!emailVerified) {
                tellAppInventor( 'Please click the Send Email Verification button to confirm your account.' );
            }

          // [START_EXCLUDE]
//          document.getElementById('quickstart-sign-in-status').textContent = 'Signed in';
//          document.getElementById('quickstart-sign-in').textContent = 'Sign out';
//          document.getElementById('quickstart-account-details').textContent = JSON.stringify(user, null, '  ');
          if (!emailVerified) {
            document.getElementById('quickstart-verify-email').disabled = false;
          }
          // [END_EXCLUDE]
        } else {
          // User is signed out.
          // [START_EXCLUDE]
//          document.getElementById('quickstart-sign-in-status').textContent = 'Signed out';
//          document.getElementById('quickstart-sign-in').textContent = 'Sign in';
//          document.getElementById('quickstart-account-details').textContent = 'null';
          // [END_EXCLUDE]
        }
        // [START_EXCLUDE silent]
        document.getElementById('quickstart-sign-in').disabled = false;
        // [END_EXCLUDE]
      });
      // [END authstatelistener]
      document.getElementById('quickstart-sign-in').addEventListener('click', toggleSignIn, false);
      document.getElementById('quickstart-sign-up').addEventListener('click', handleSignUp, false);
      document.getElementById('quickstart-verify-email').addEventListener('click', sendEmailVerification, false);
      document.getElementById('quickstart-password-reset').addEventListener('click', sendPasswordReset, false);
    }
    window.onload = function() {
      initApp();
    };
  </script>
</head>
<body>
<div class="demo-layout mdl-layout mdl-js-layout mdl-layout--fixed-header">

  <!-- Header section containing title
  <header class="mdl-layout__header mdl-color-text--white mdl-color--light-blue-700">
    <div class="mdl-cell mdl-cell--12-col mdl-cell--12-col-tablet mdl-grid">
      <div class="mdl-layout__header-row mdl-cell mdl-cell--12-col mdl-cell--12-col-tablet mdl-cell--8-col-desktop">
        <a href="/explore/"><h3>Firebase Authentication</h3></a>
      </div>
    </div>
  </header>
  -->

  <main class="mdl-layout__content mdl-color--grey-100">
    <div class="mdl-cell mdl-cell--12-col mdl-cell--12-col-tablet mdl-grid">

      <!-- Container for the demo -->
      <div class="mdl-card mdl-shadow--2dp mdl-cell mdl-cell--12-col mdl-cell--12-col-tablet mdl-cell--12-col-desktop">
        <div class="mdl-card__title mdl-color--light-blue-600 mdl-color-text--white">
          <h2 class="mdl-card__title-text">Sign In or Sign Up</h2>
        </div>
        <div class="mdl-card__supporting-text mdl-color-text--grey-600">
          <p>Enter an email and password below and either sign in to an existing account or sign up</p>

          <input class="mdl-textfield__input" style="display:inline;width:auto;" type="text" id="email" name="email" placeholder="Email"/>
          <p/><p/>
          <input class="mdl-textfield__input" style="display:inline;width:auto;" type="password" id="password" name="password" placeholder="Password"/>
          <p/>
          <button disabled class="mdl-button mdl-js-button mdl-button--raised" id="quickstart-sign-in" name="signin">Sign In</button>

          <button class="mdl-button mdl-js-button mdl-button--raised" id="quickstart-sign-up" name="signup">Sign Up</button>
          <p/>
          <button class="mdl-button mdl-js-button mdl-button--raised" disabled id="quickstart-verify-email" name="verify-email">Send Email Verification</button>
          <p/>
          <button class="mdl-button mdl-js-button mdl-button--raised" id="quickstart-password-reset" name="verify-email">Send Password Reset Email</button>
          <p/>

          <!-- Container where we'll display the user details -->
          <div class="quickstart-user-details-container" style="display:none">
            Sign-in status: <span id="quickstart-sign-in-status">Unknown</span>
            <div>Authorization <code>currentUser</code> object value:</div>
            <pre><code id="quickstart-account-details">null</code></pre>
          </div>
        </div>
      </div>

    </div>
  </main>
</div>
</body>
</html>
Create an App Inventor App to Use Firebase Website Authentication
Designer


Screen1.Initialize
Clock1.Timer

Conclusion
MIT App Inventor


This work is licensed under a Creative Commons Attribution-ShareAlike 4.0 International License.
Terms of Service and Privacy Policy
Other inquiries: Email
GitHub: mit-cml
Accessibility: accessibility.mit.edu


